Welcome to Data Exploitation Hub documentation
The Data Exploitation Hub is a service that enables users to discover, access, visualize, manage, and exploit data from the DestinE Data Lake, Copernicus CDSE, and other relevant sources.
This guide provides detailed instructions for accessing and using the service through two distinct entry points:
Section 1: The Data Exploitation Hub, a web-based interface that provides user-friendly access to the service.
Section 2: Describes how to use the service through APIs, intended for users who prefer a programmatic approach.
Section 1: Data Exploitation Hub UI
Interface Walkthrough
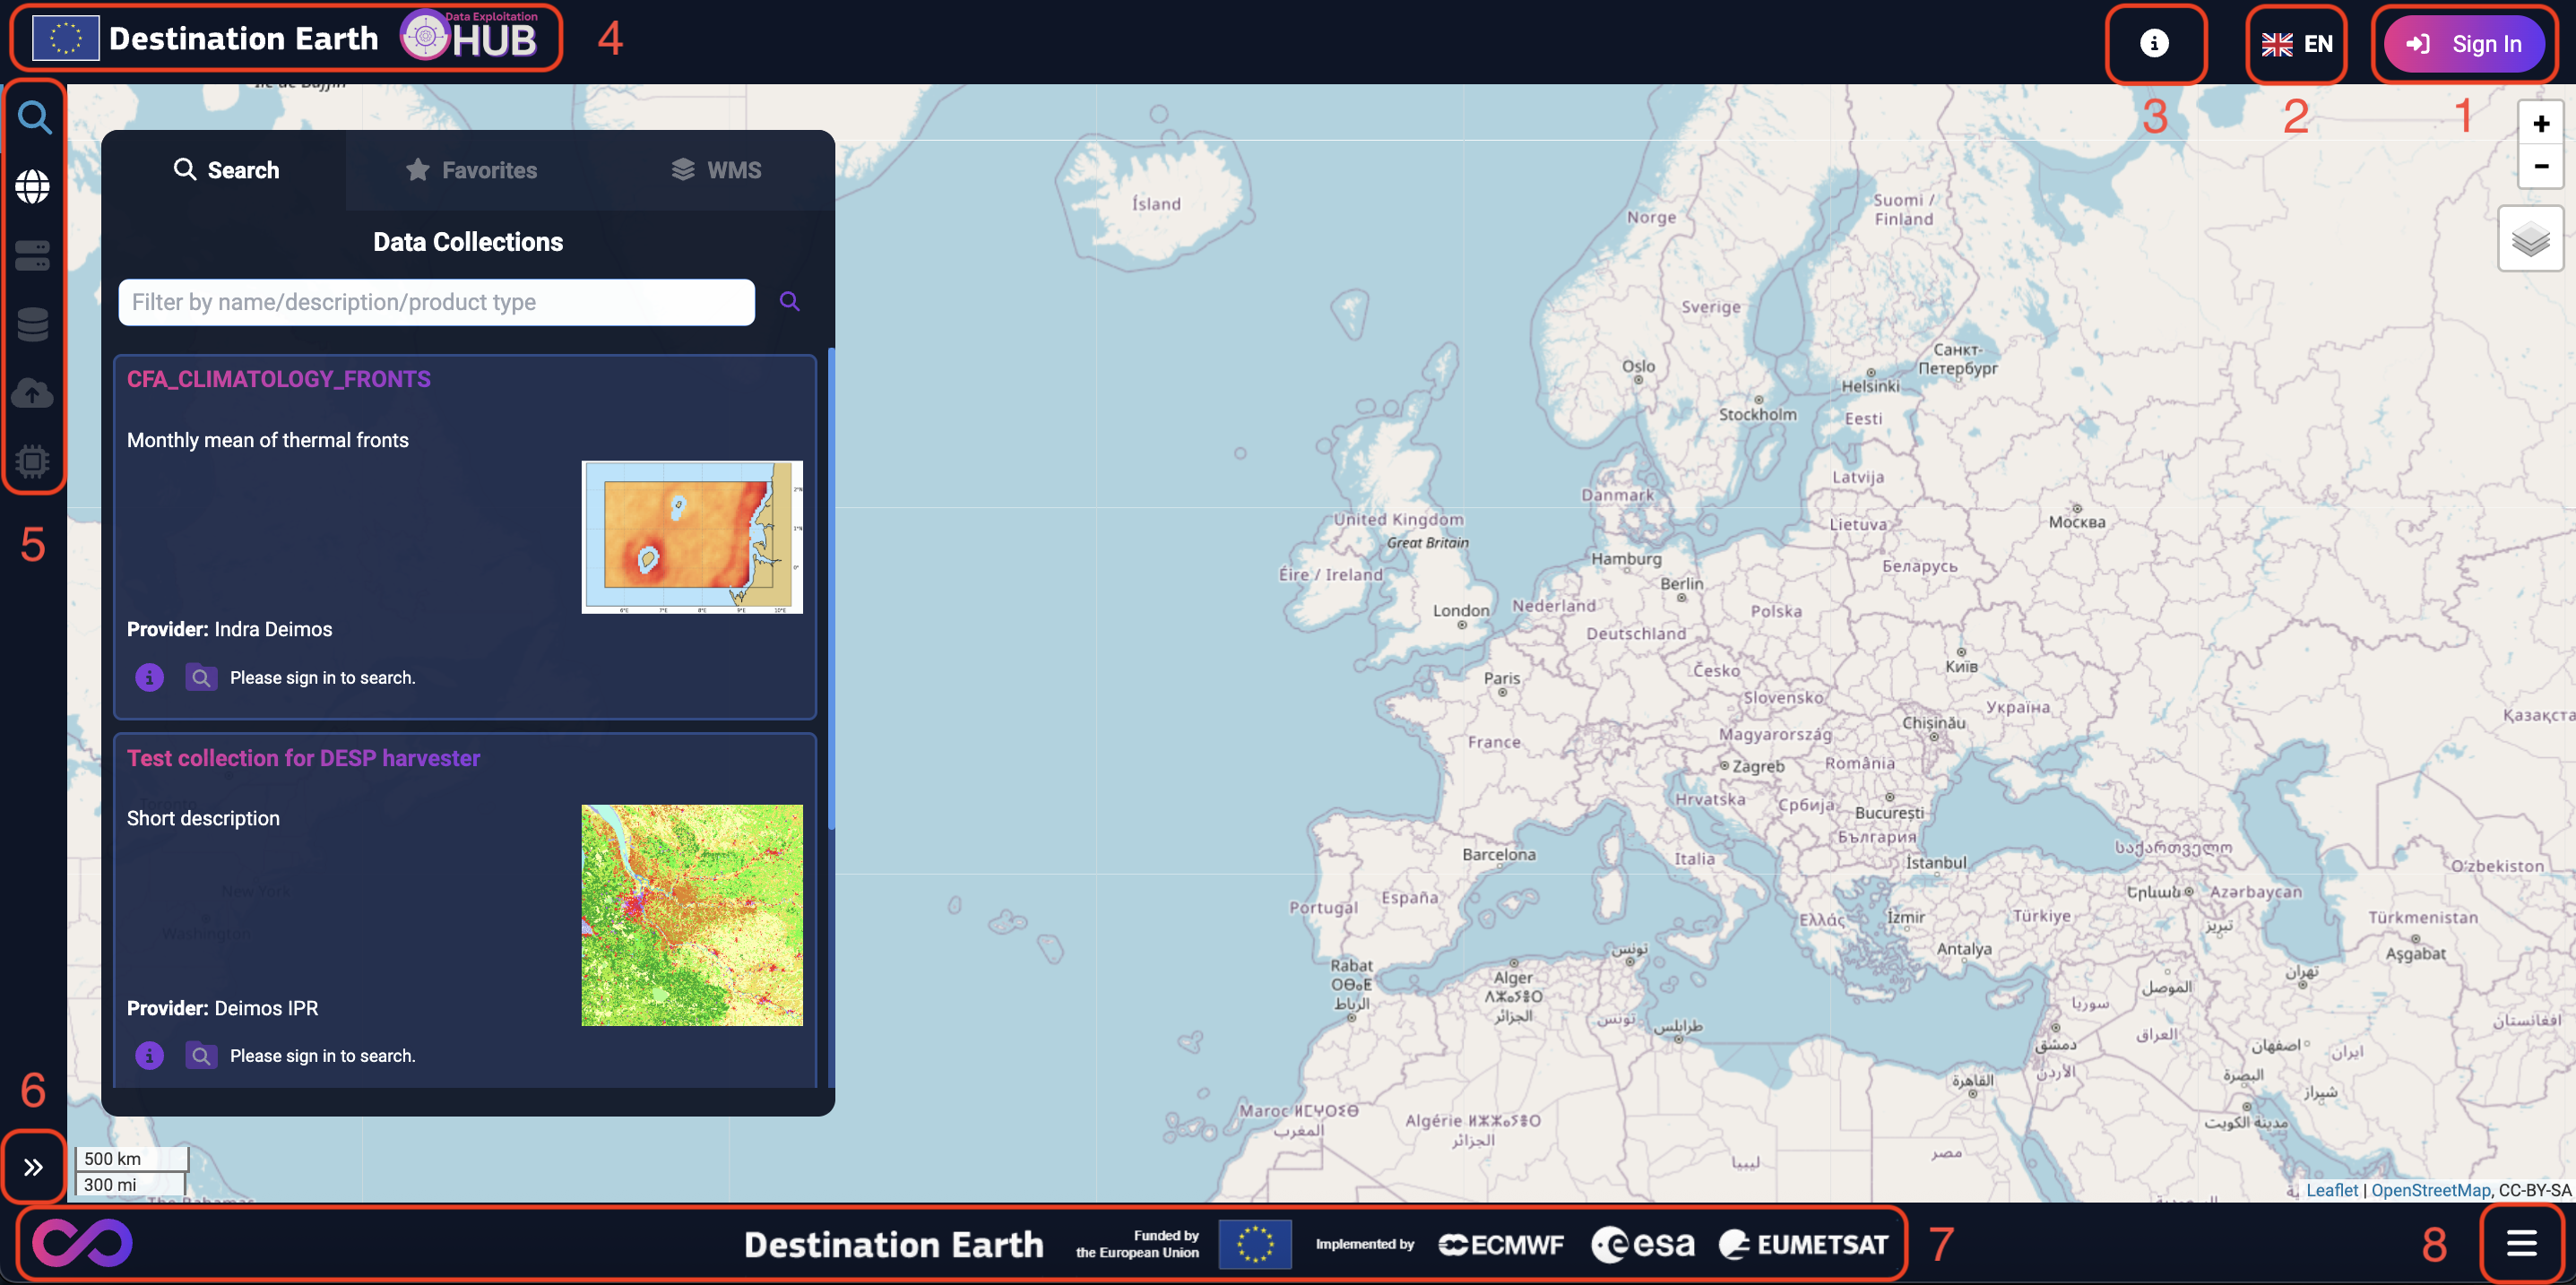
The numbered points below describe each major section of the portal’s home page.
Sign In Button: Allows users to log in or access their accounts.
Language Selector: Dropdown menu for selecting the display language.
Documentation / API / Support Menu: Quick access to help and resources.
Portal Name: Displays the portal name or logo.
Sidebar Menu: Main navigation panel listing all sections of the portal.
Expand Sidebar Menu: Button to expand the information of sidebar menu.
Footer: Shows sponsor logos and acknowledgments.
Bottom Right Menu: Links to Terms and Conditions, Code of Conduct, Privacy Policy, and Legal Notice.
Below is a visual reference of the interface layout:
Discovering for data
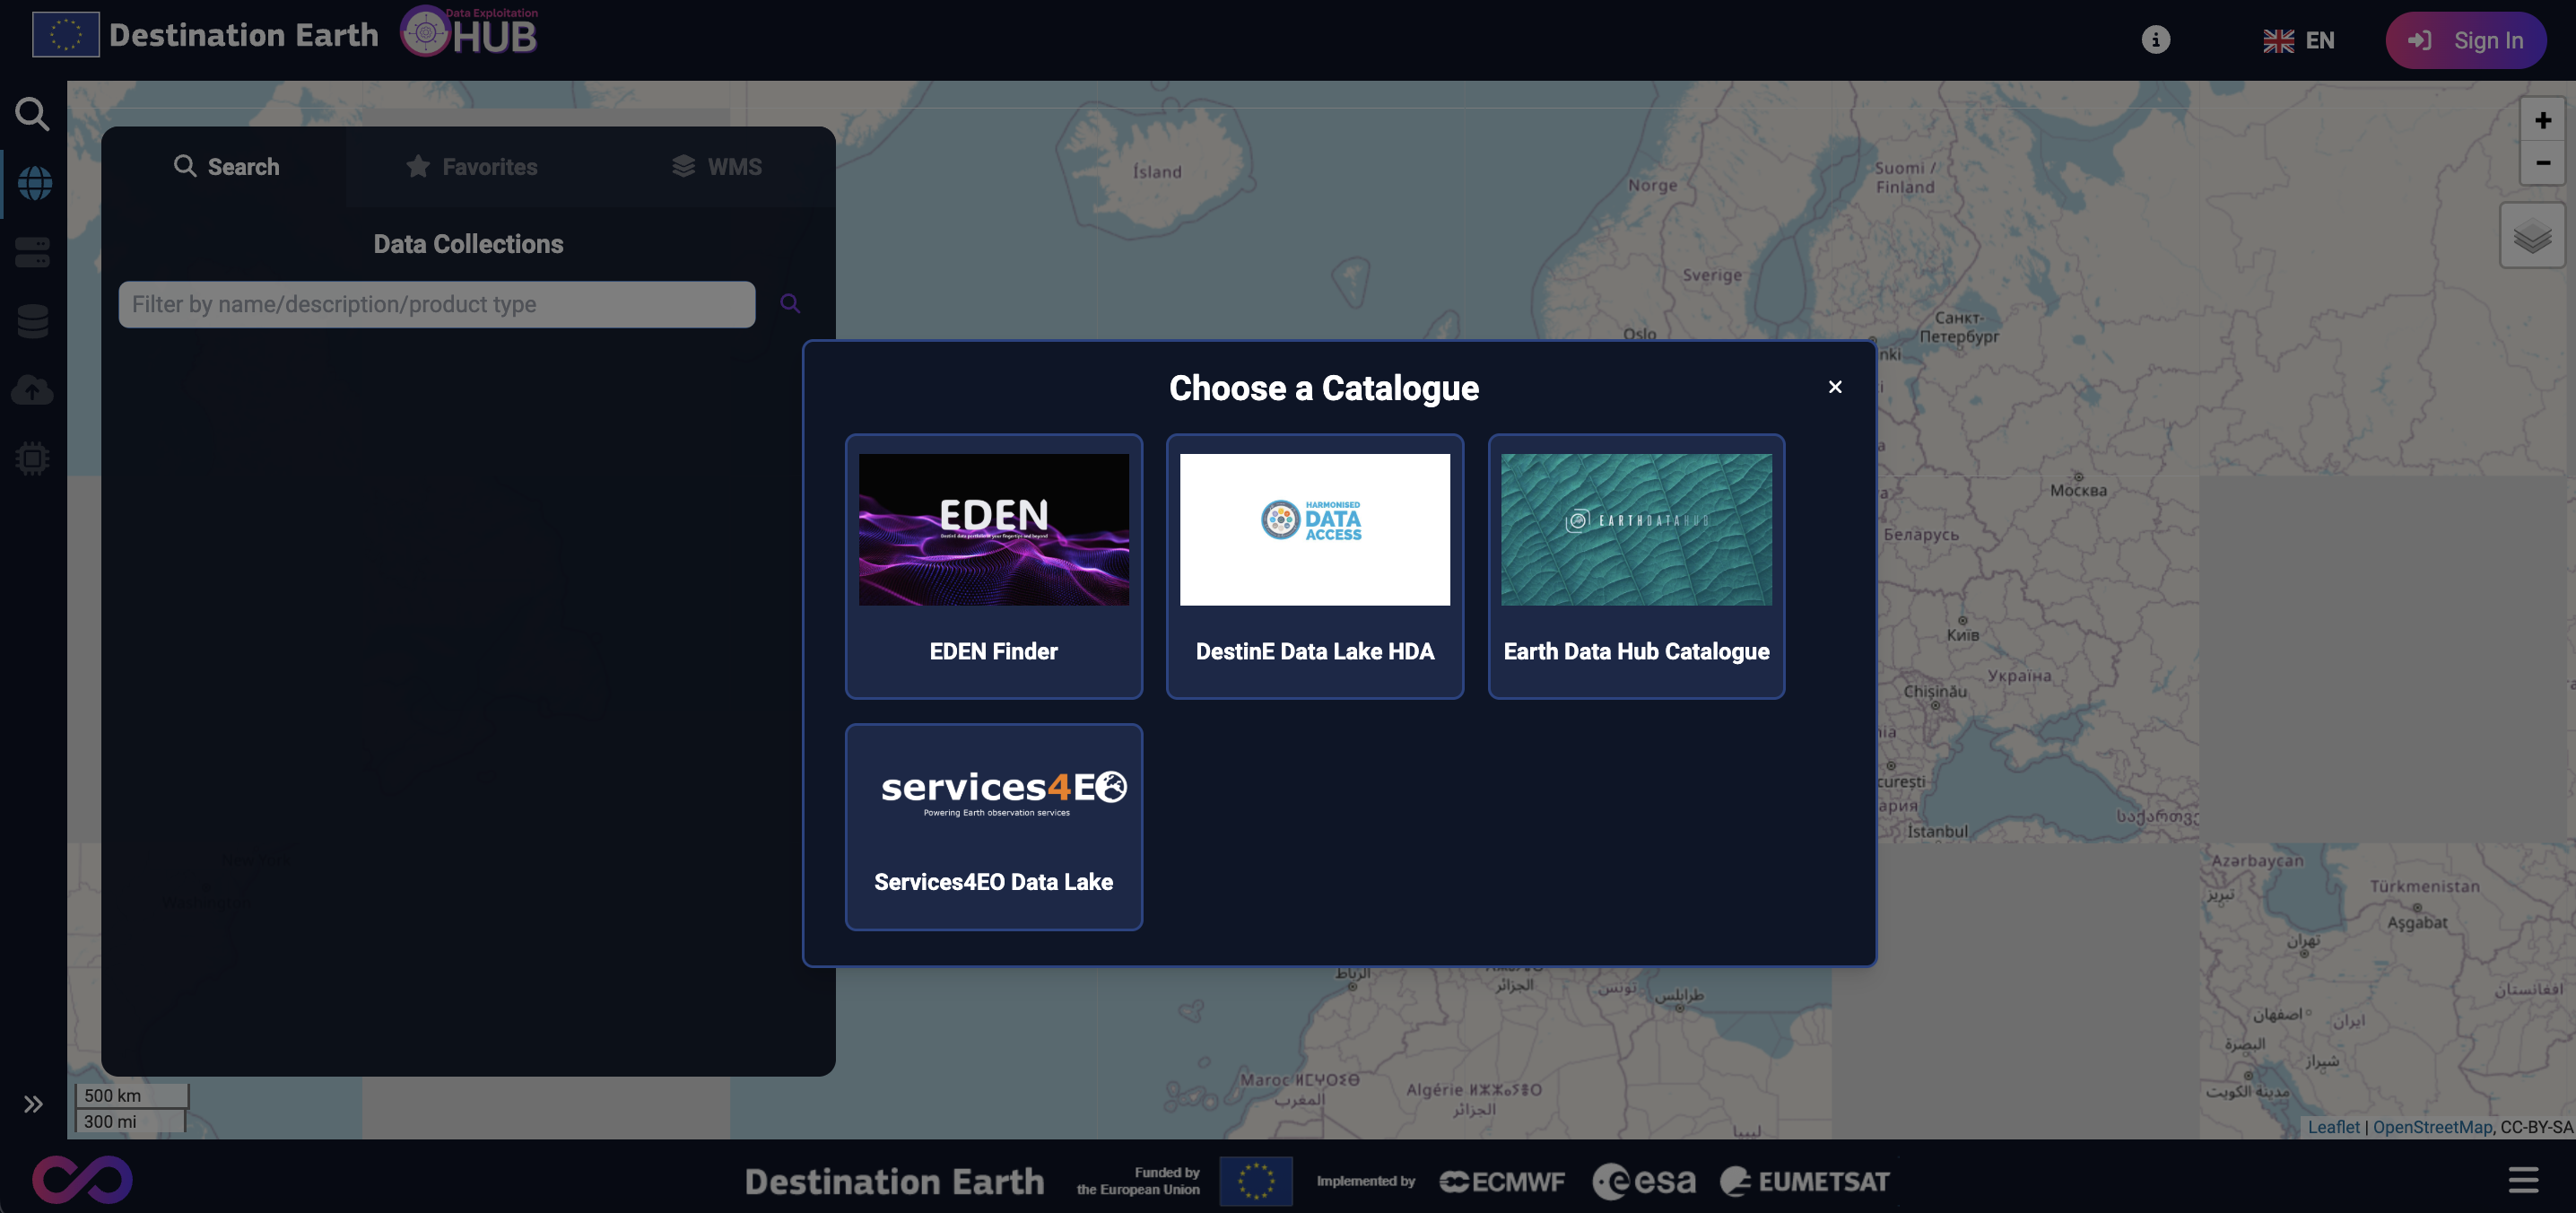
You can explore available data in two ways: by using the Internal Catalogue or by the Federated Catalogue.
Note
The Internal Catalogue and the Federated Catalogue provide the same features. The only difference is that, when using the Federated Catalogue, you must select a specific catalogue before viewing the data collections.
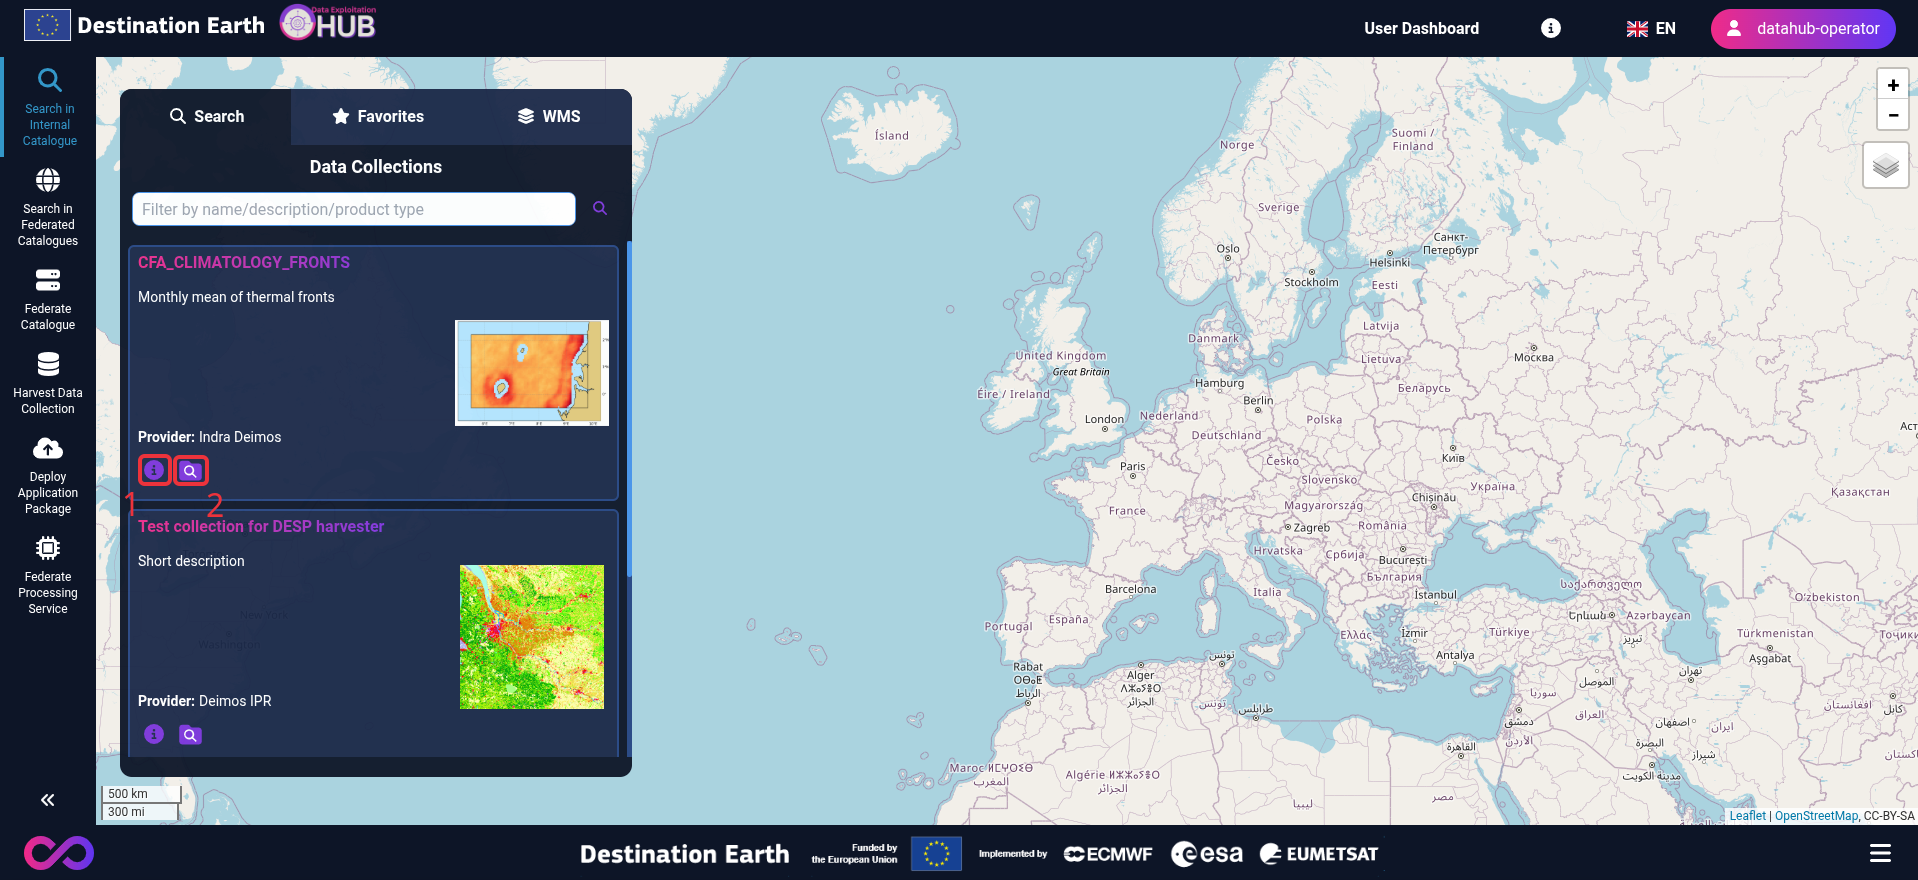
Under the Search tab in both the Internal Catalogue and Federated Catalogue, you can browse all available data collections.
Use the search bar to filter (by name, description, or product type) to easily find the data collection you need.
You can view the details of a specific data collection by clicking the Info button.
You can also search for data within that collection by clicking the Search button on the collection card.
Note
The search for collection functionality is only available when you are logged in.
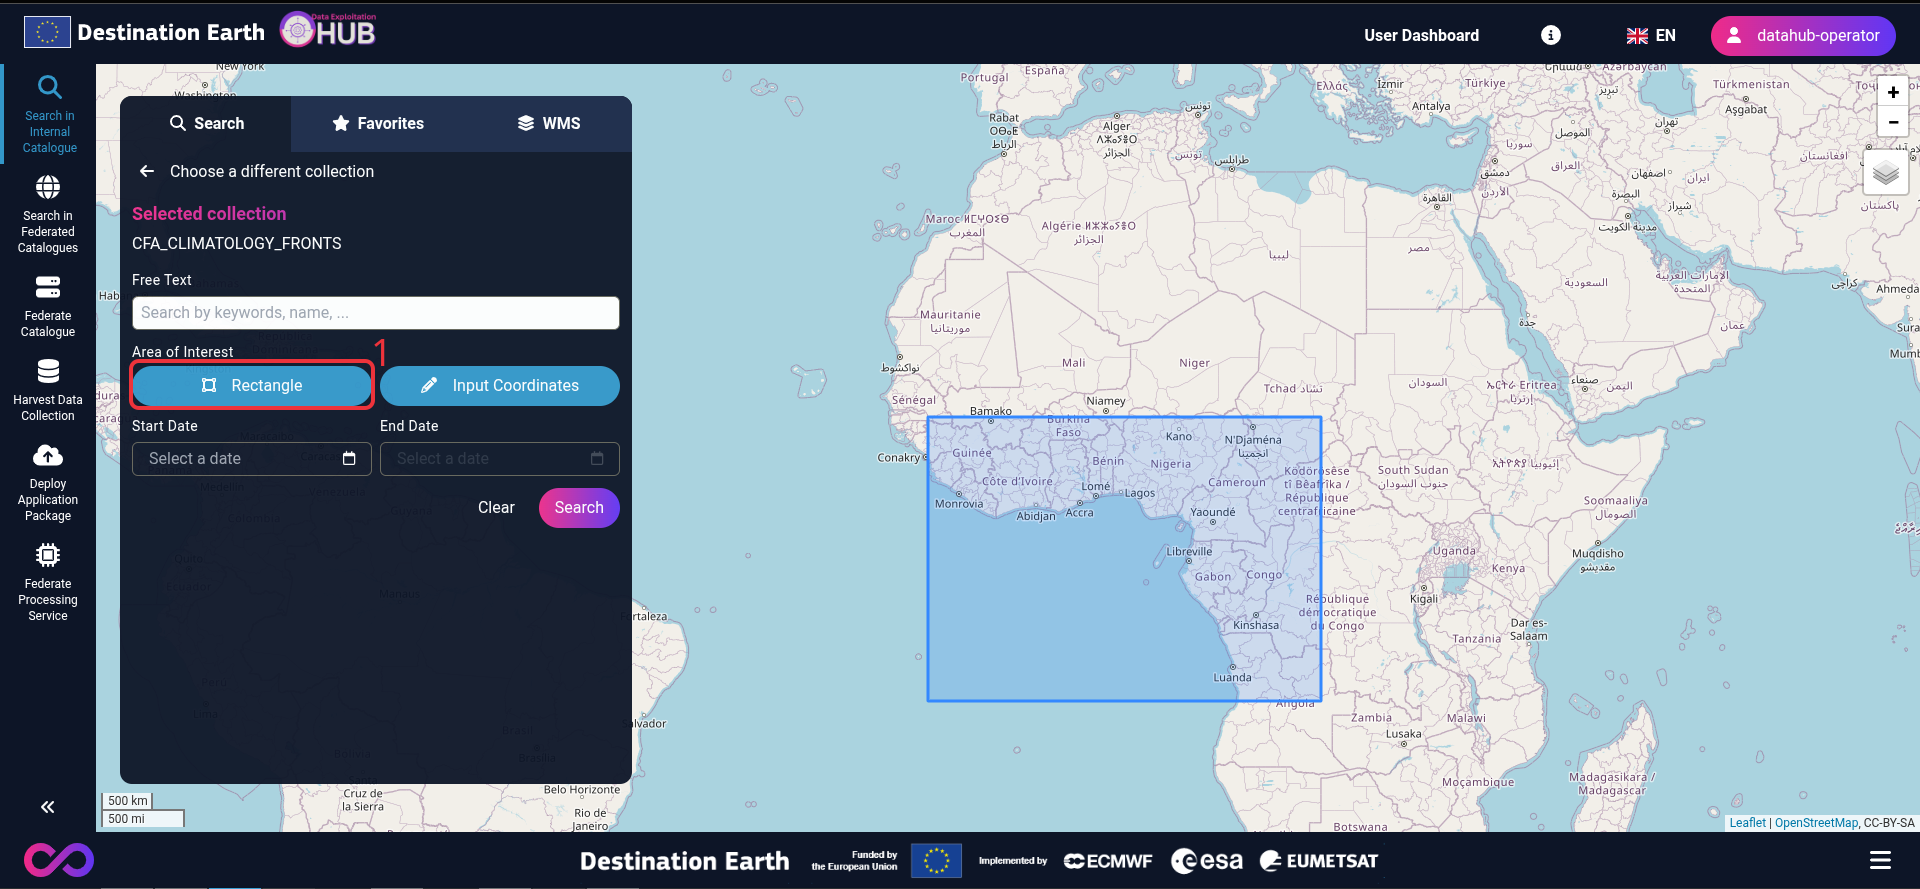
After selecting a specific collection, you can search for results in several ways:
Draw a rectangle over the area of interest.
The Rectangle Search feature allows users to draw a custom rectangular area directly on the map. By clicking the rectangle button, users can define the area of interest. Once the rectangle is drawn and the search is executed, all results located within the selected area will be displayed on the map.
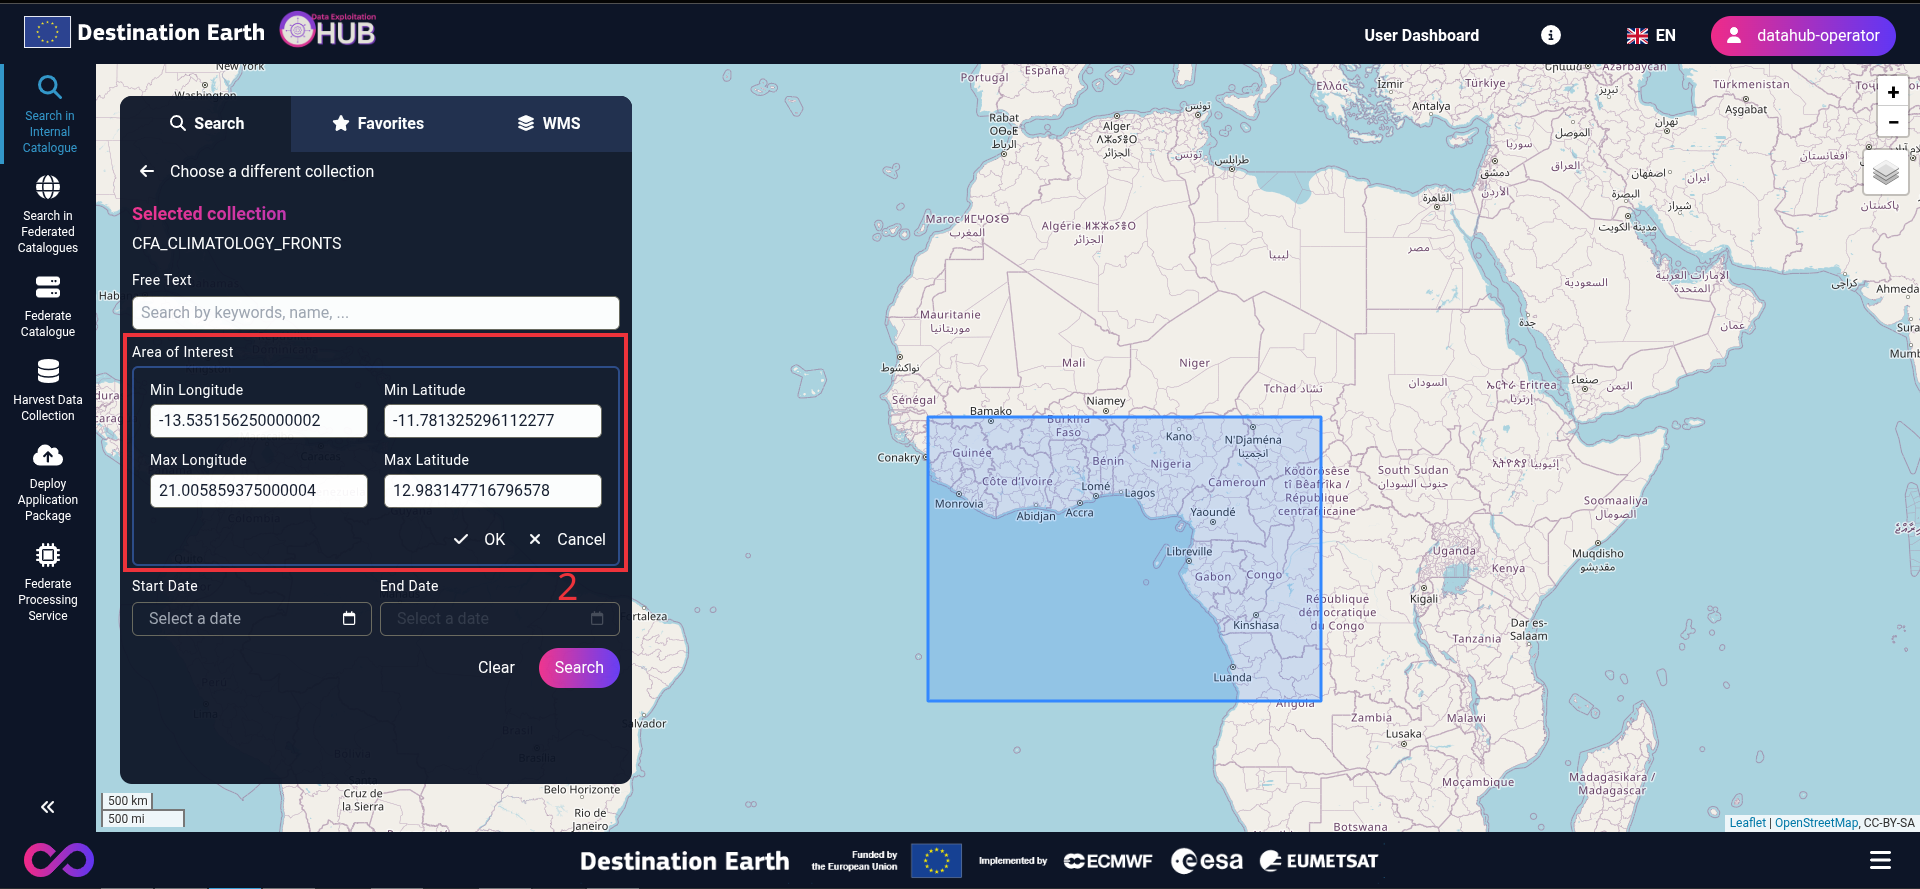
Enter specific coordinates.
The Coordinate Search feature allows users to define a rectangular area on the map by manually entering coordinates. Users can input the minimum and maximum longitude and latitude values, and by clicking the OK button, a rectangle corresponding to the chosen coordinates will be drawn on the map. Performing a search will then display all results located within that specified area.
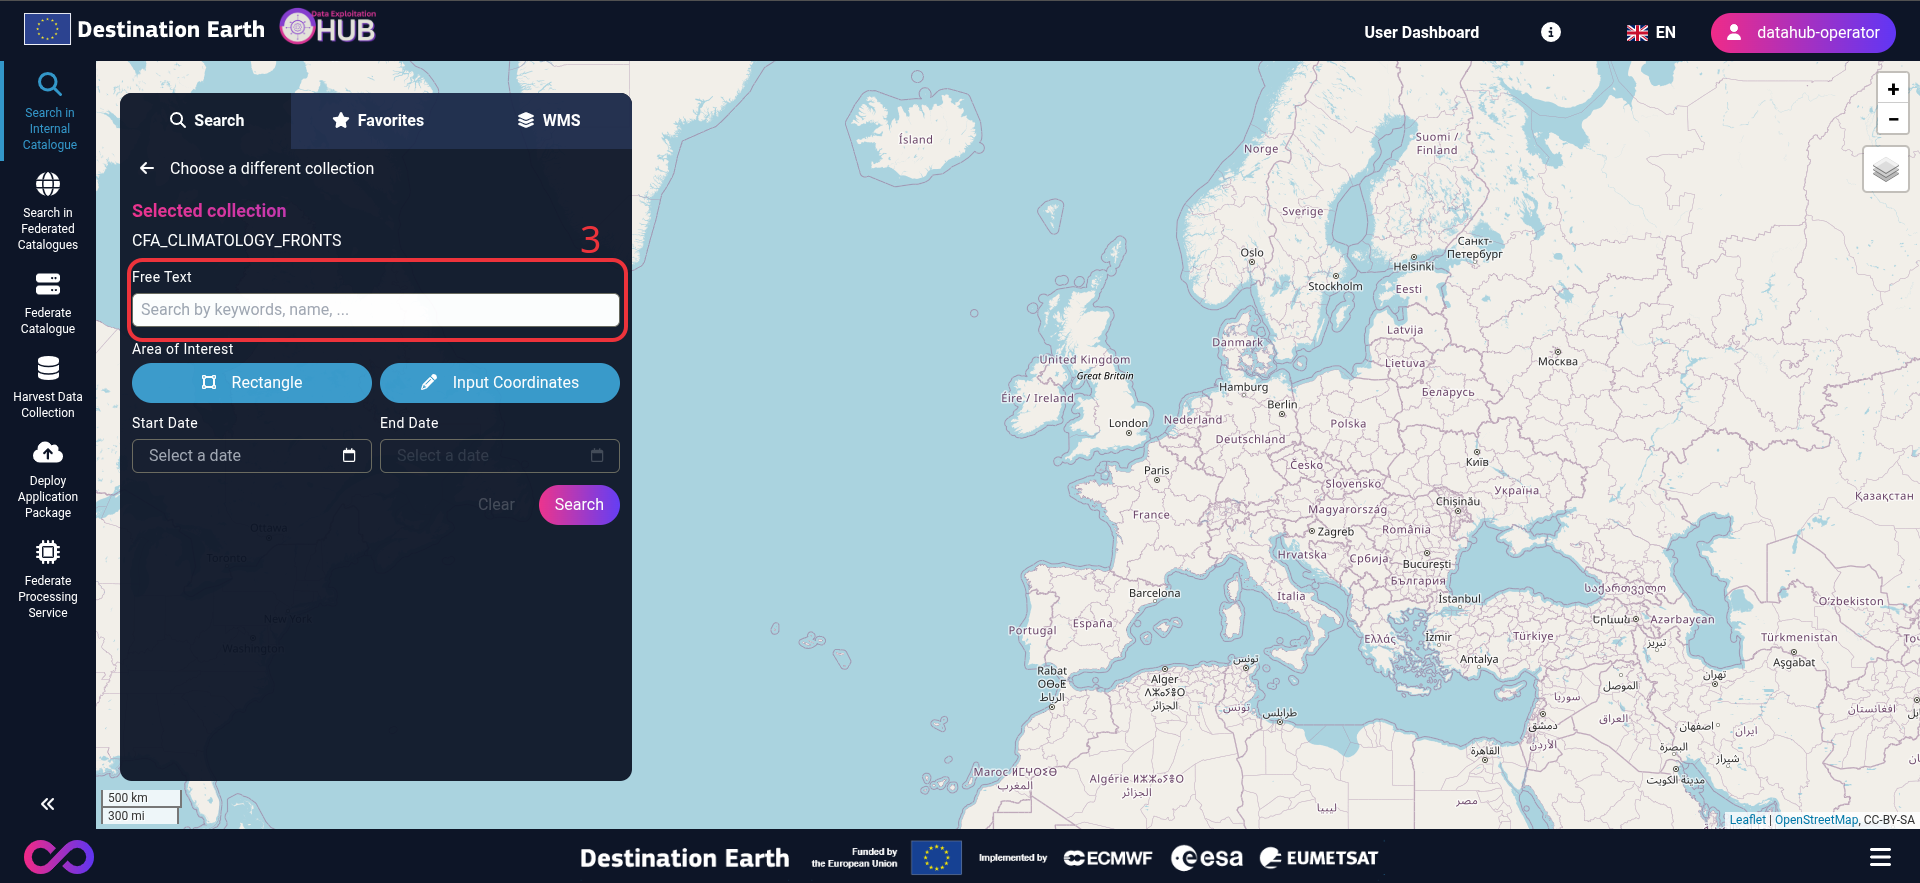
Use a free-text search.
The Free-Text Search feature allows users to search for specific results by entering keywords or names. Users can type their query into the search box, and the system will return all results that match the entered terms.
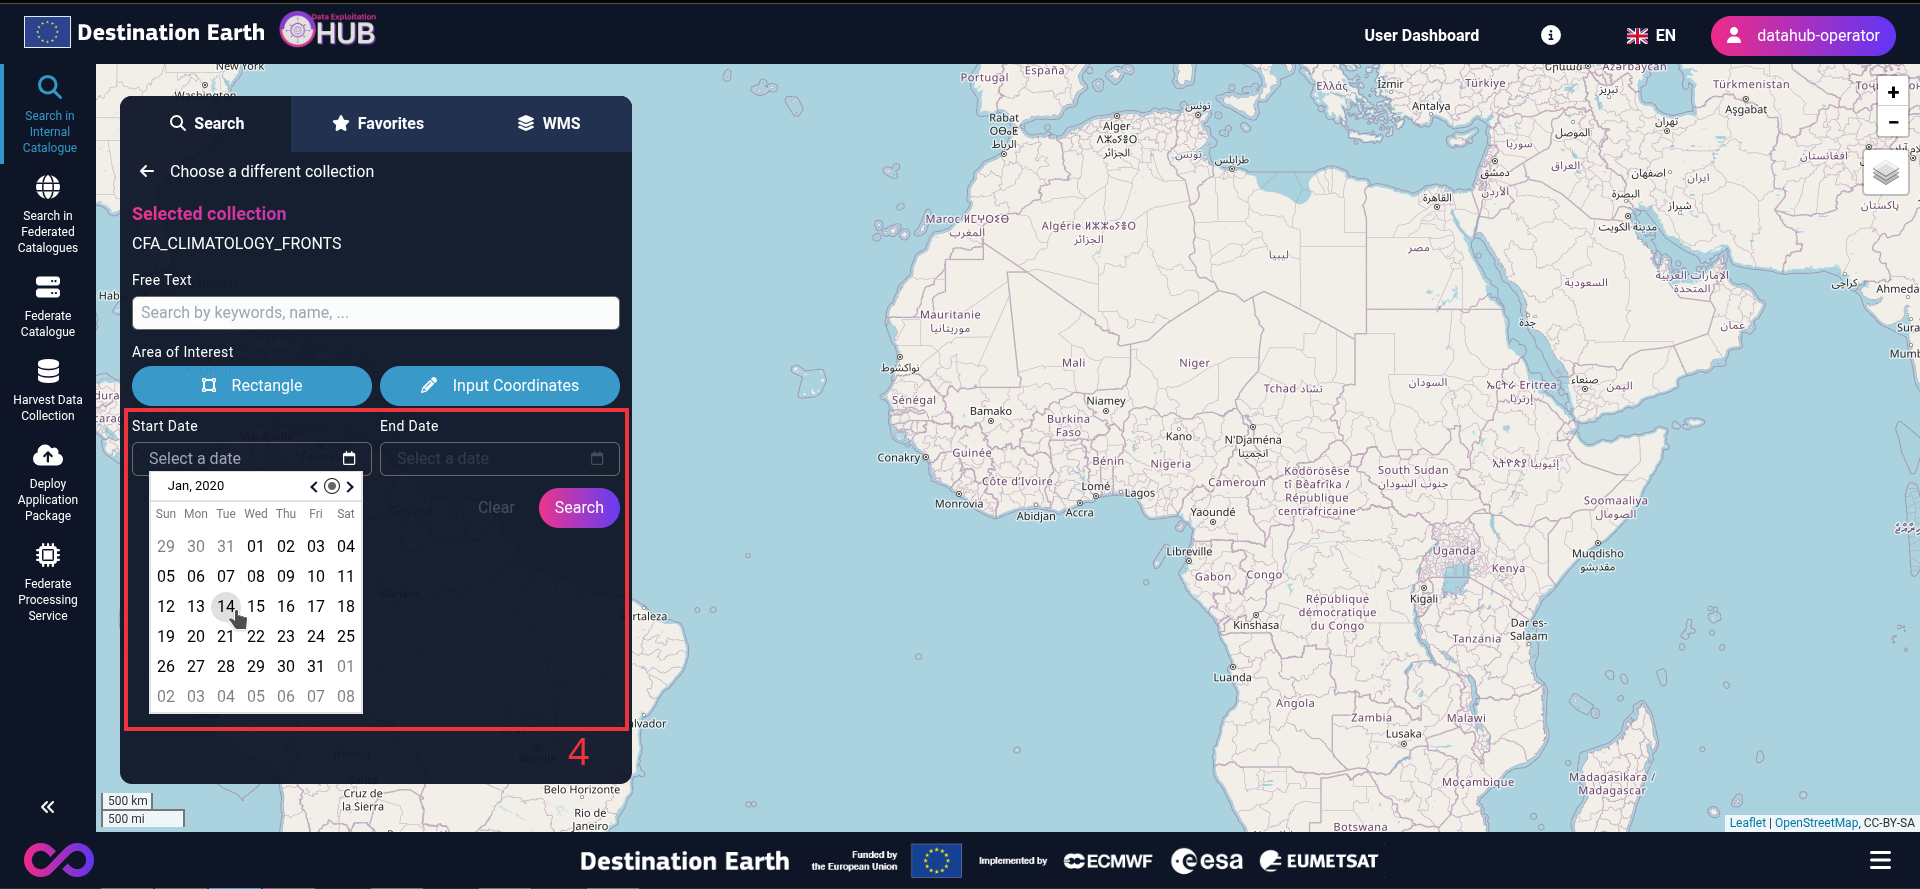
Specify a start and/or end date.
The Date Filter allows users to select a specific date range to view results available within that period. Clicking the start or end date field displays a calendar for easy selection.
Note
The End Date cannot be earlier than the Start Date, and the Start Date must be selected first before choosing the End Date.
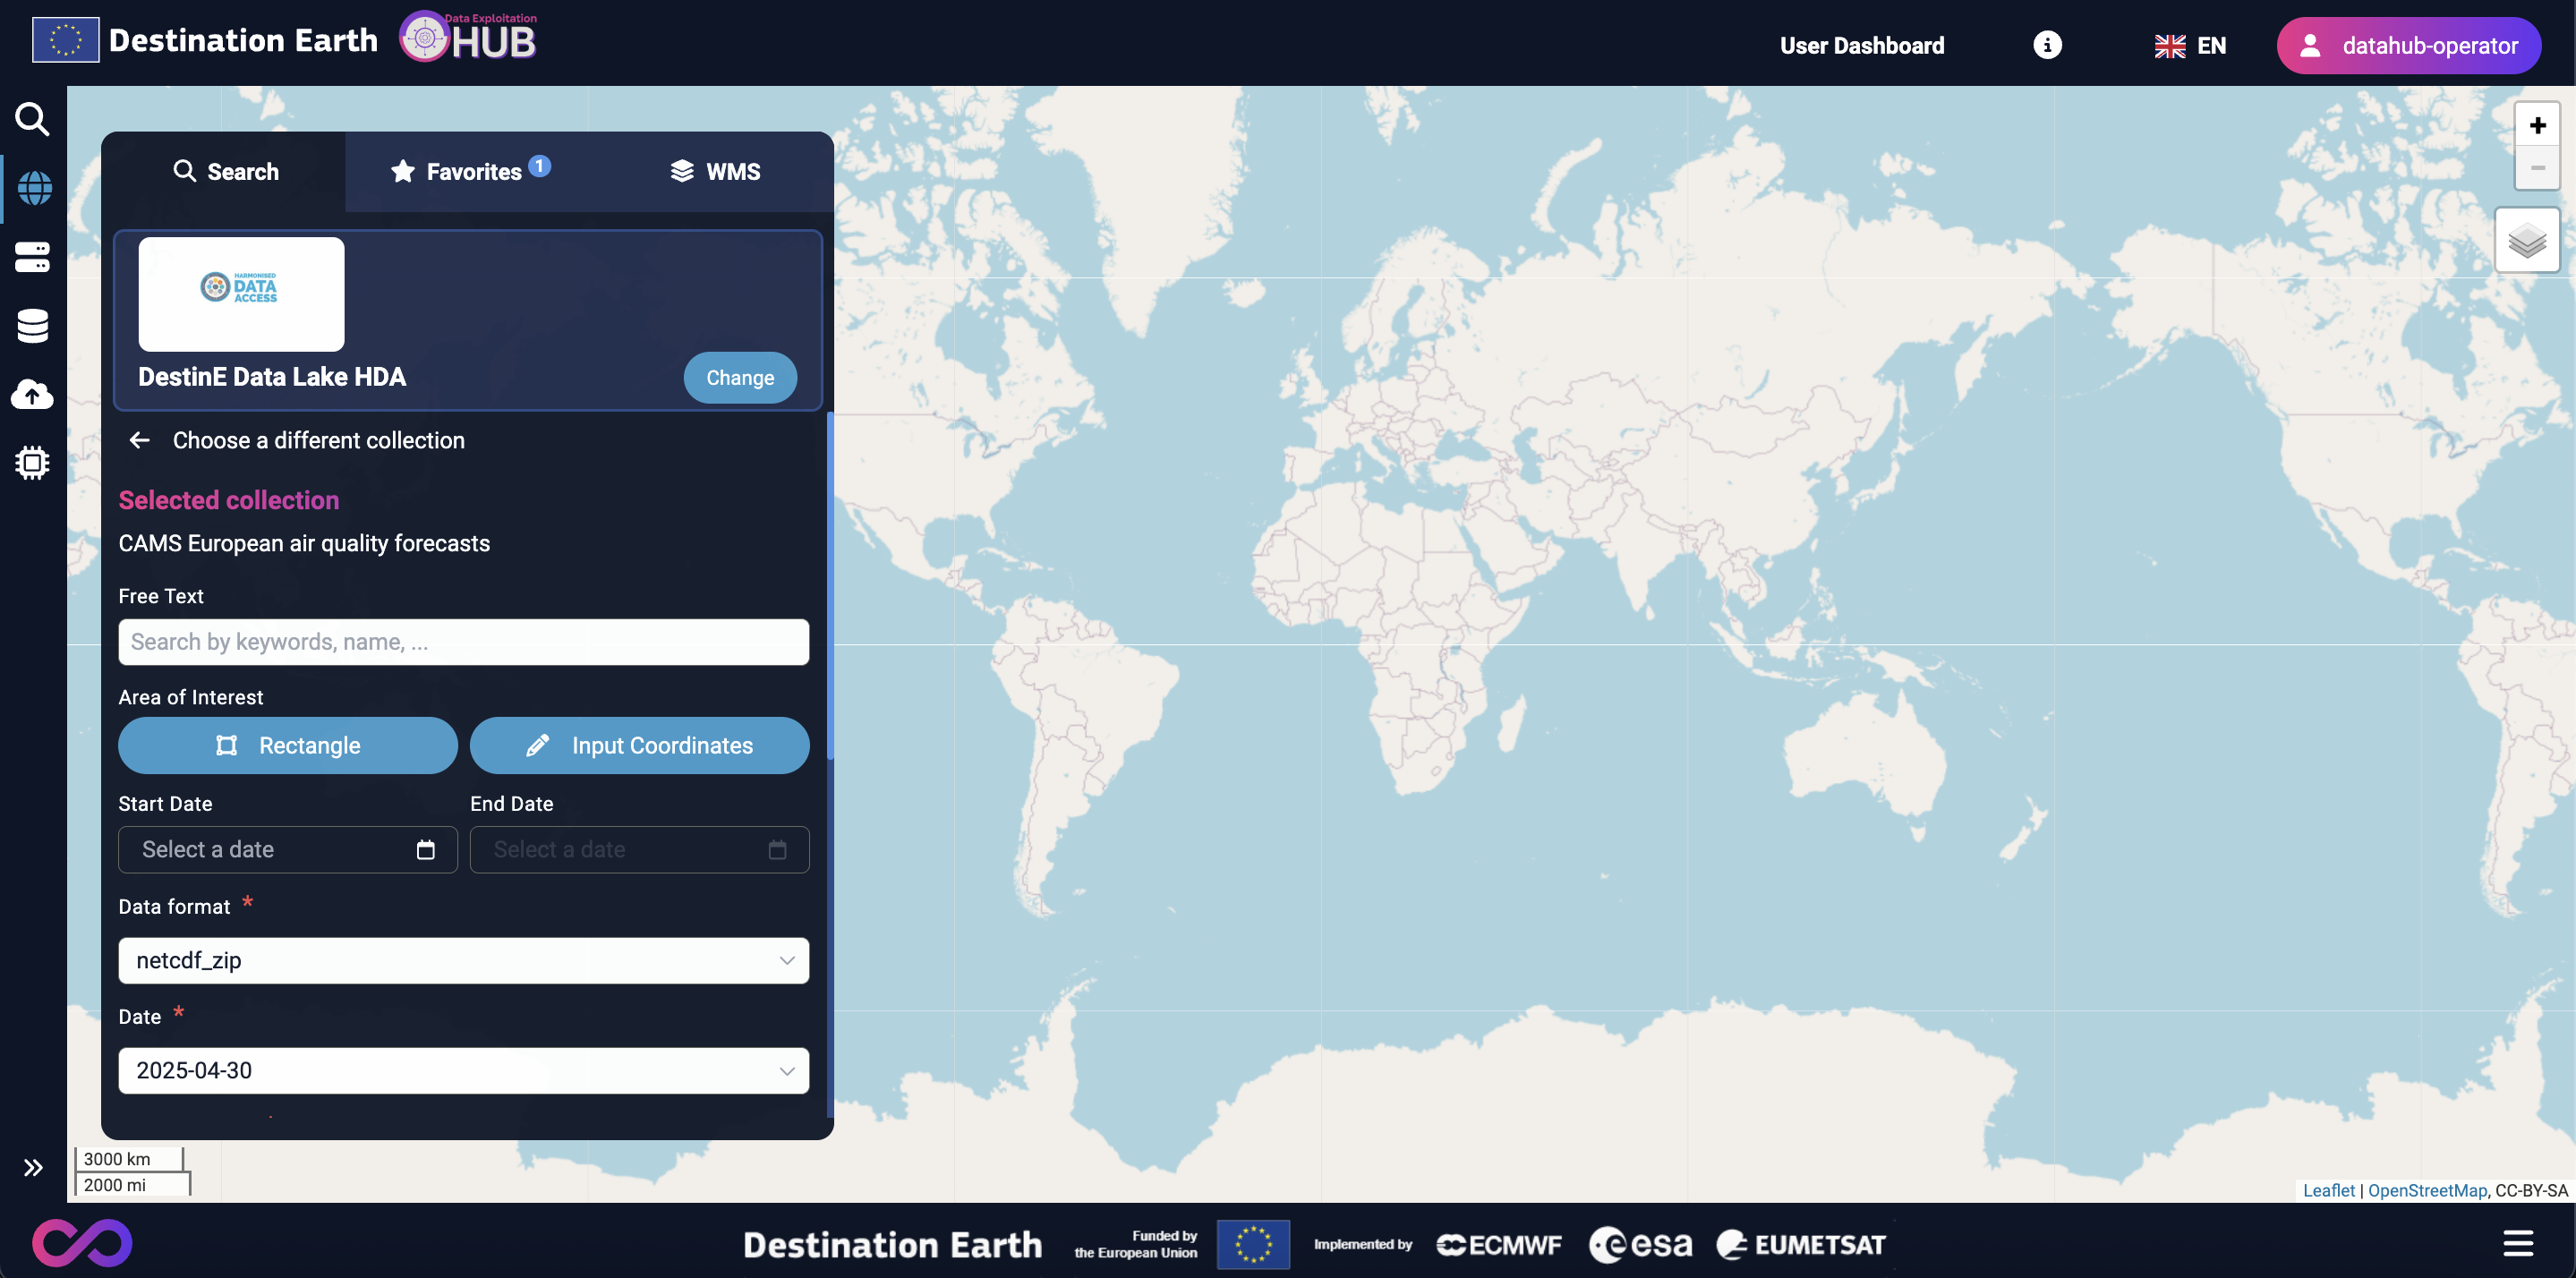
If the selected data collection includes additional parameters, a supplementary form will be automatically displayed for completion. Once all required fields have been filled in, you can proceed with the search and view the results.
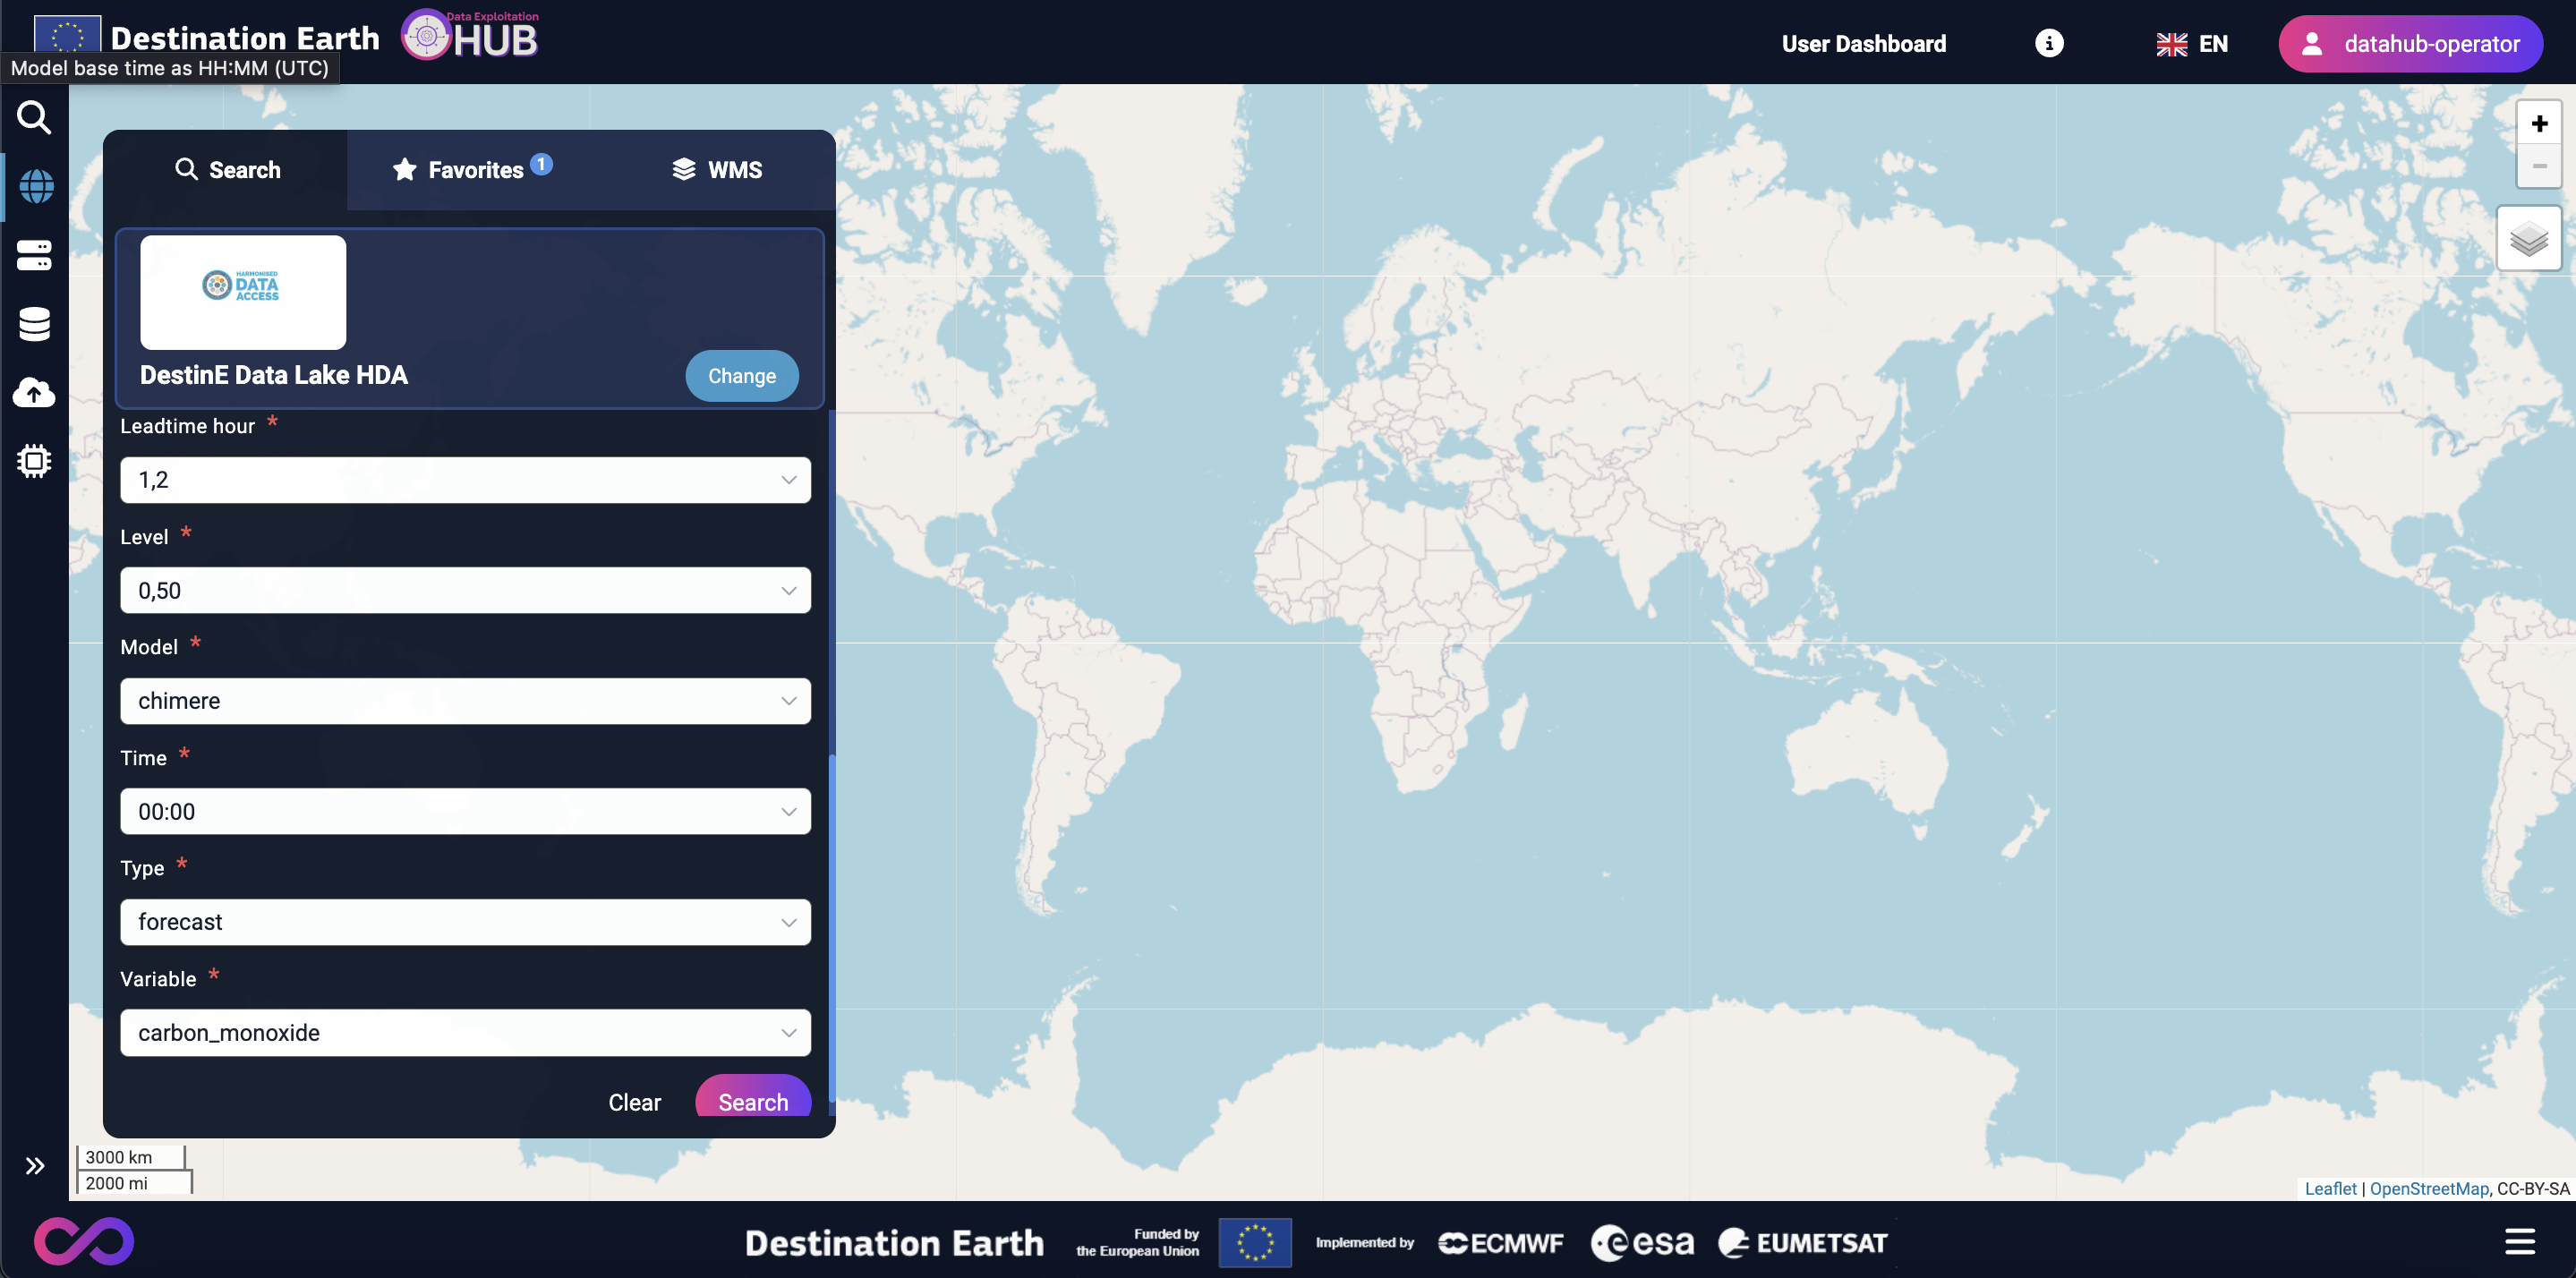
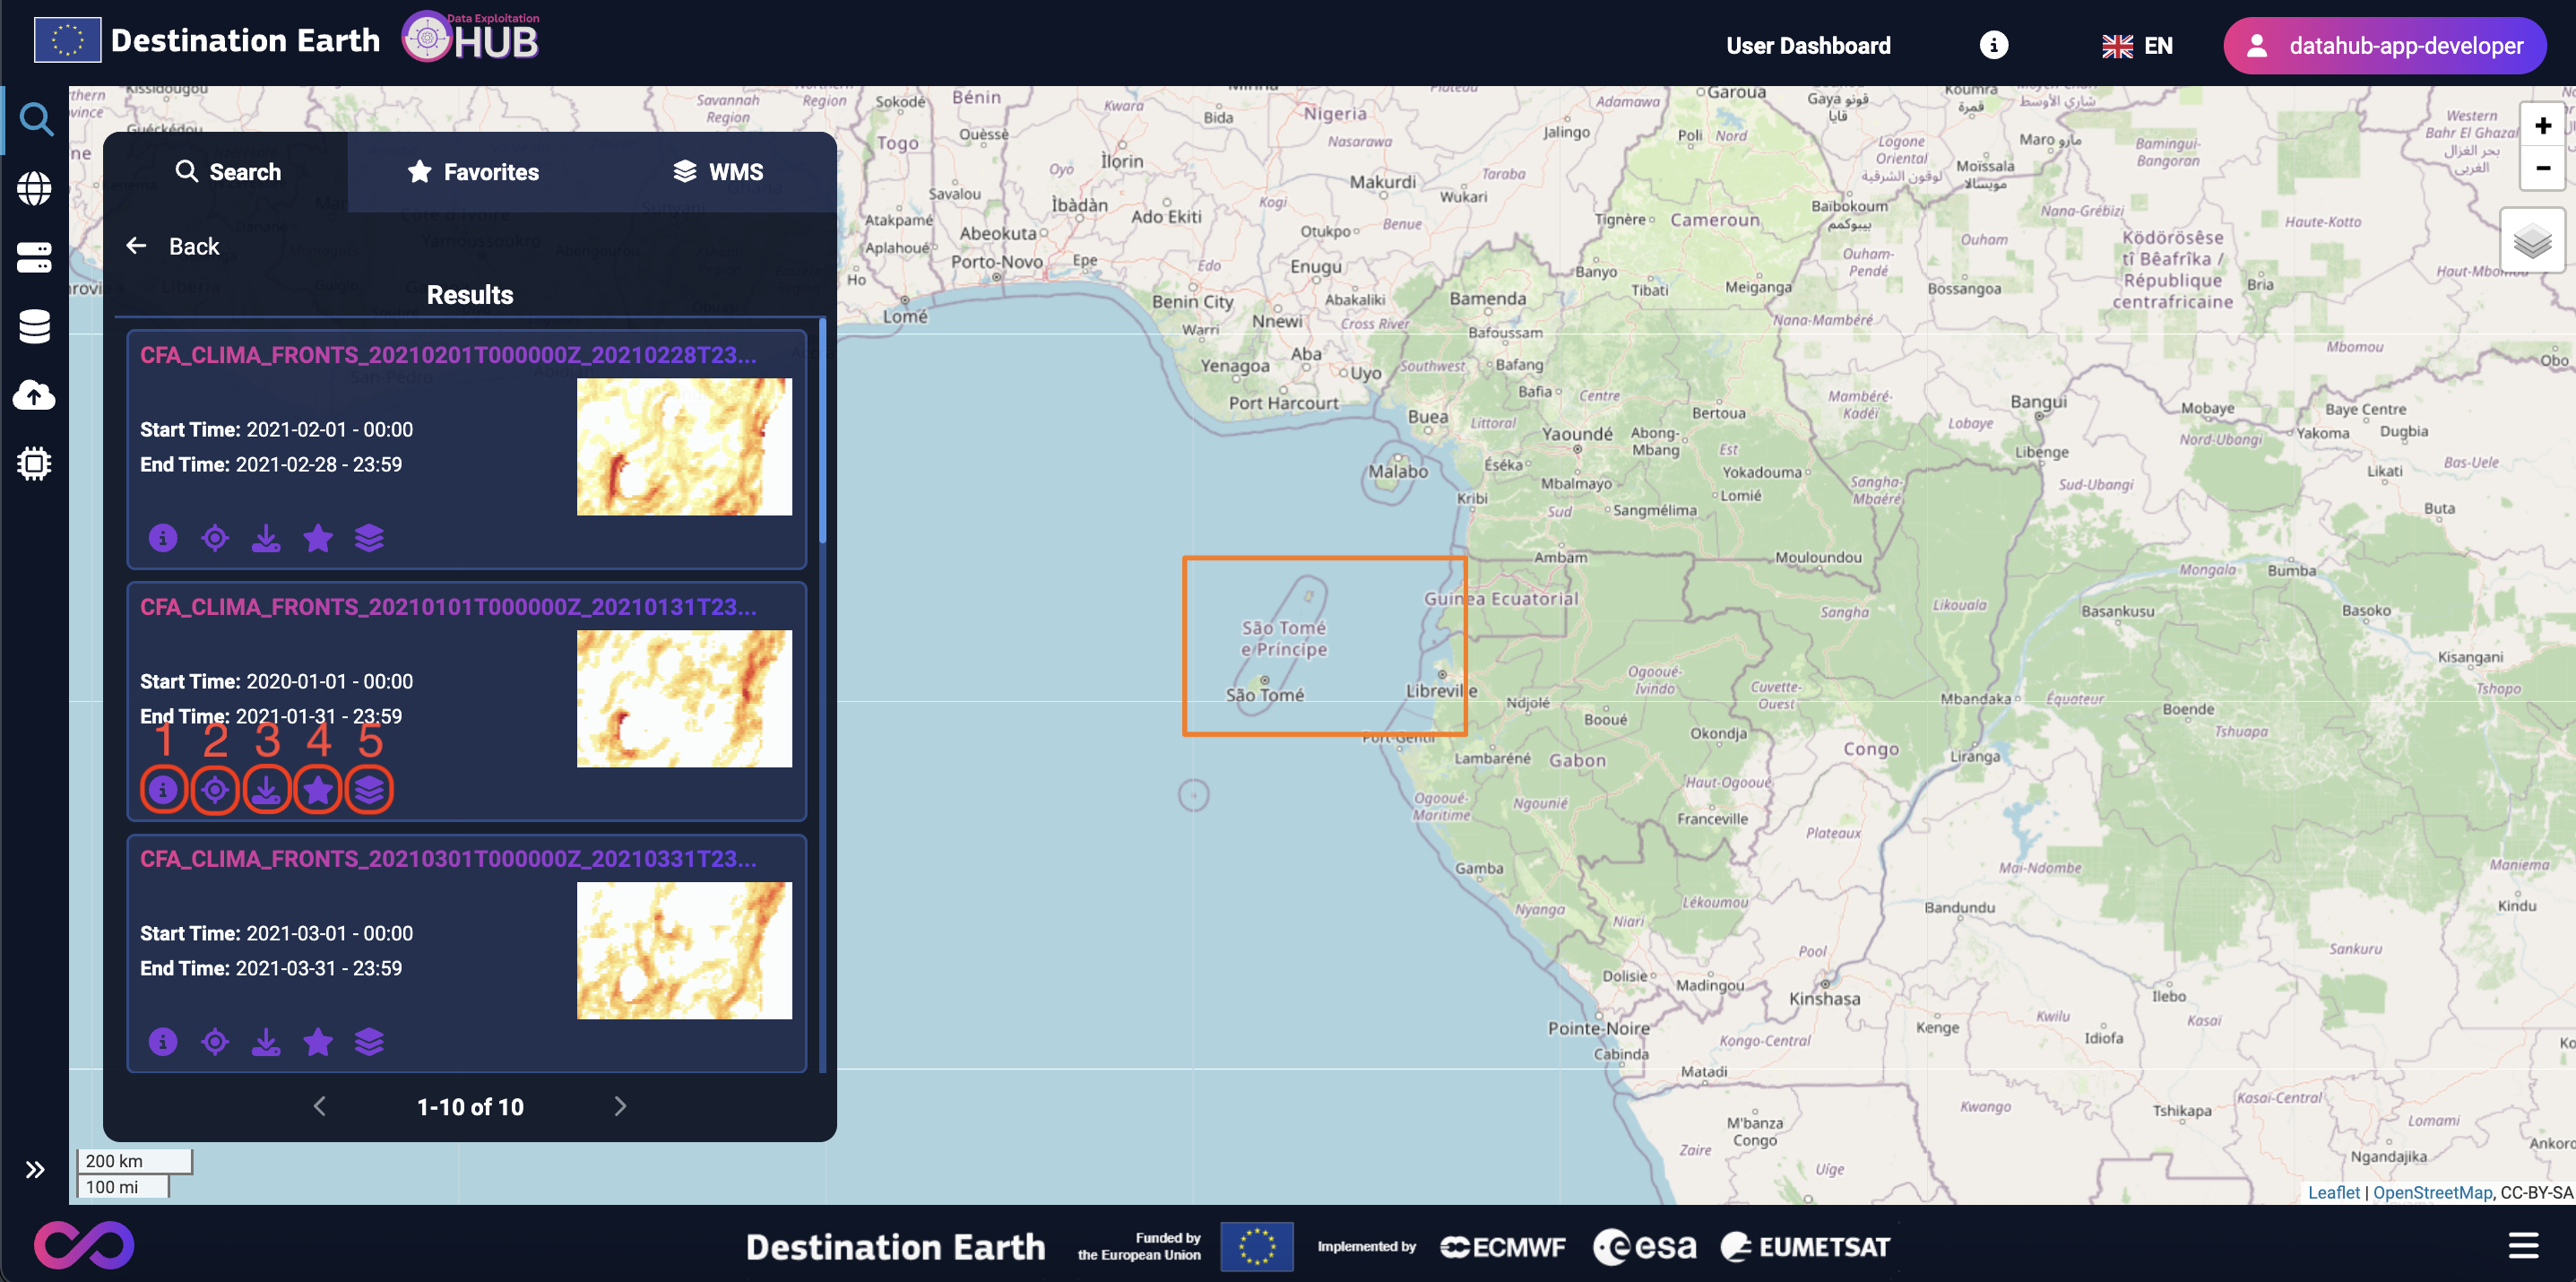
After clicking Search with your selected filters, the results will be displayed.
Each result provides the following actions:
Info – View more details about the selected result.
Zoom to area – Center the map on the area of your result.
Download – If available, download the corresponding data.
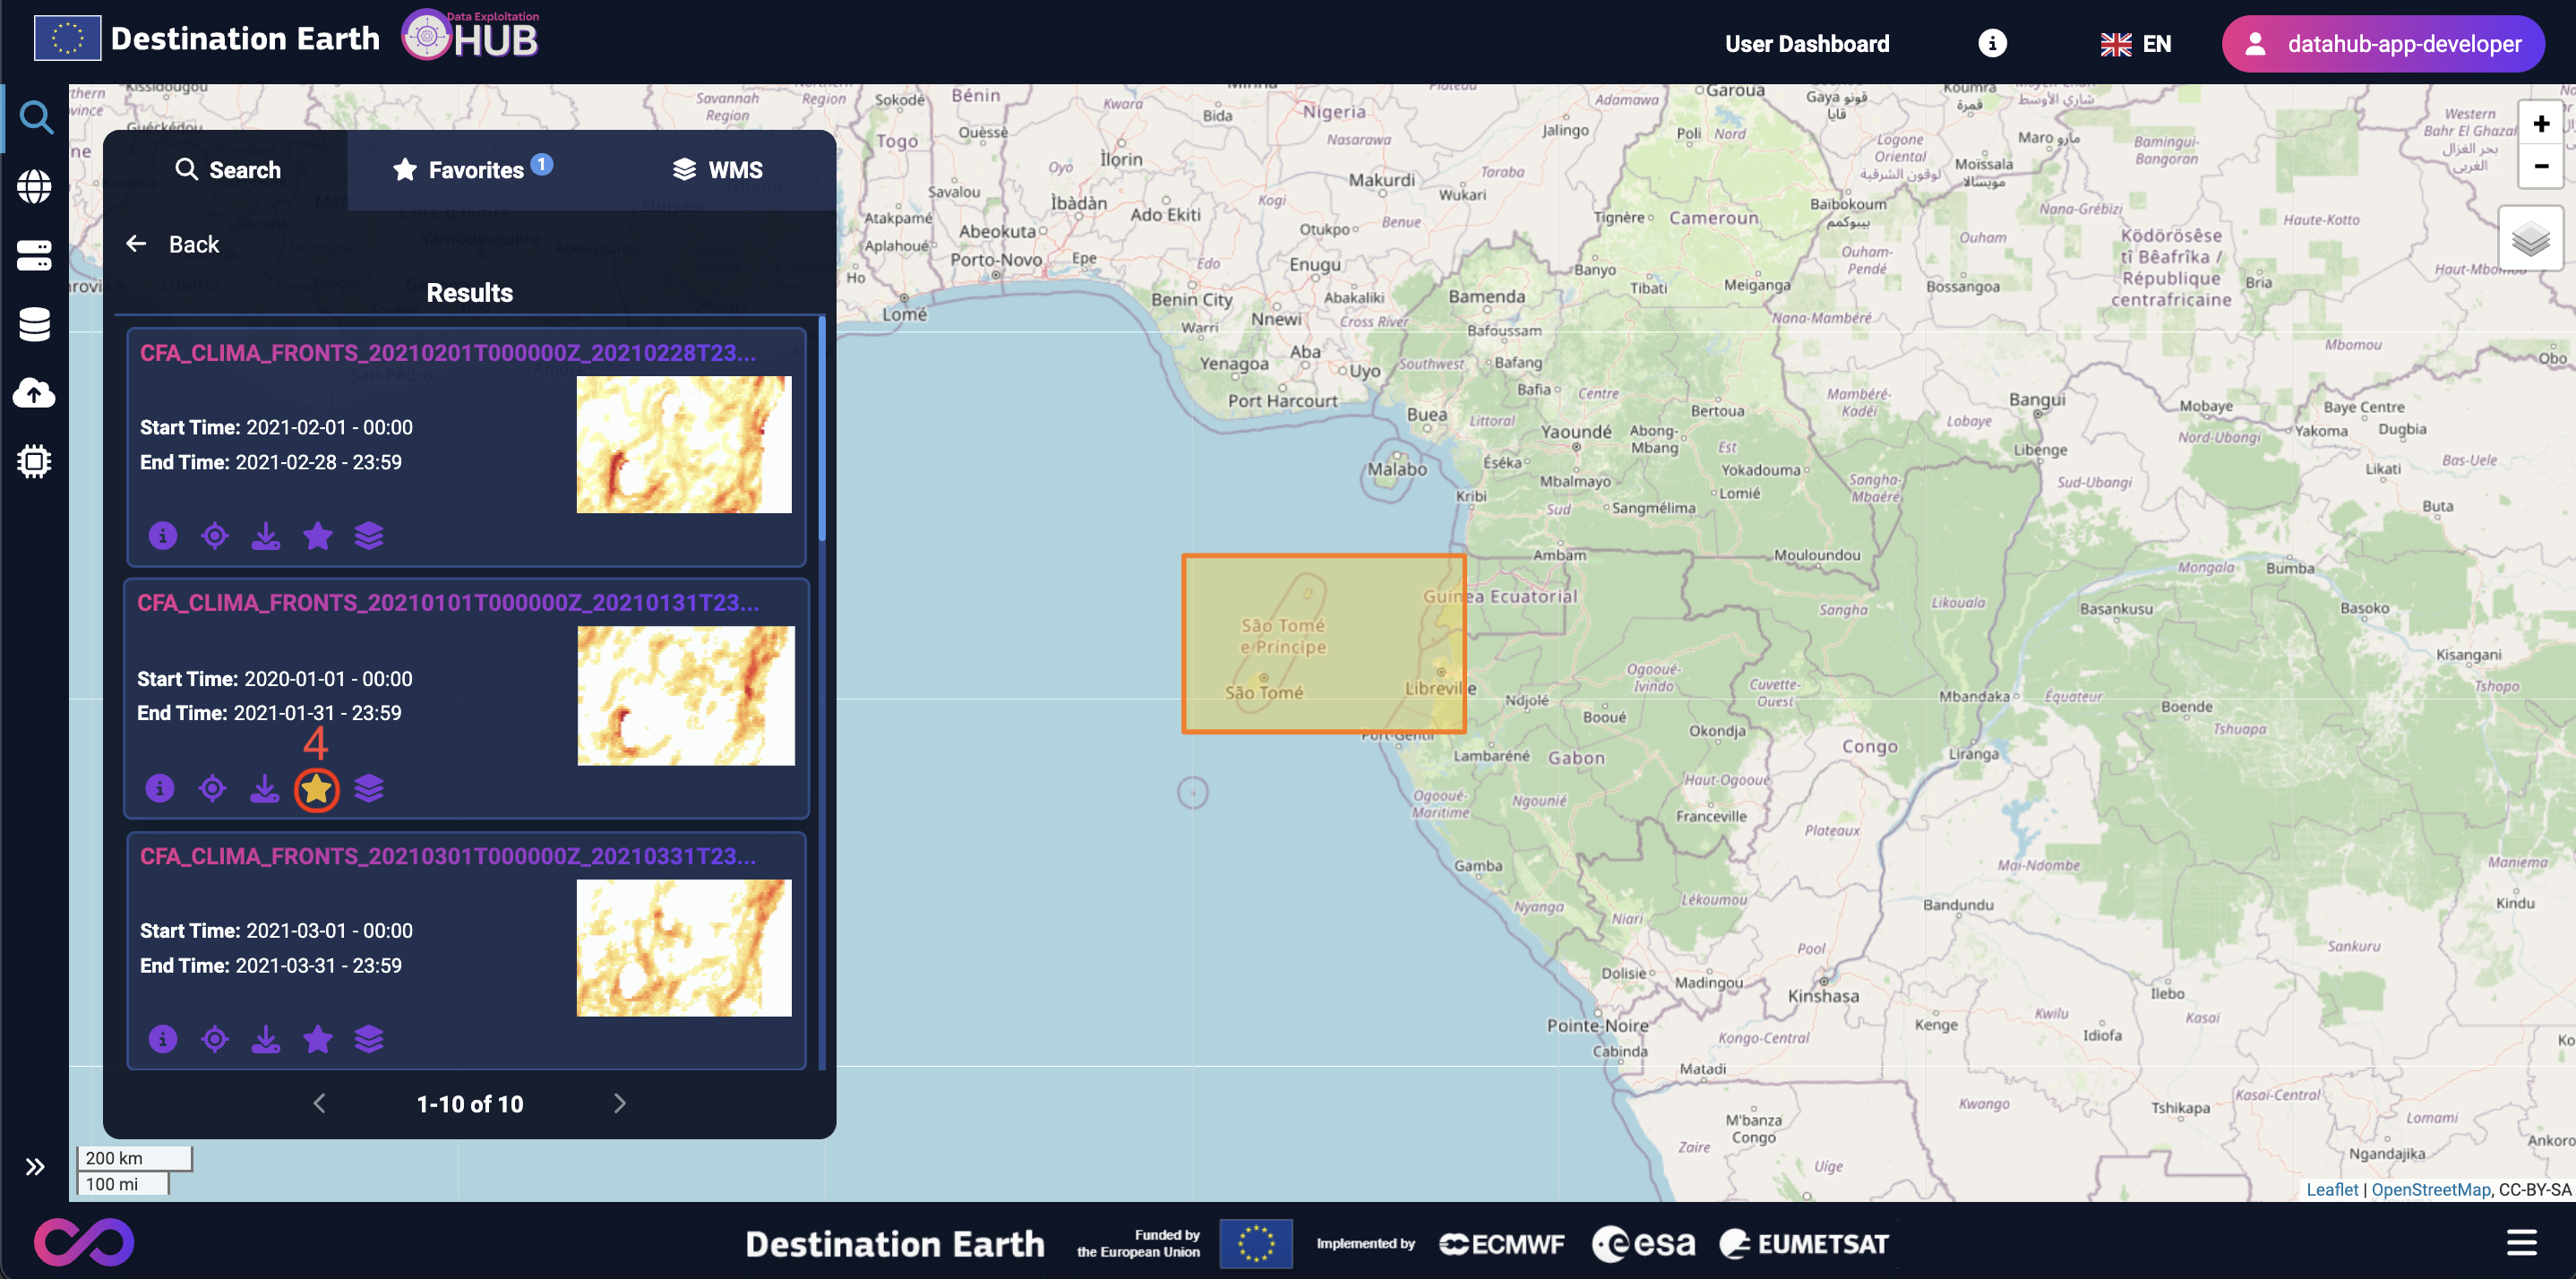
Add to Favorites – Add the result to your Favorites tab.
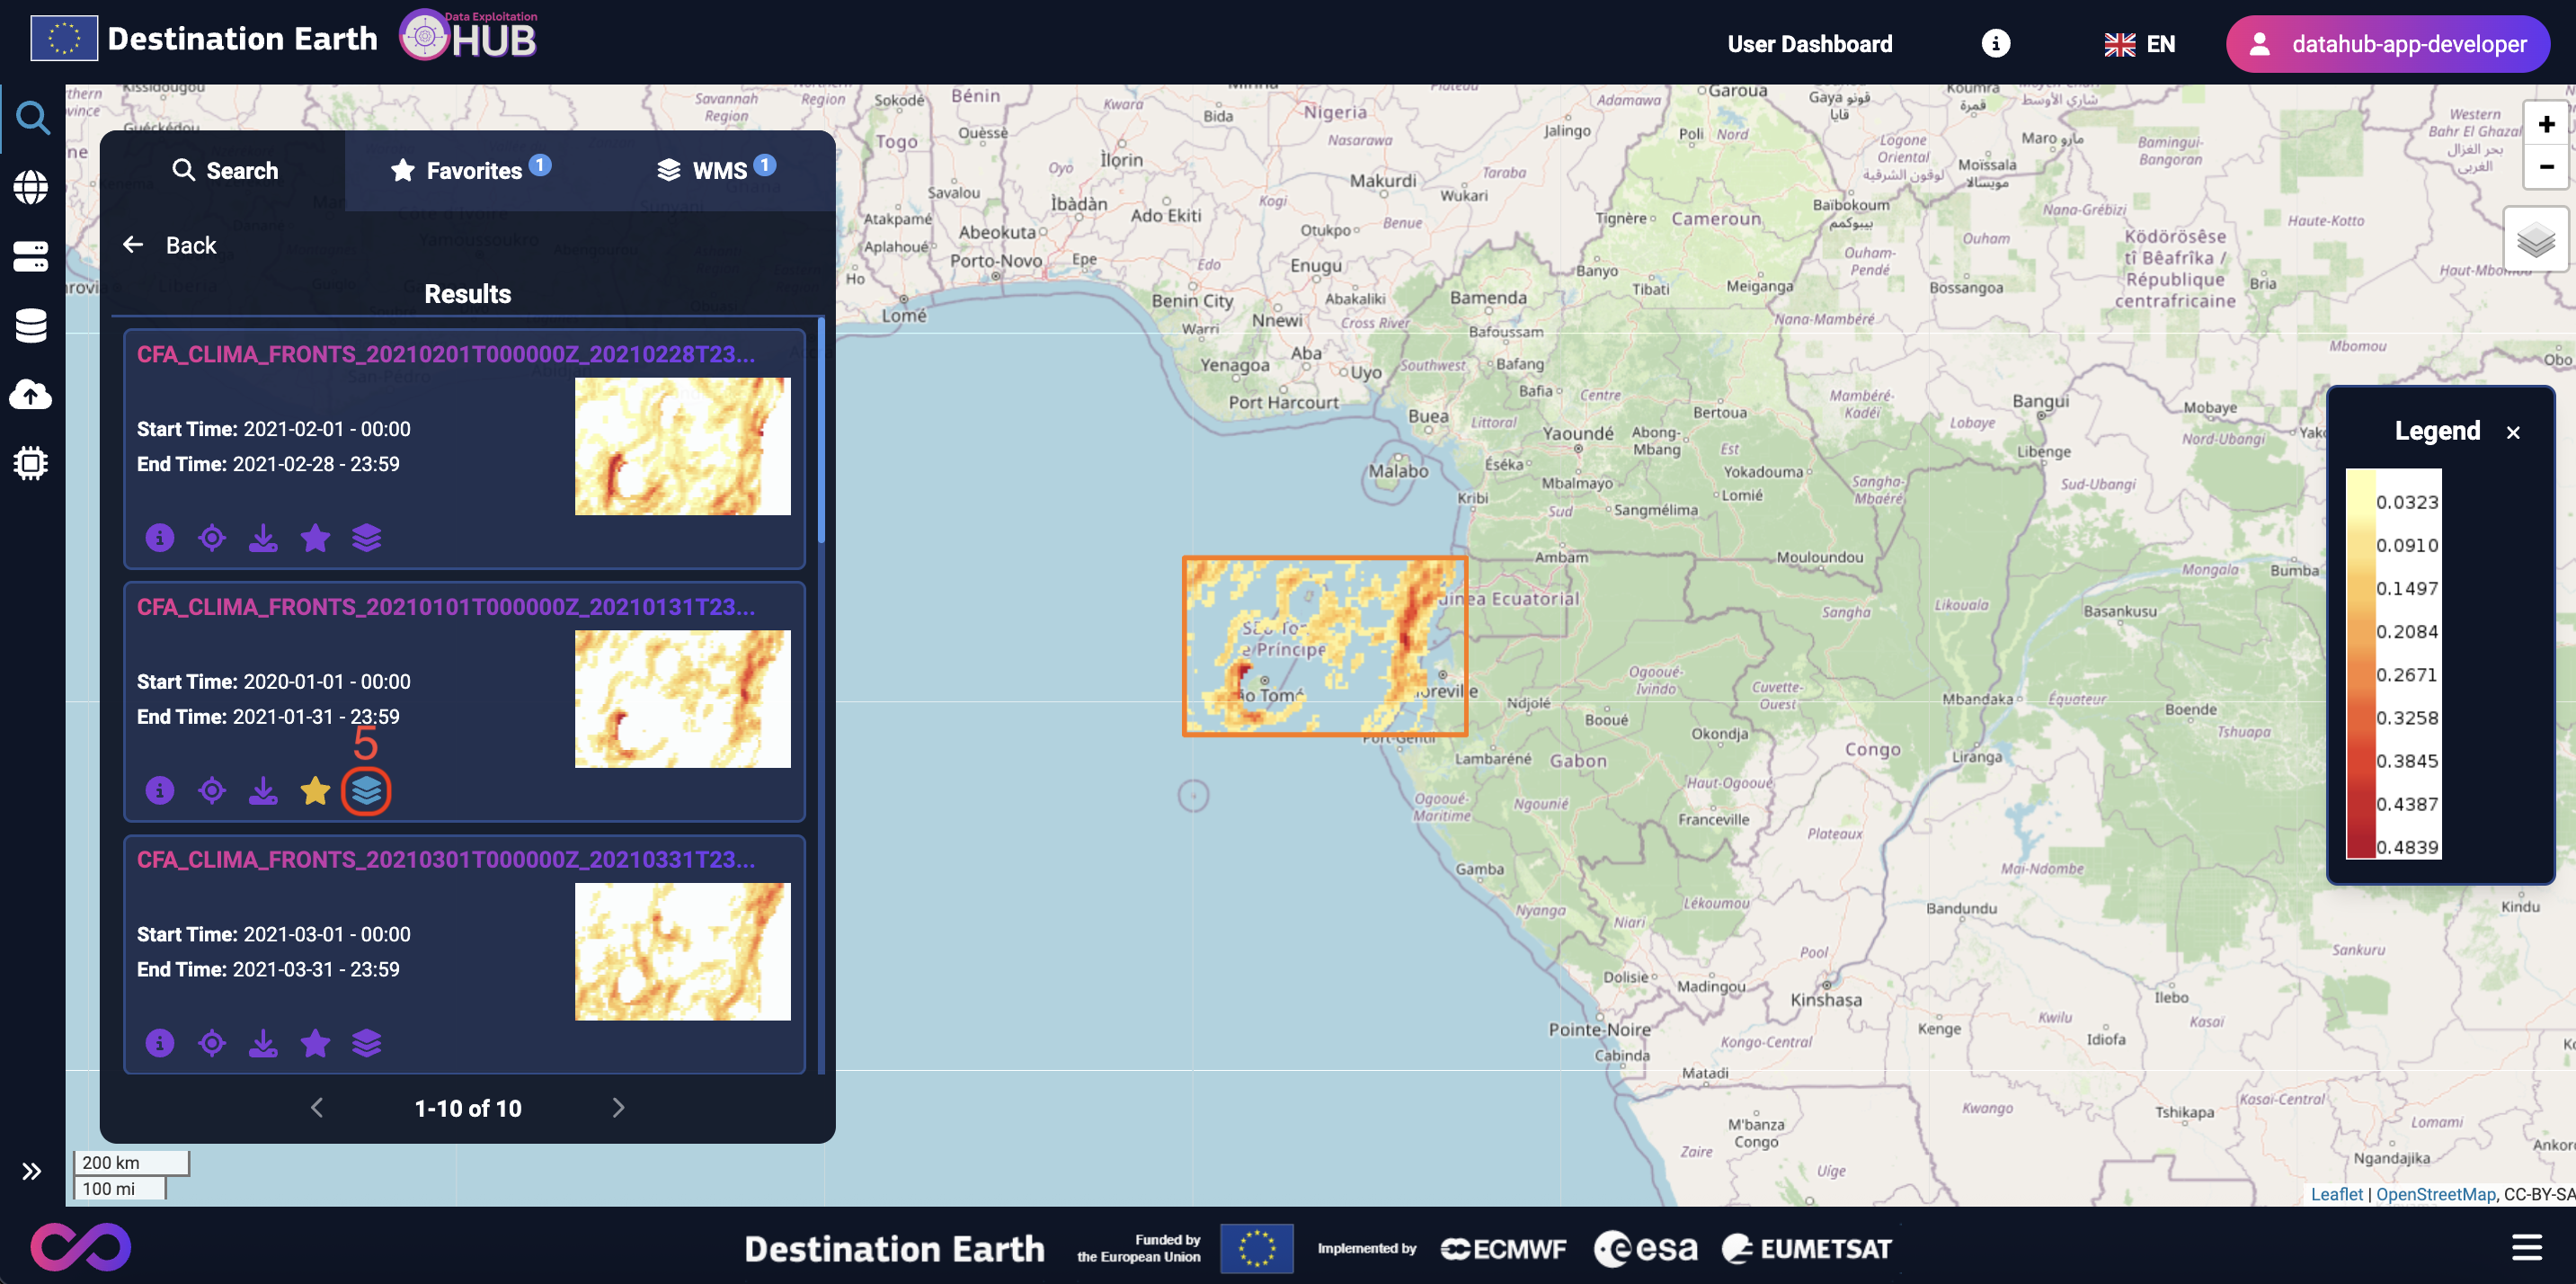
Visualize (WMS layer) – If the result contains a WMS layer, visualize it directly on the map.
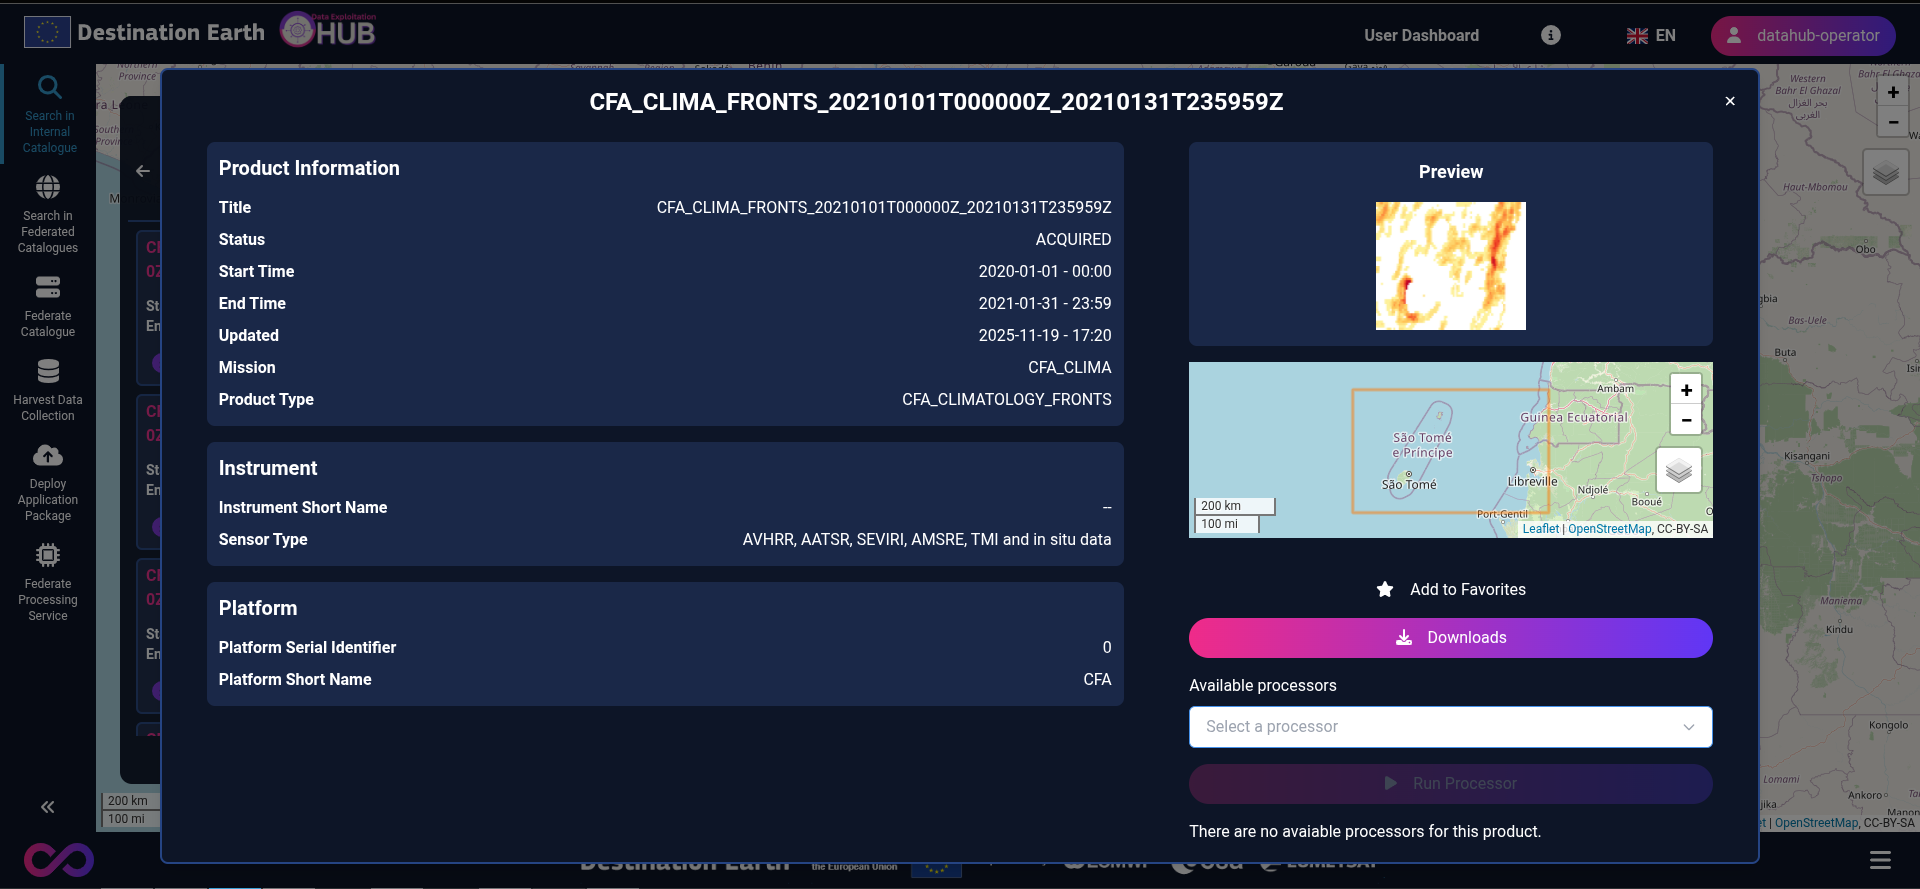
Info
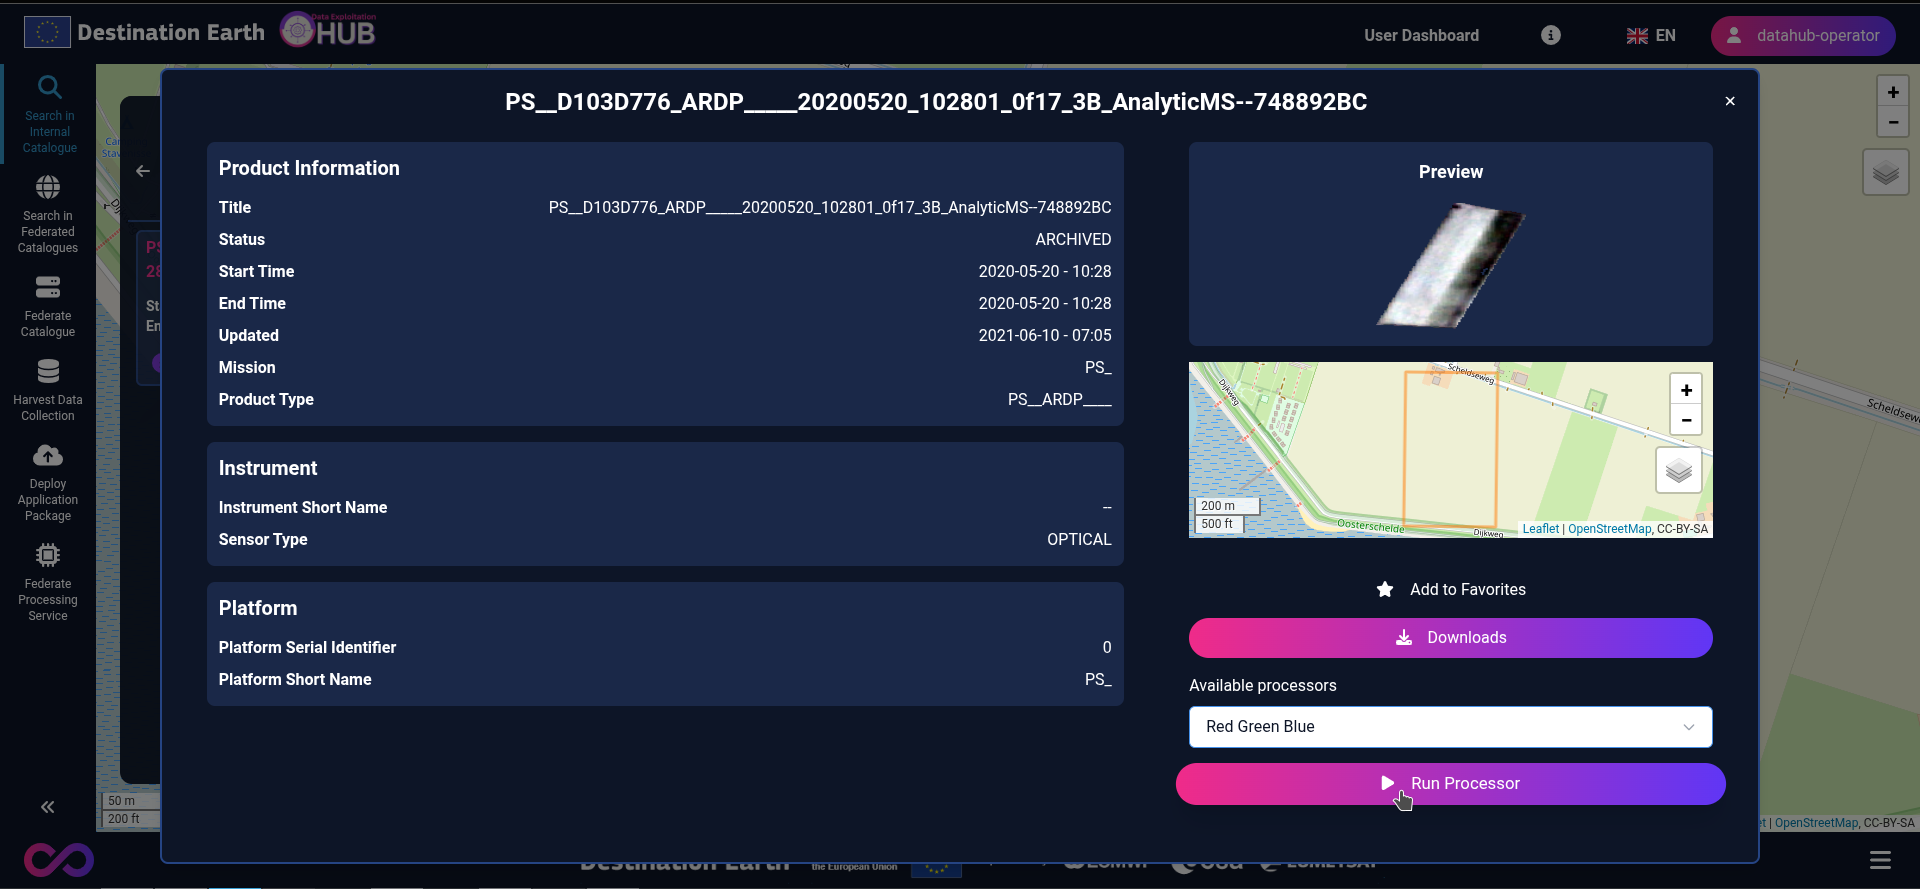
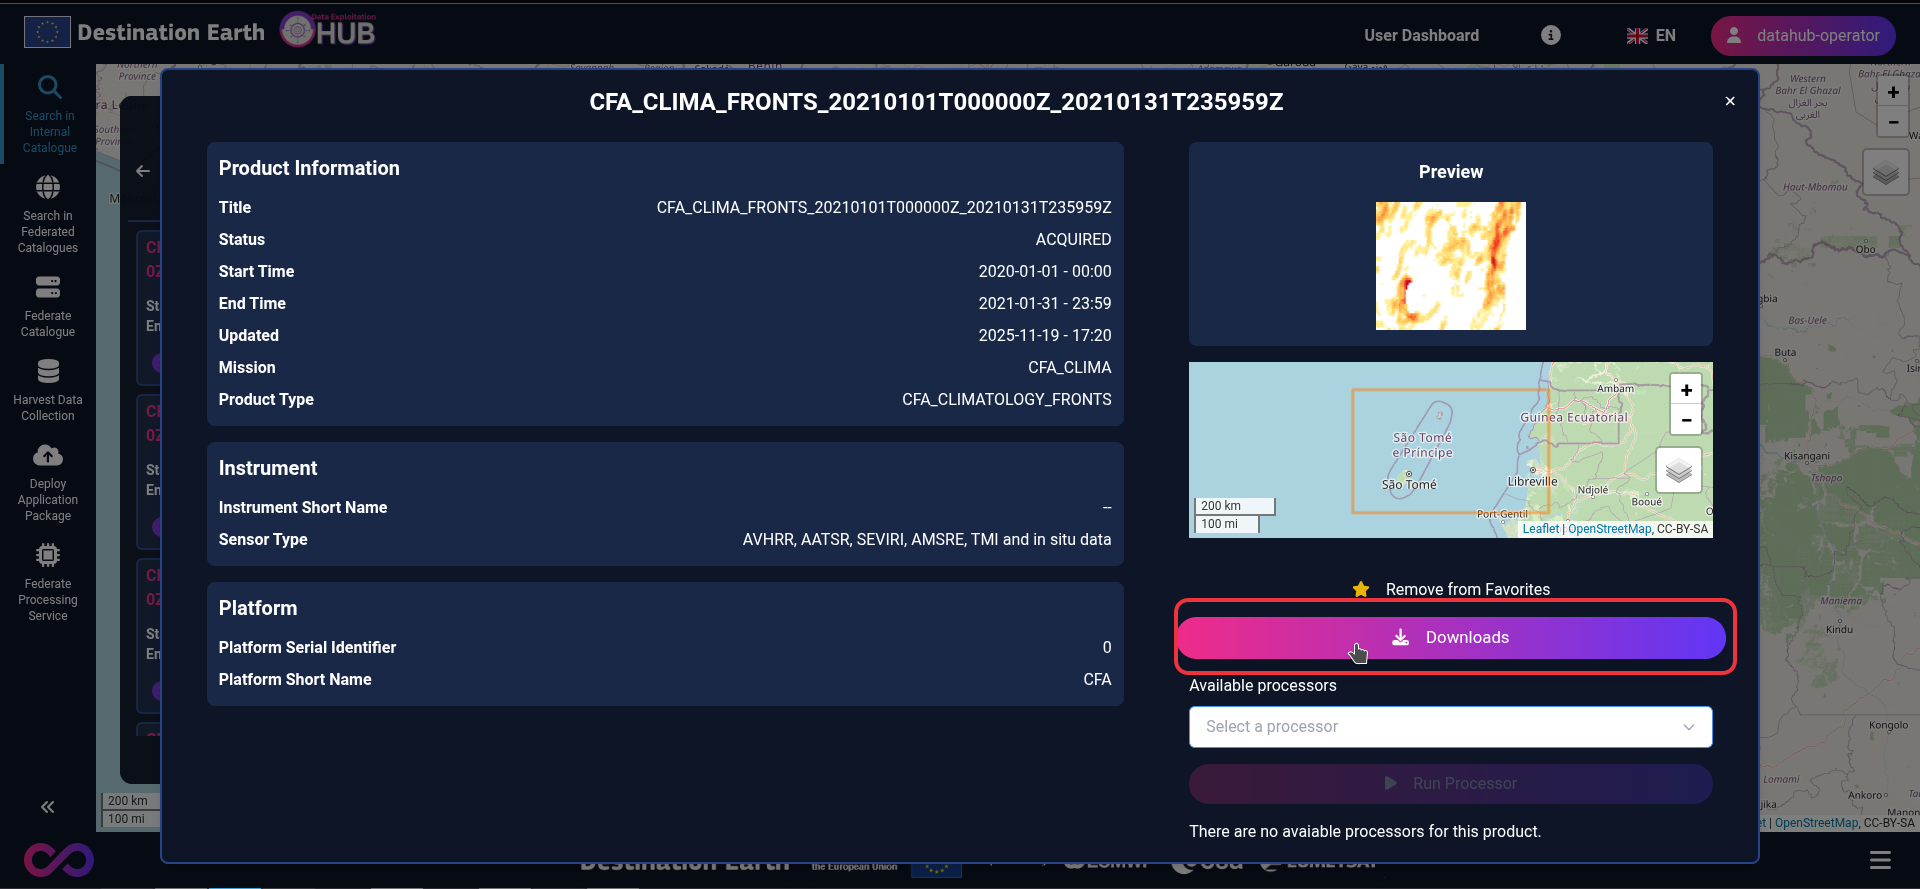
The Info button opens a dialog window that displays the full details of the selected result, including product information, instrument and platform details. It also allows users to add the result to their favorites, run a processor if available, download the result, view the thumbnail image or quicklook and display the product footprint on the map.
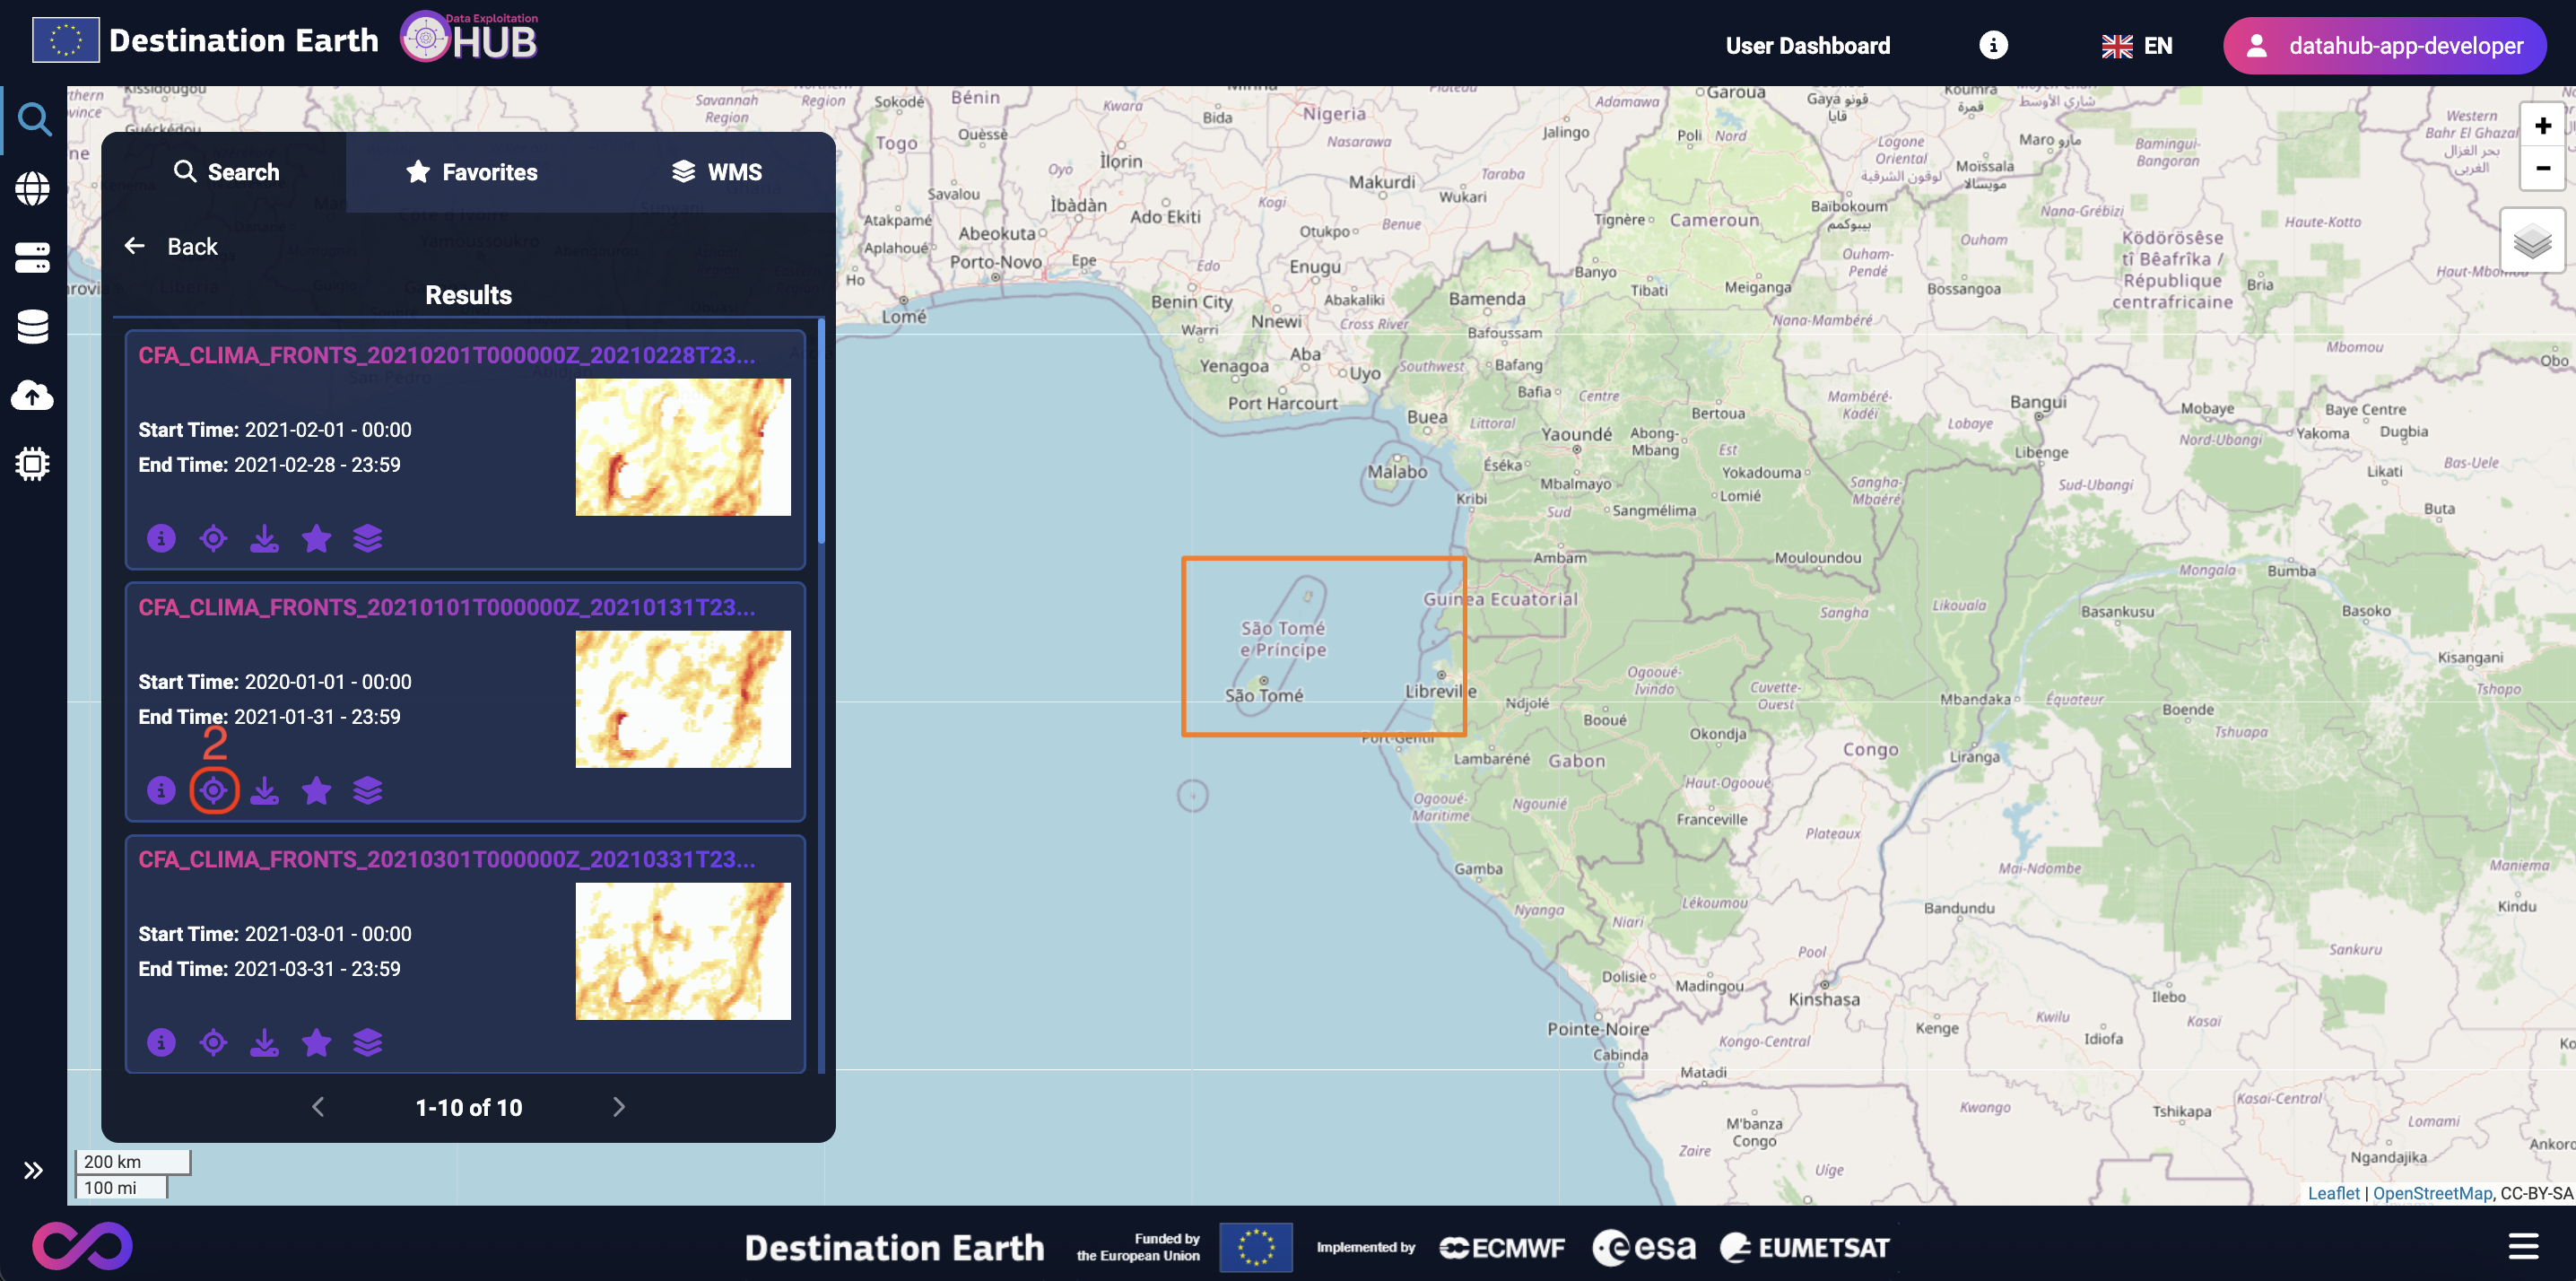
Zoom to area
The Zoom button allows the user to focus closely on the area of the currently selected result, providing a detailed view of its location on the map.
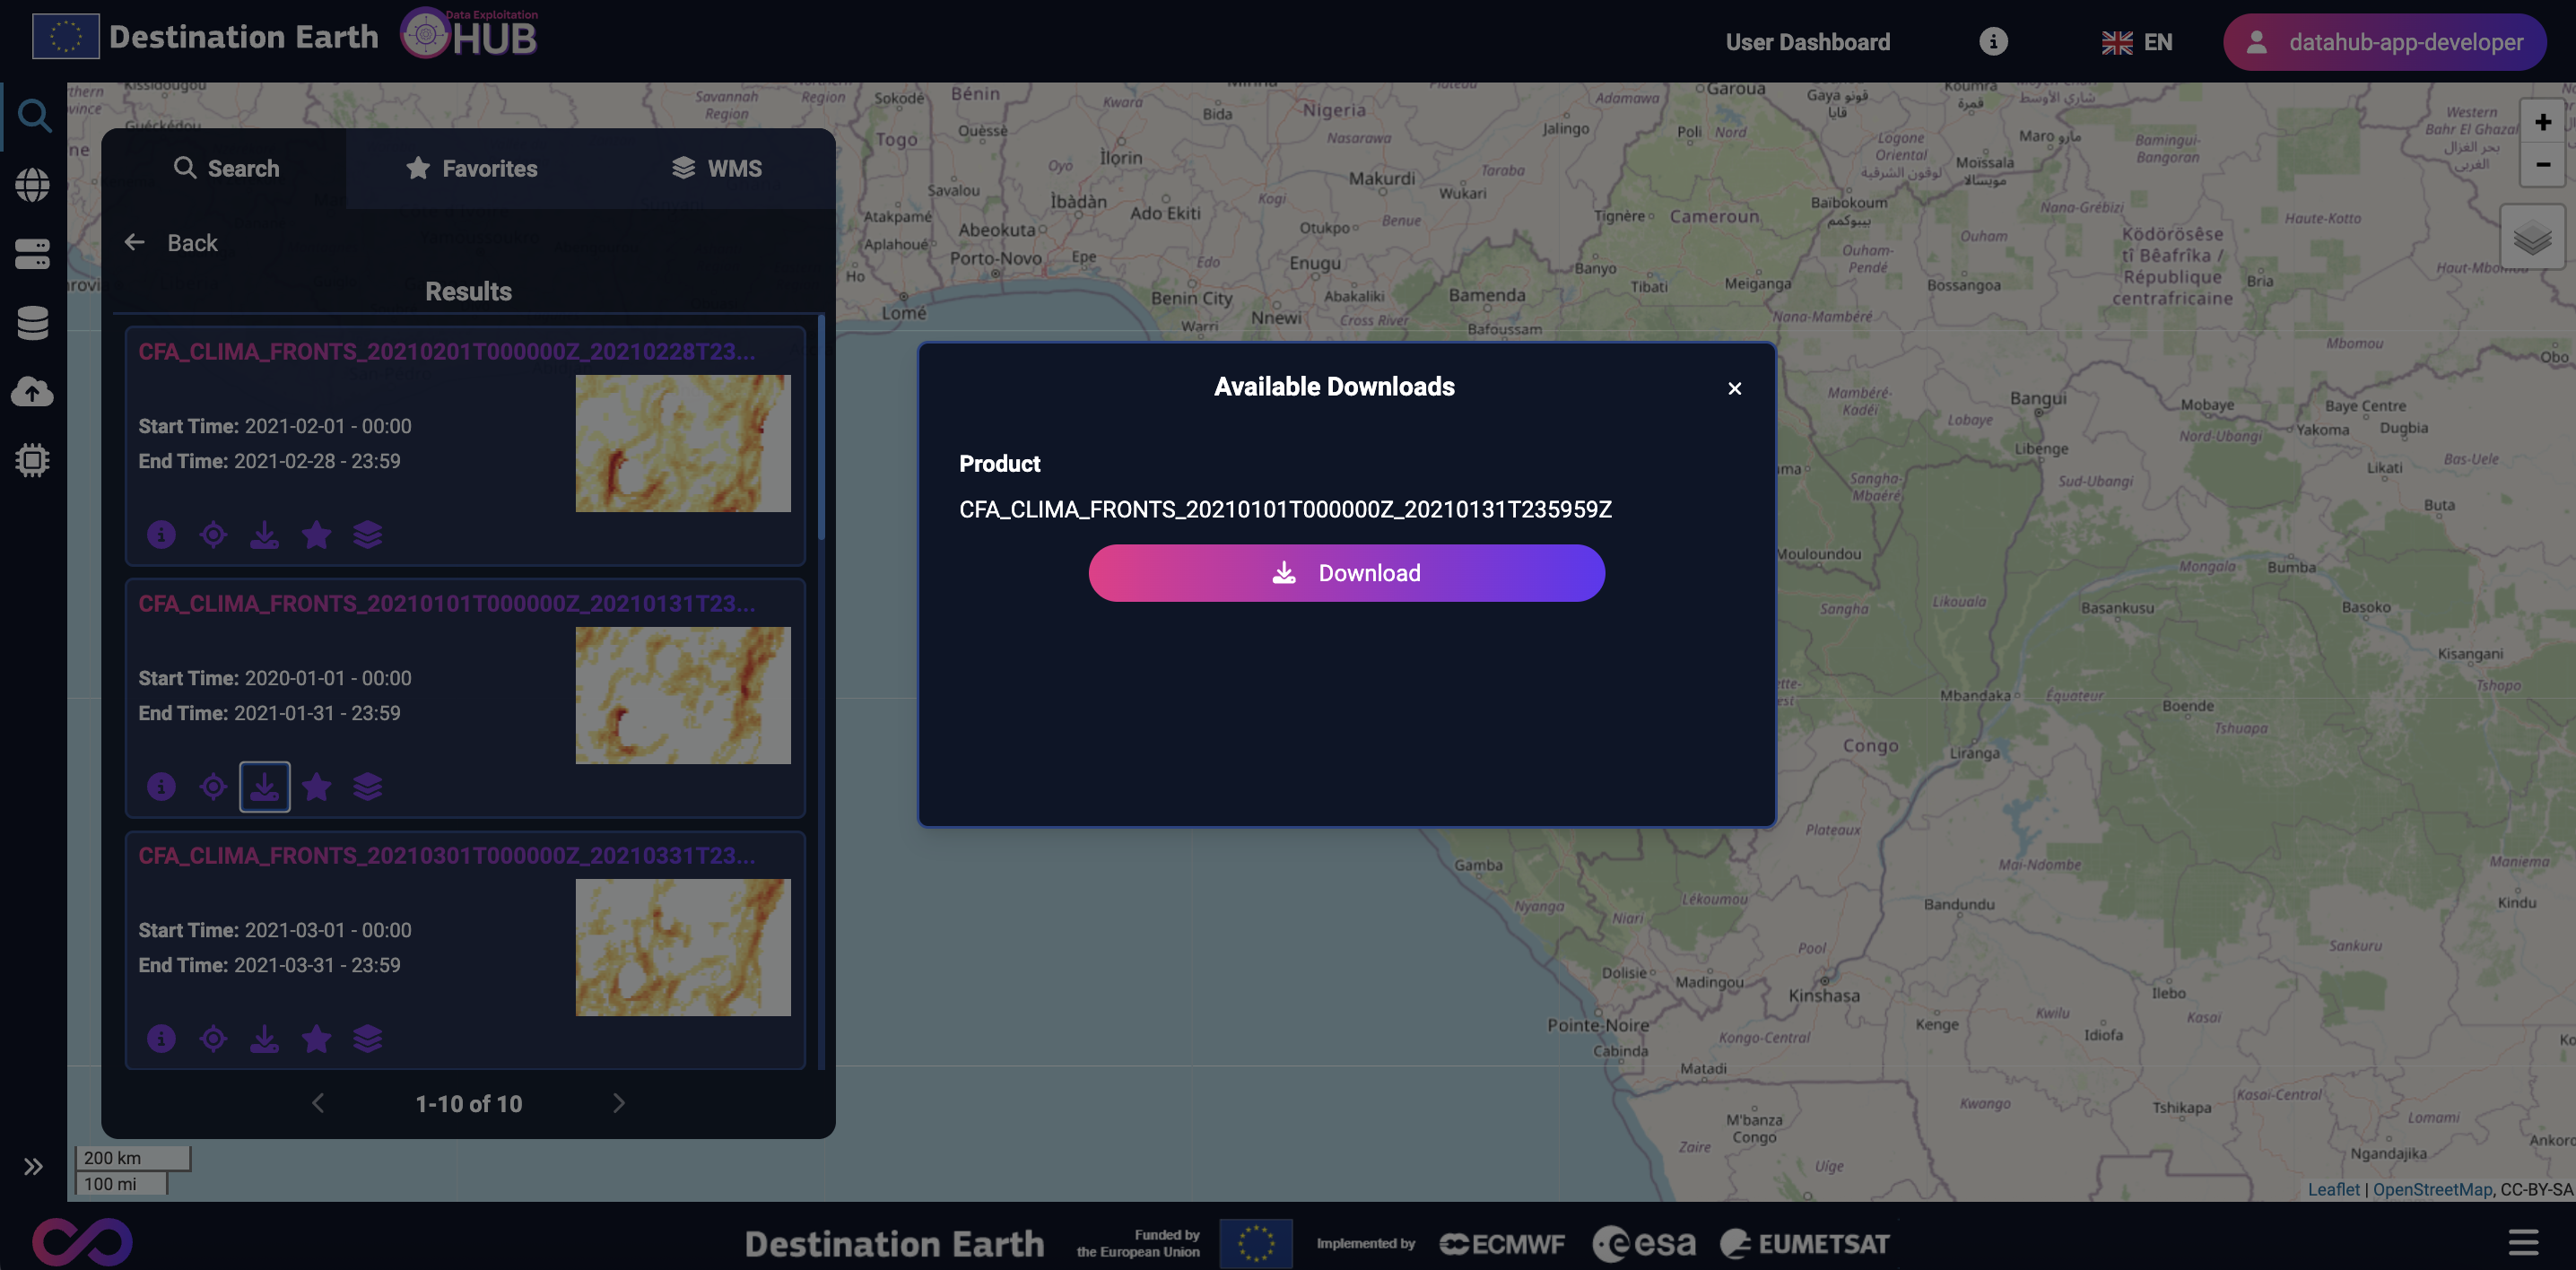
Download
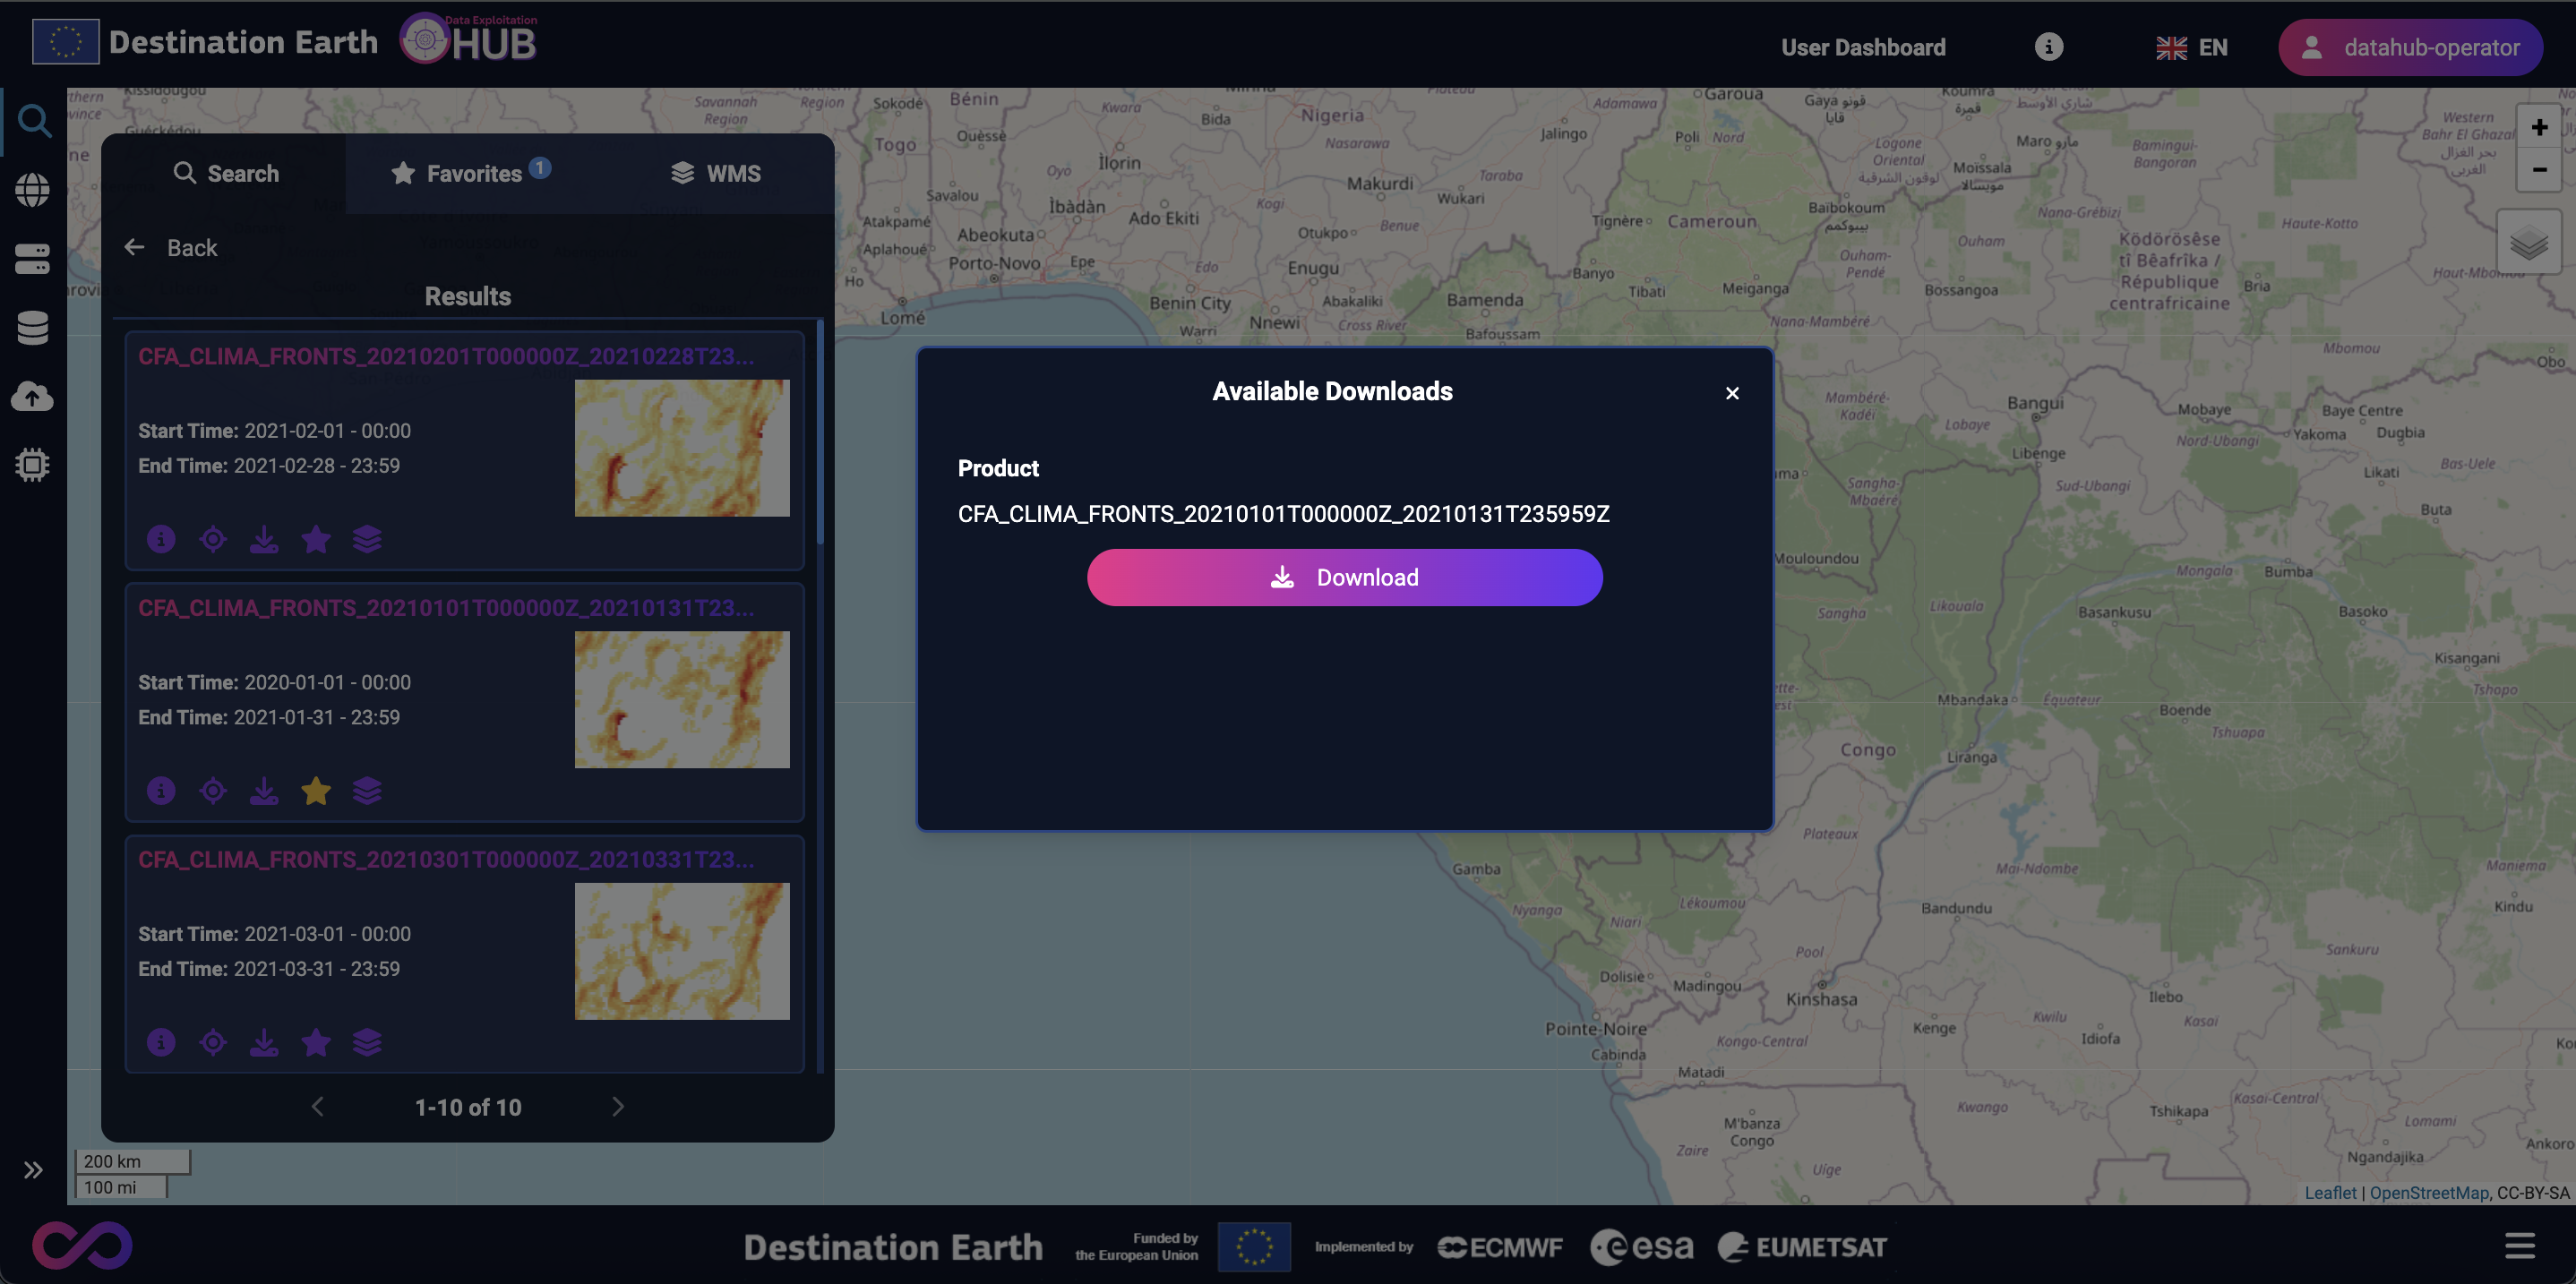
Clicking the Download button opens a dialog window that allows the user to download the list of available products for the selected result. Pressing in the download button will automatically start the download in the user’s browser.
Add to Favorites
By pressing the Start button, the current result will be added to your favorites.
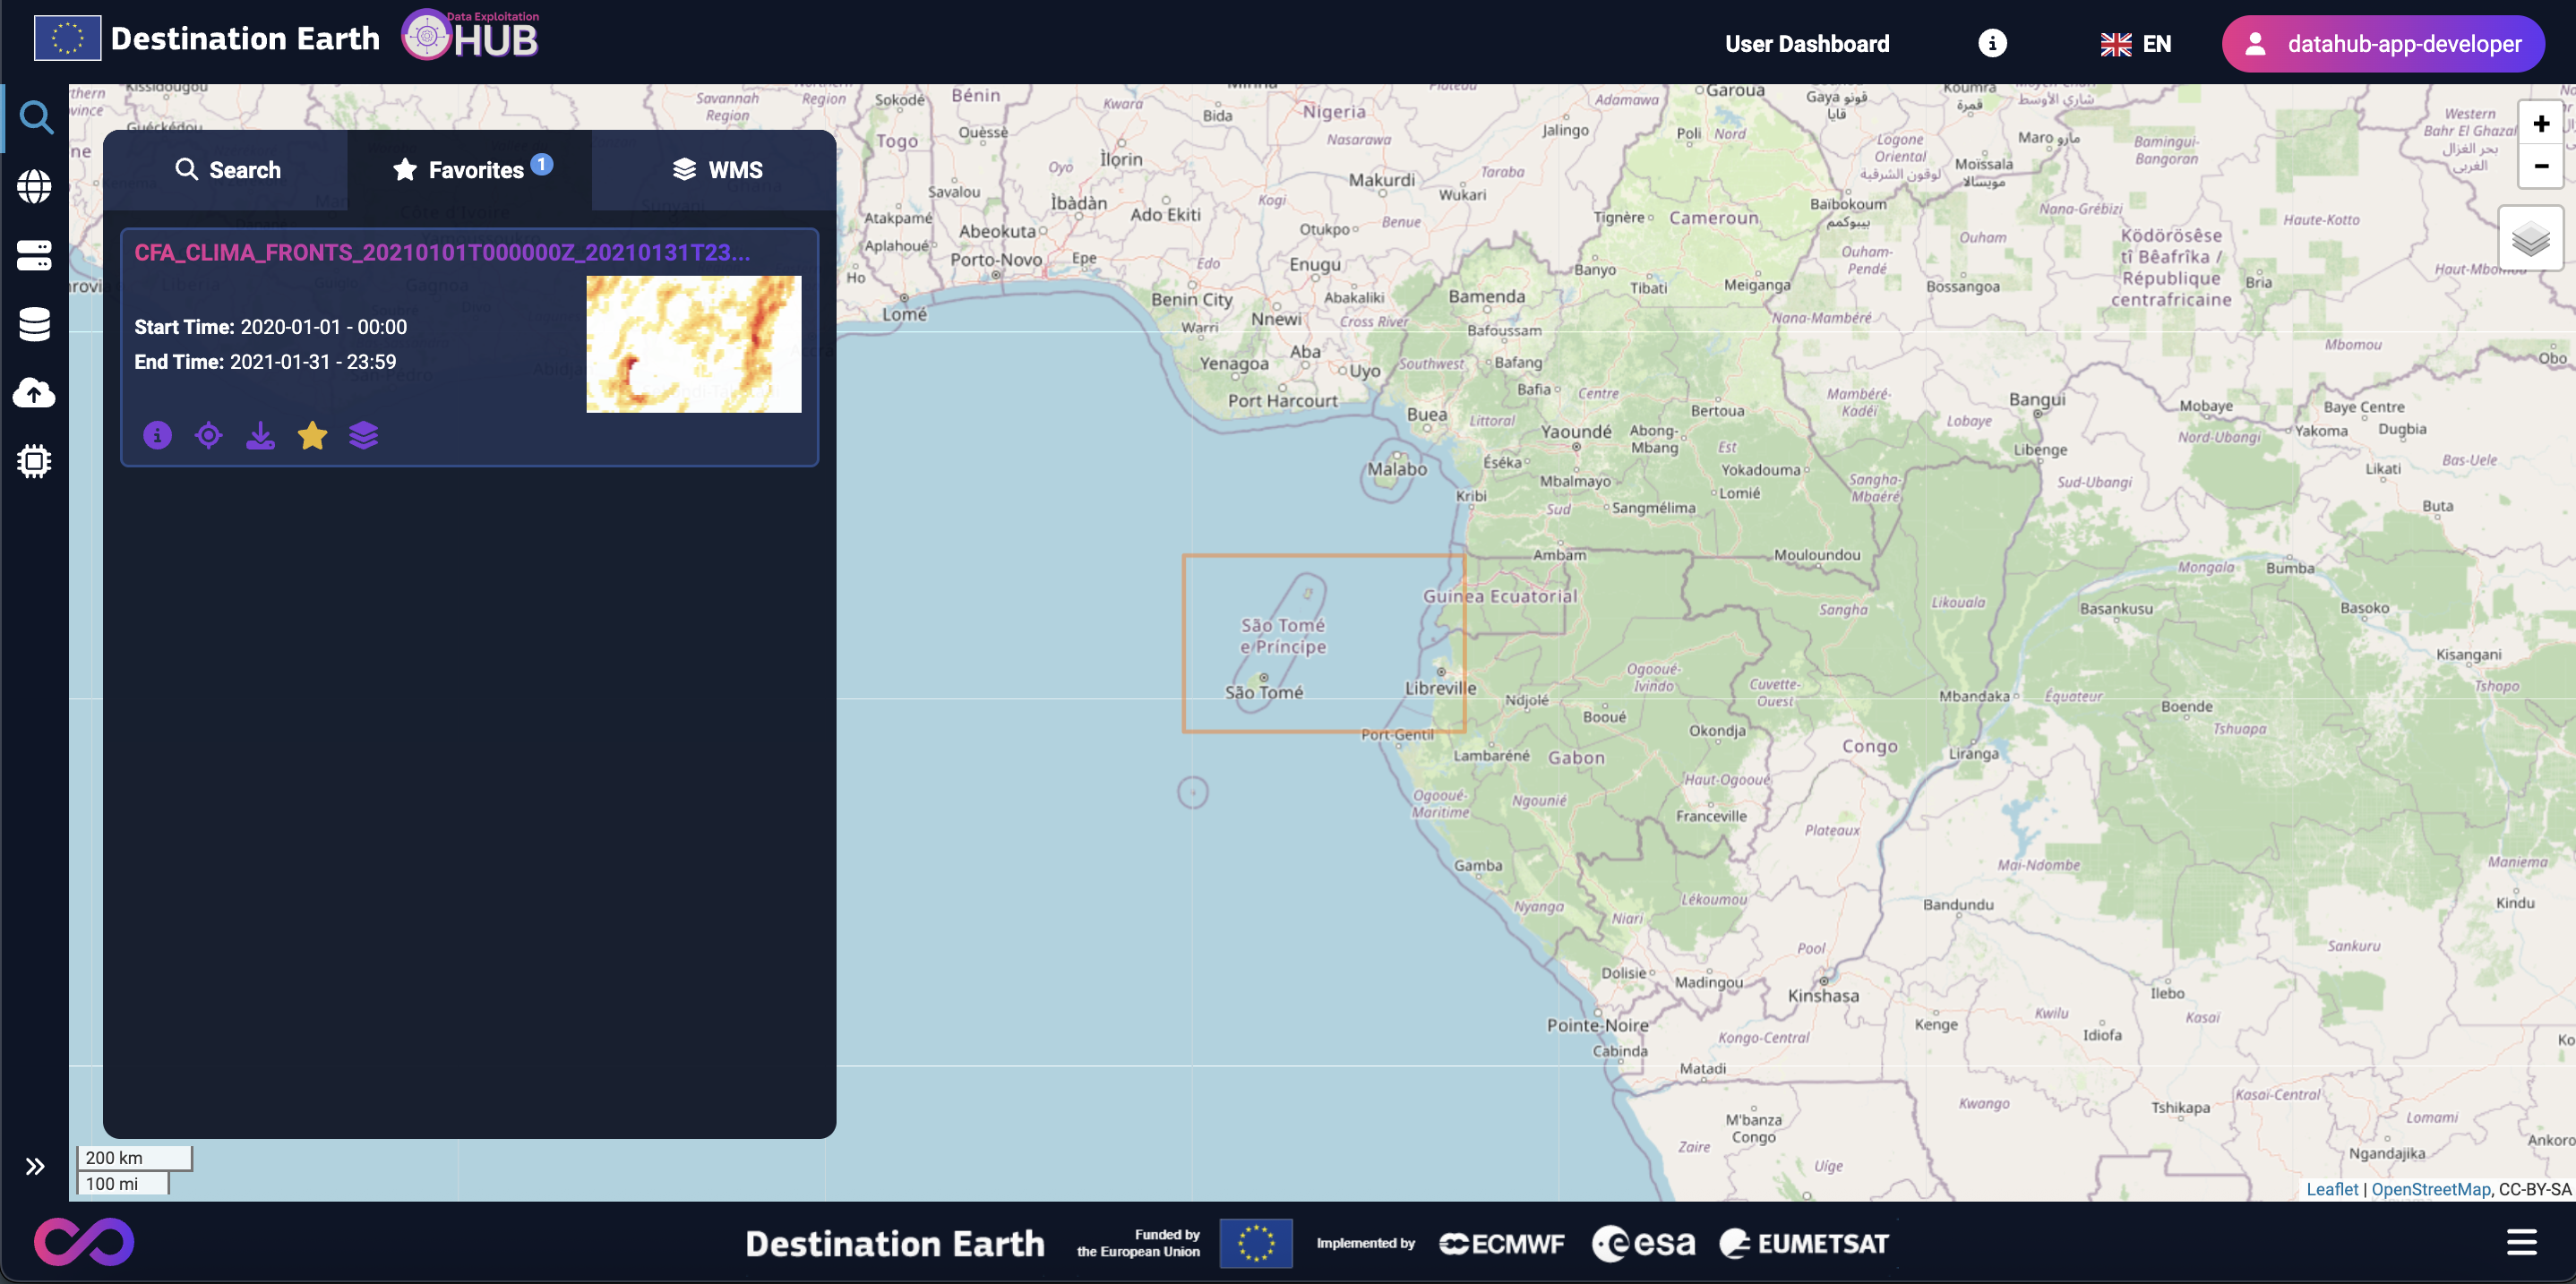
After marking a result as a favorite, it can be viewed in the Favorites tab. This tab stores your favorite results in the browser’s cache, so they are only available in the current browser. If you switch browsers or clear the browser’s cache, the saved favorites will no longer be displayed.
Visualize (WMS layer)
By clicking the Layers icon, the system will display the available WMS layers from the GeoServer. If the WMS layer is not available, the button will not be visible.
Visualize Products
The visualization of products is available through the Search in Internal Catalogue and Search in Federated Catalogues menus.
After selecting a data collection, a button is provided to enable the visualization of the corresponding layer.
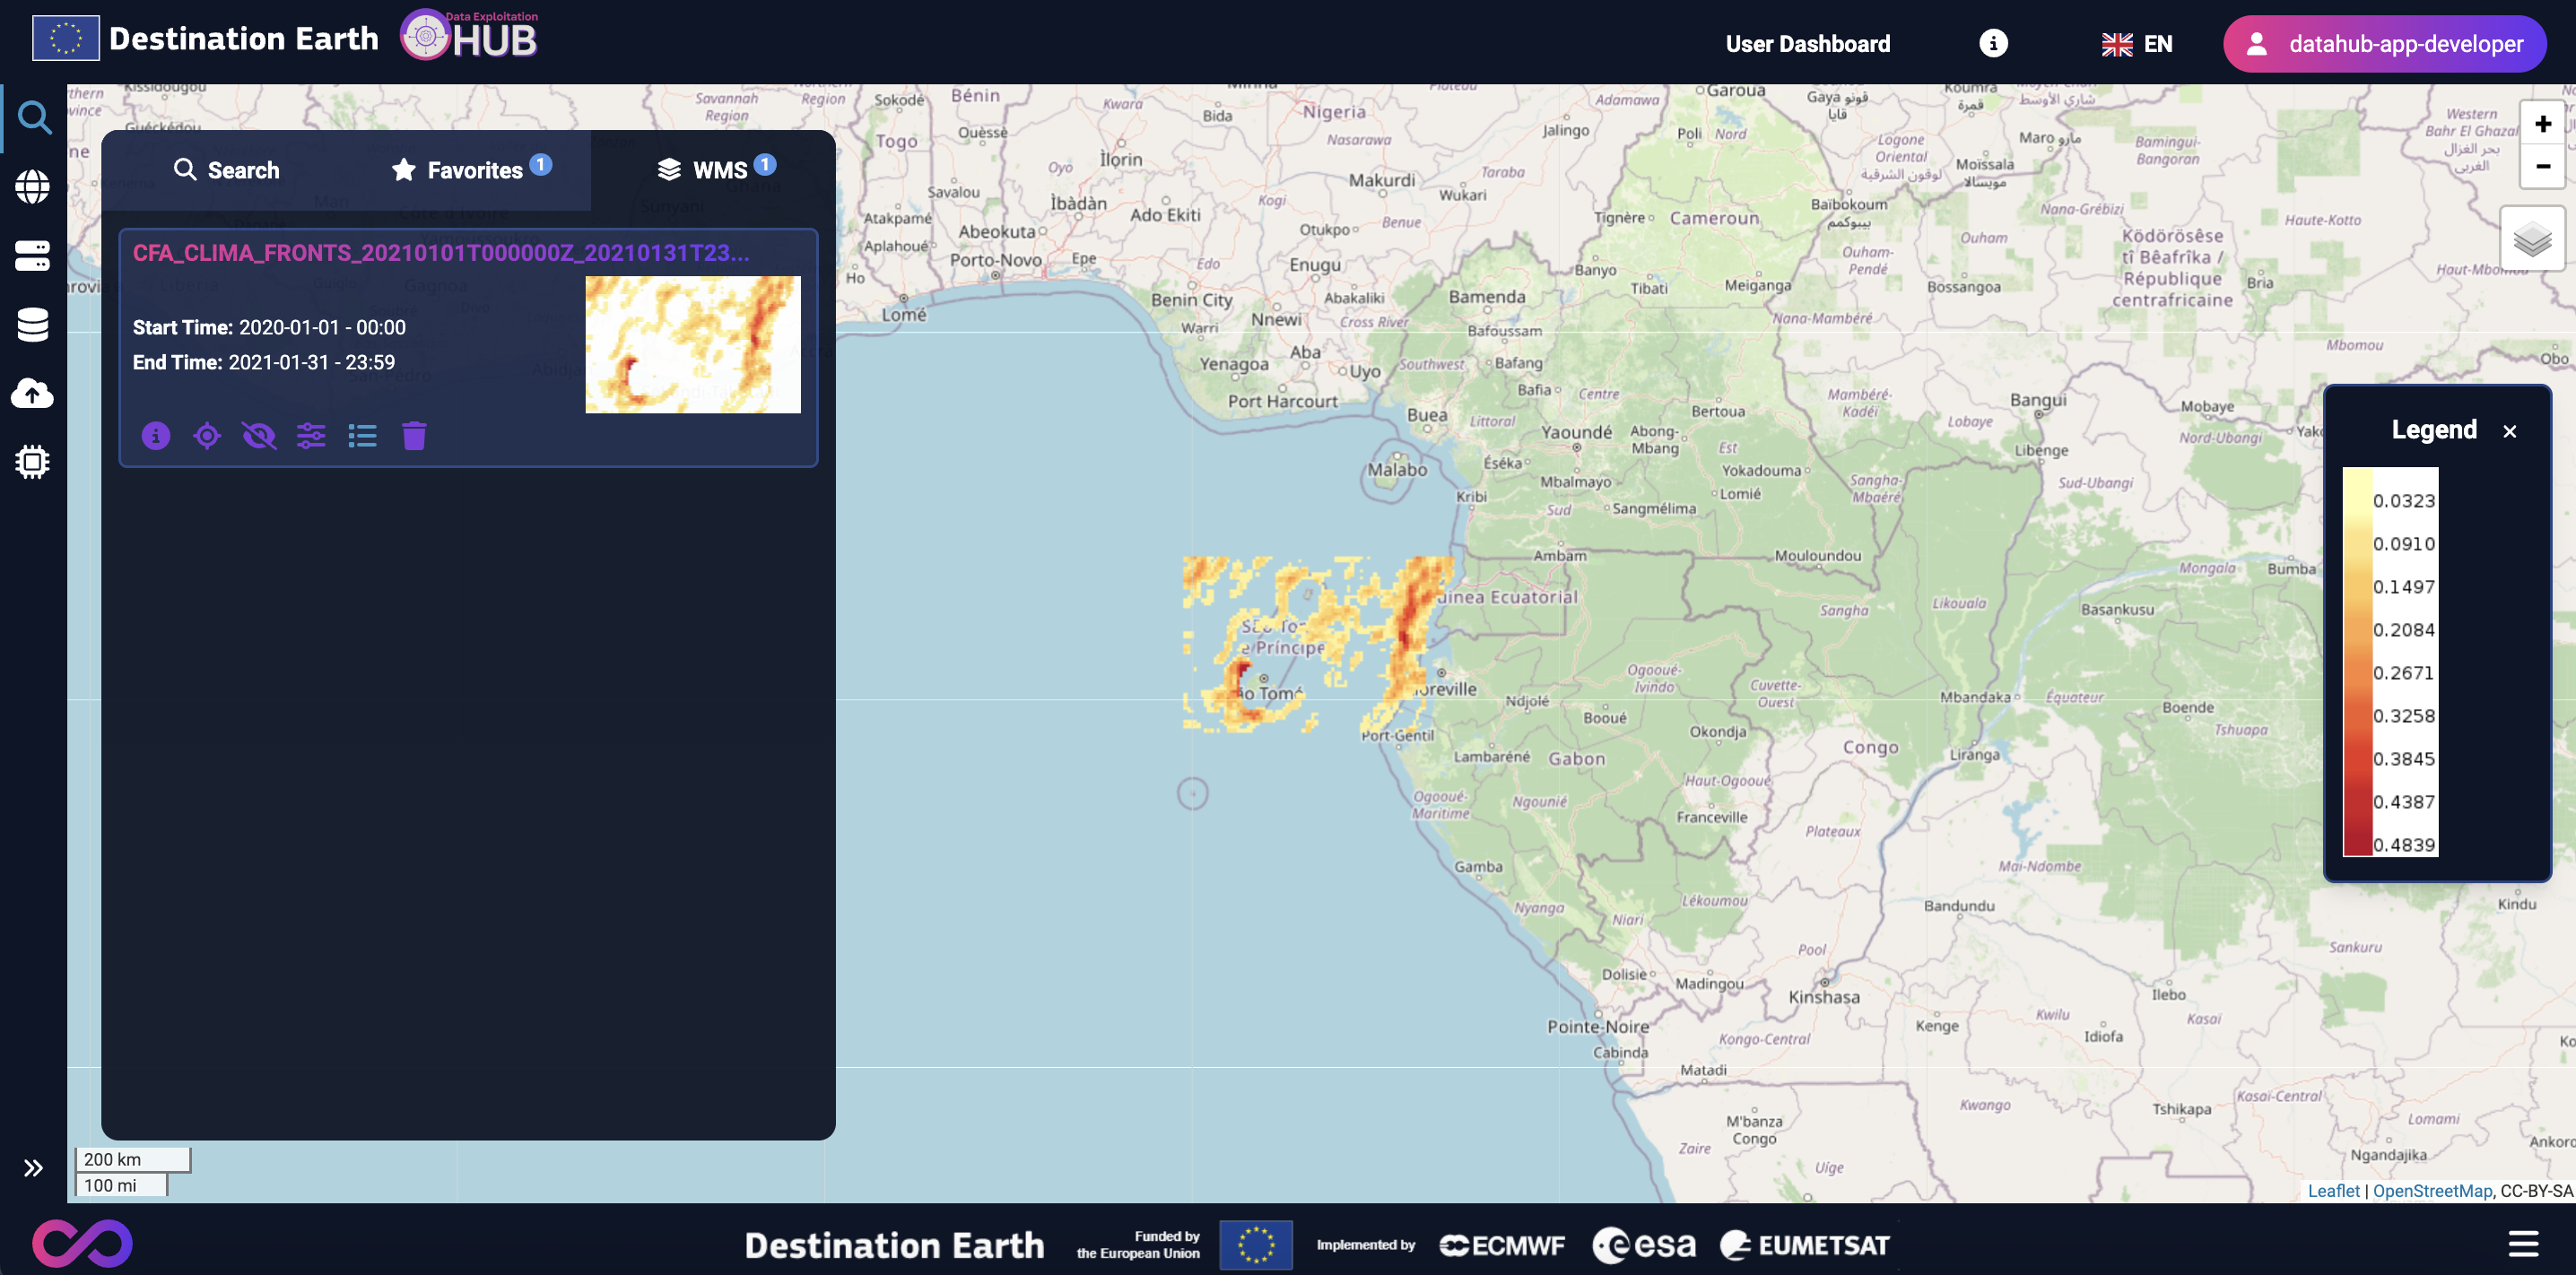
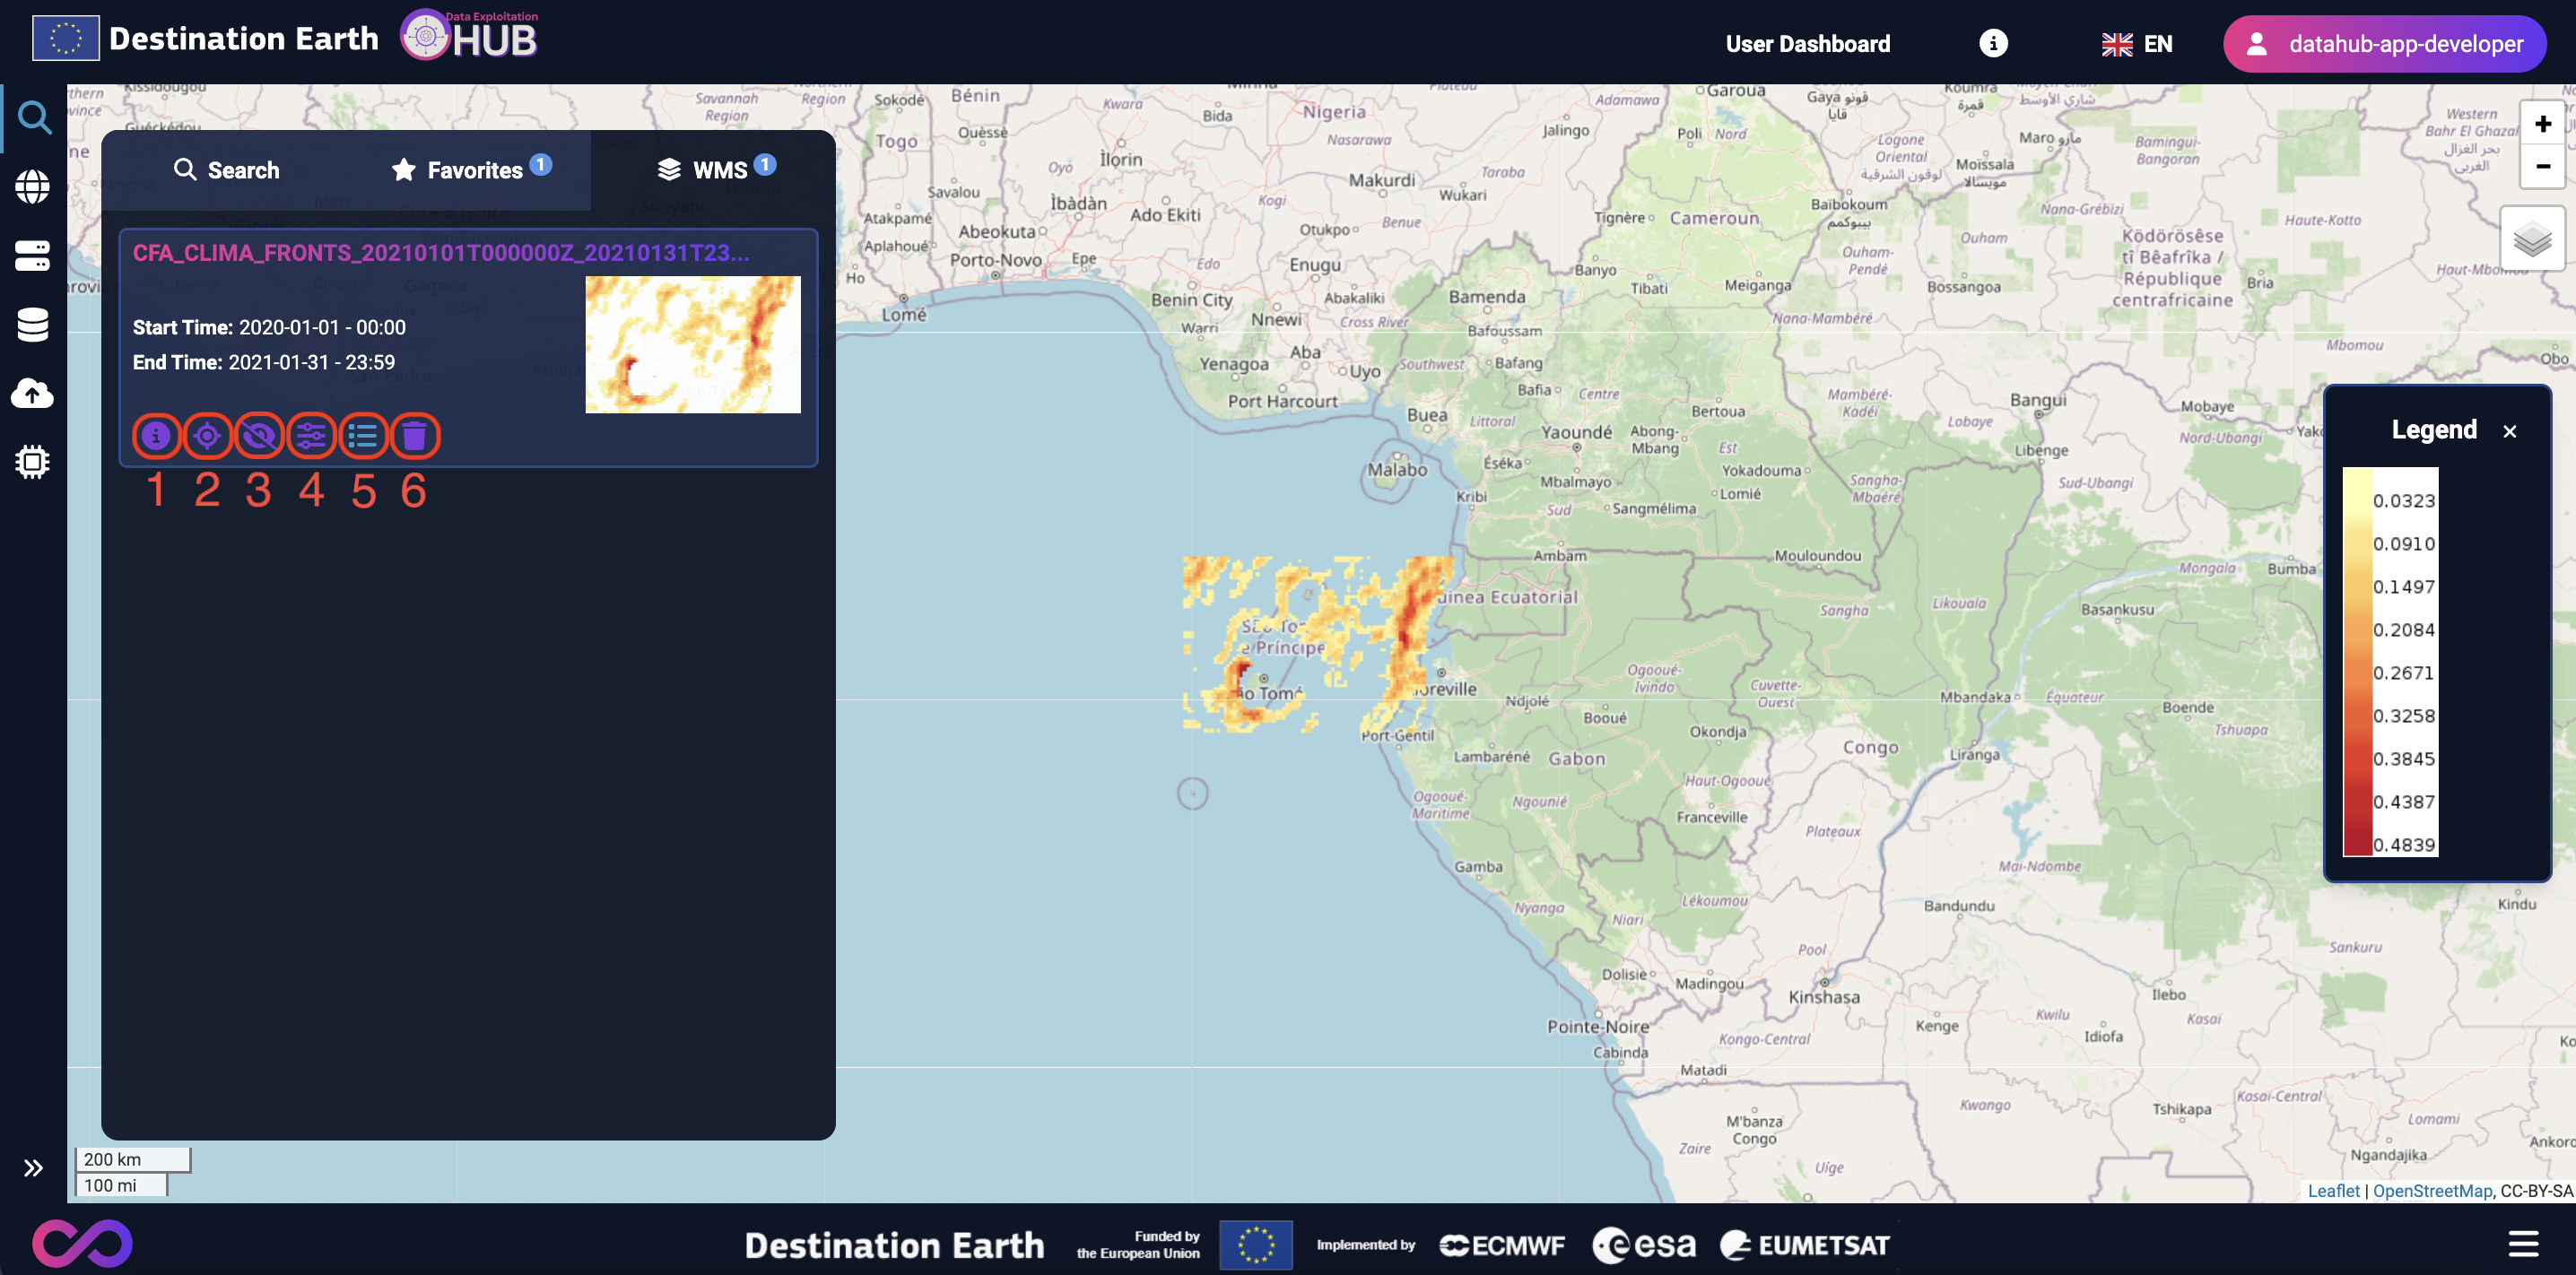
The WMS tab displays a list of all layers currently being visualized. Each layer card contains six buttons with the following functions:
Info — Displays detailed information about the current collection.
Zoom to Collection — Zooms the map to the area covered by the collection.
Show/Hide Layer — Toggles the visibility of the layer.
Layer Settings — Opens or closes the layer settings panel.
Layer Legend — Opens or closes the layer legend.
Delete Layer — Removes the layer from the visualization list.
Submit Processing Orders
As mentioned earlier, the Data Exploitation Hub allows users to run processors on selected data collections. This option is available from each data collection card through the Info button.
After clicking the Info button, a dialog window opens with detailed information about the collection. At the bottom of this window, an input selector is available (if a processor is available). Once a processor is selected, click the Run Processor button to start the processing task.
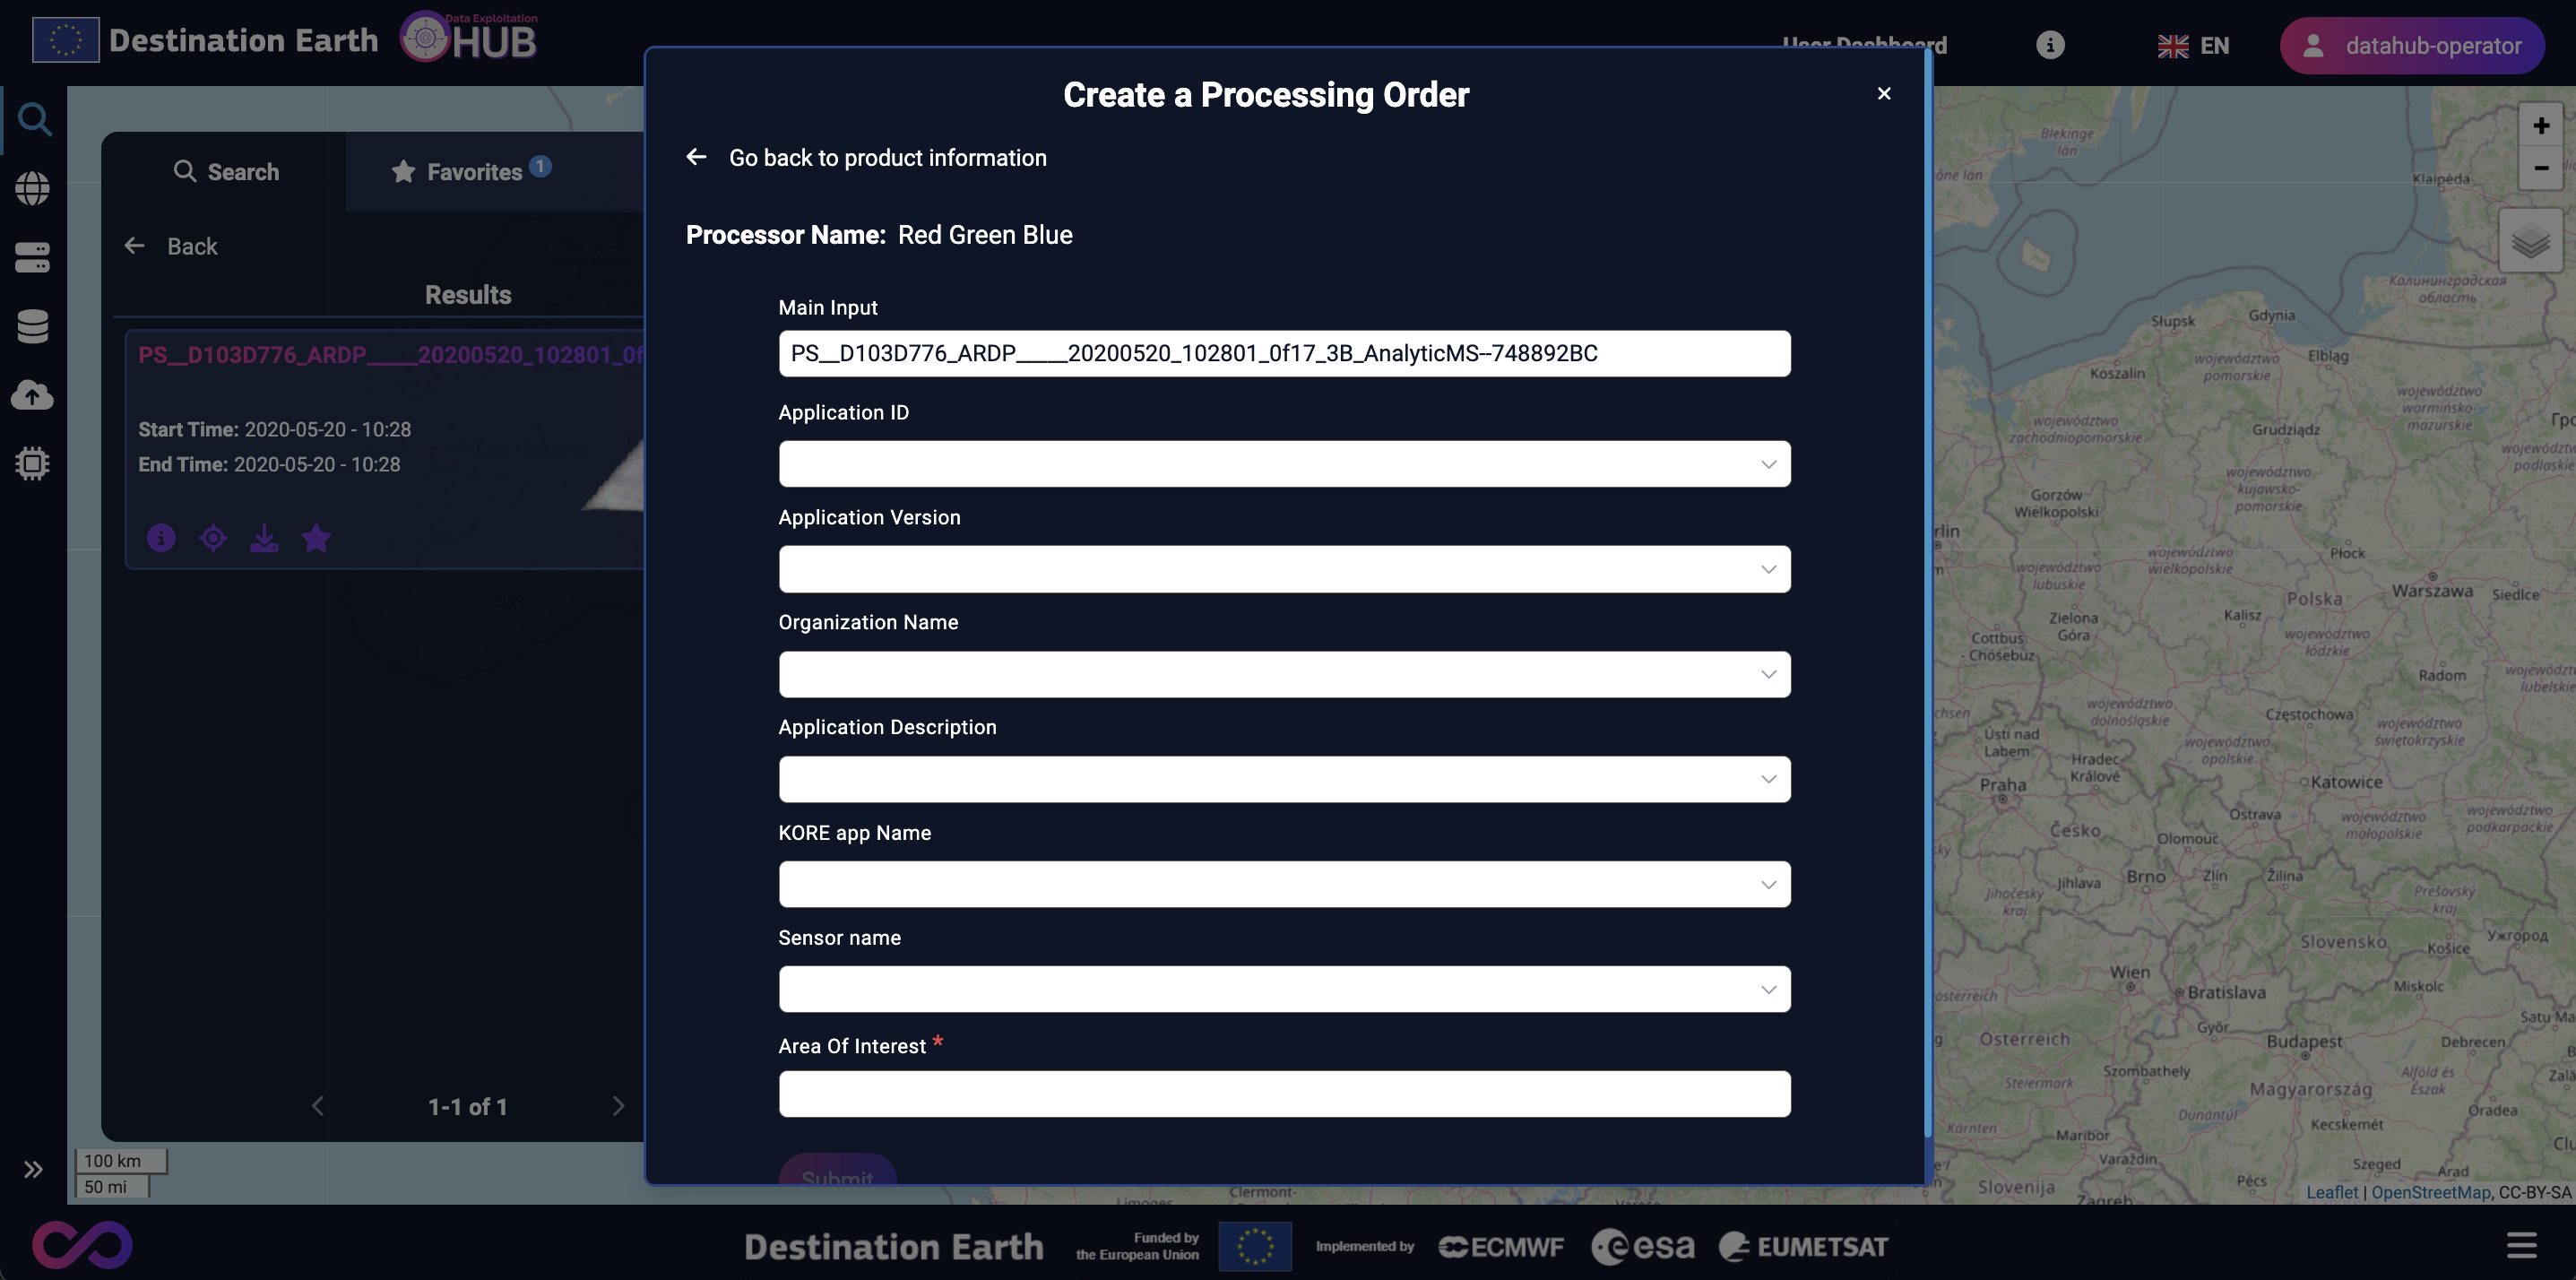
After clicking the Run Processor button, a form appears with input fields required to create a processing order. Fill in all the fields with the corresponding information, then click the Submit button to proceed.
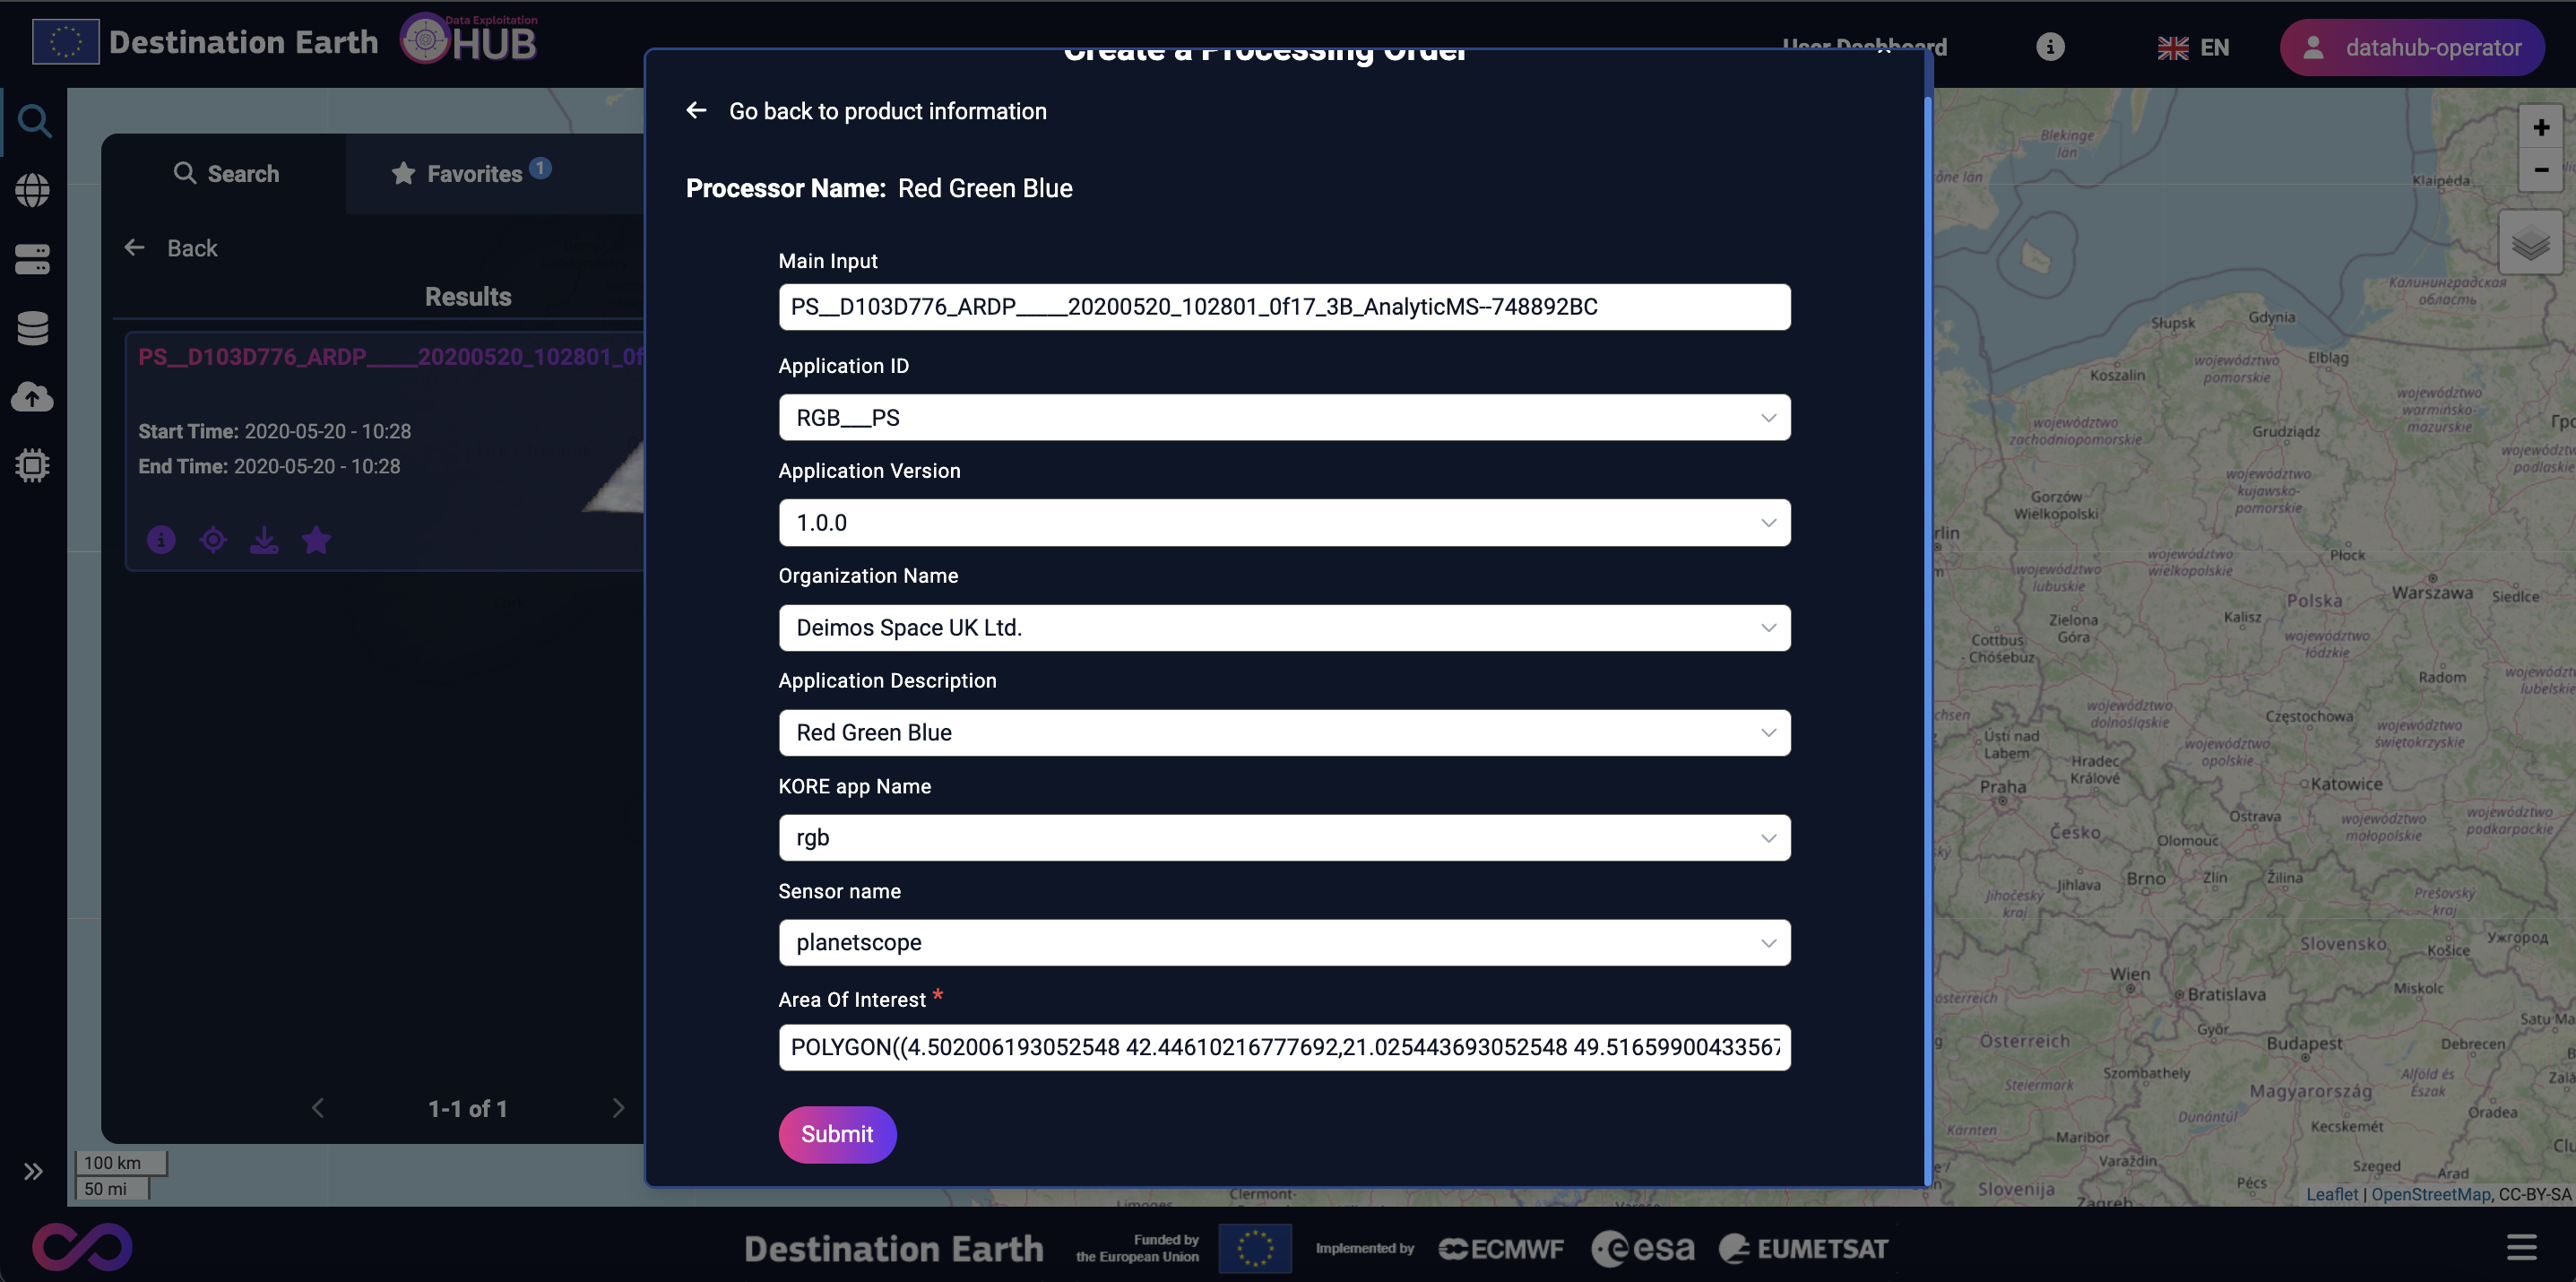
Once the processing order is submitted, a message is displayed indicating whether the creation was successful or if an error occurred.
If the creation is successful, the message includes a hyperlink to the Processing Status Dashboard, available in the User Dashboard. The status and details of the submitted processing order can be viewed from this dashboard.
Download Products
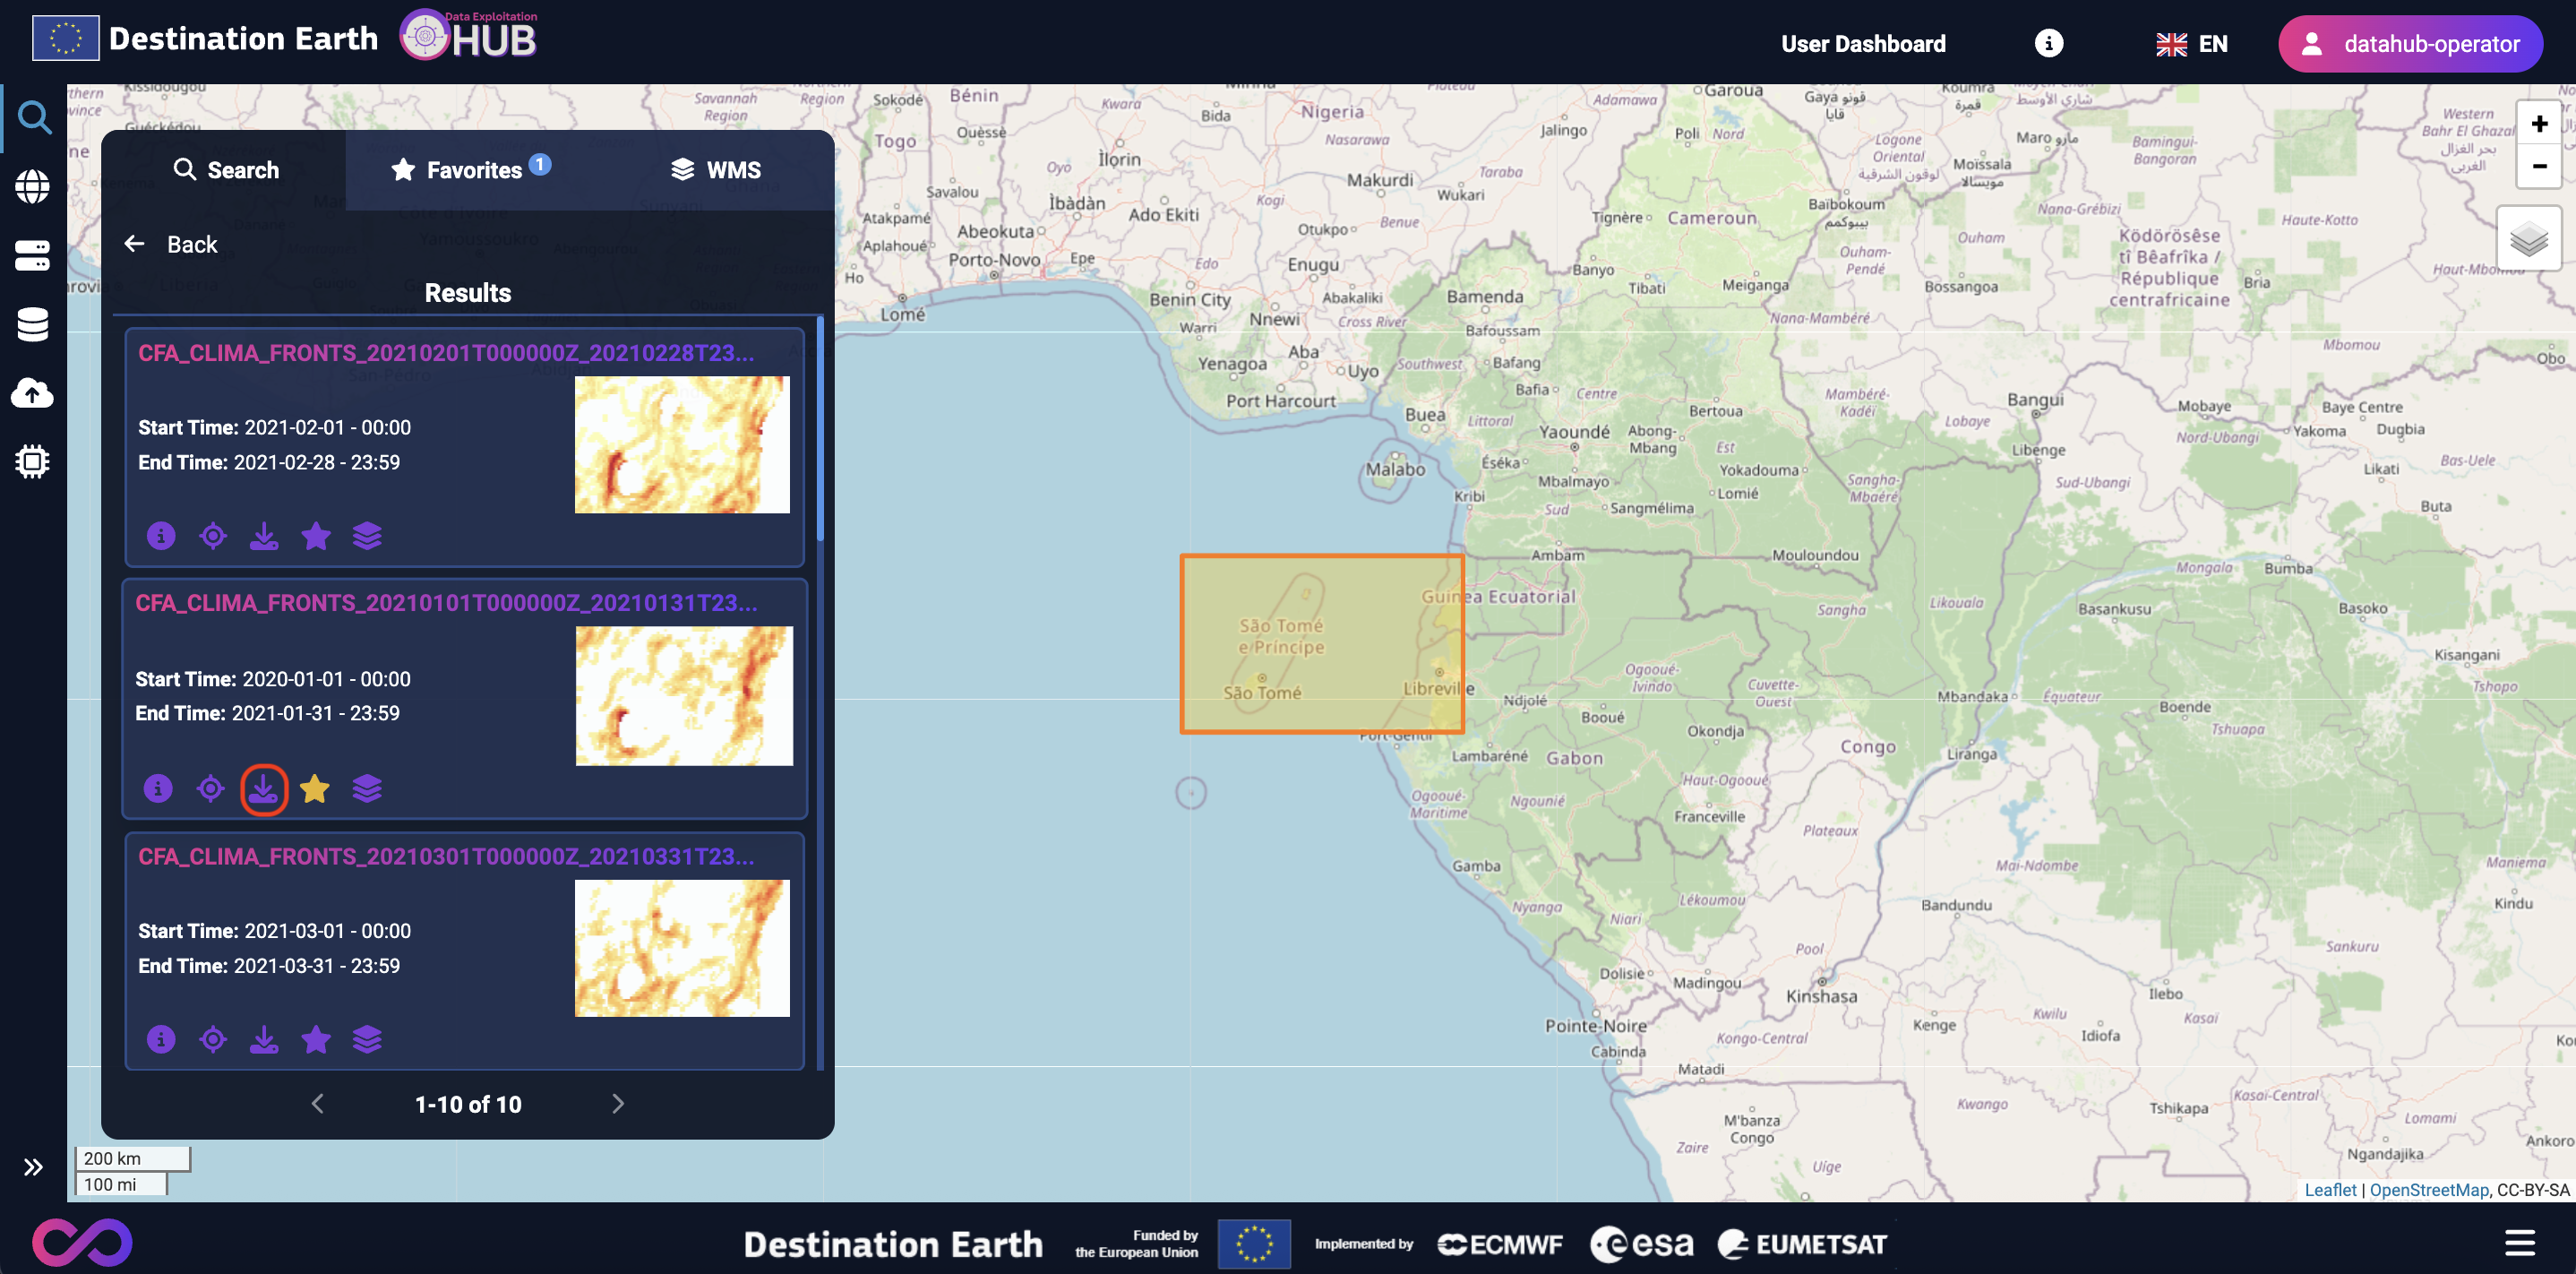
The Data Exploitation Hub also allows users to download products from data collections. This option is available by clicking the Download icon on the card of the desired product.
After clicking the icon, a dialog window opens displaying the list of available downloads. From this window, users can select the desired items and click the Download button to start the download process.
Note
The Data Exploitation Hub does not allow downloading files in zarr format.
The download of products is also available through the Info dialog window, using the Downloads button.
Submit Data
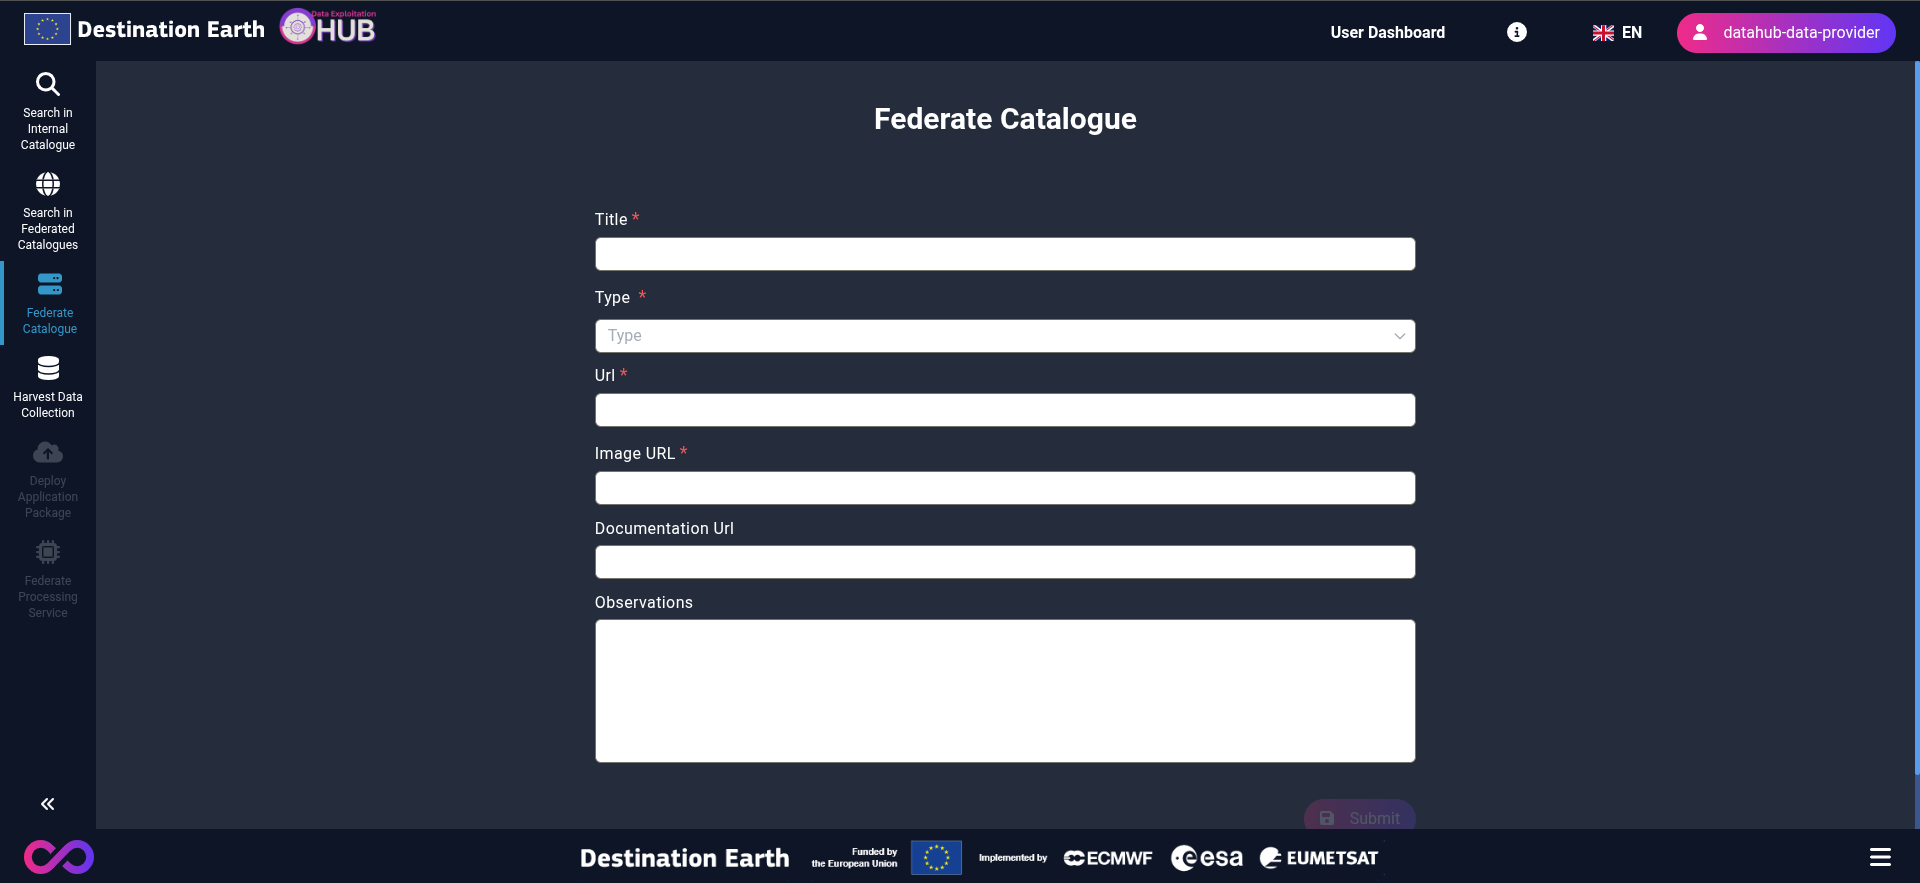
Federate a Catalogue
The user begins by logging into the Data Exploitation Hub using their DESP Identity and Access Management (IAM) credentials. After successful authentication the user can access the Federate Data Collection operation, where a form is presented.
Note
Access to the Federate Data Collection operation is restricted to users with the Data Provider role.
The user fills out the form with:
Title
Access Point API (Type: STAC/OpenSearch)
Access Point URL
Image URL
Documentation URL
Some observations
Then submits the request for validation. Once approved by Deimos Service Operators, the collection becomes available for all users.
Under the Federate Data Collection operation, the user can view the status and other details of previous submissions in their personal dashboard.
Harvest Data Collection
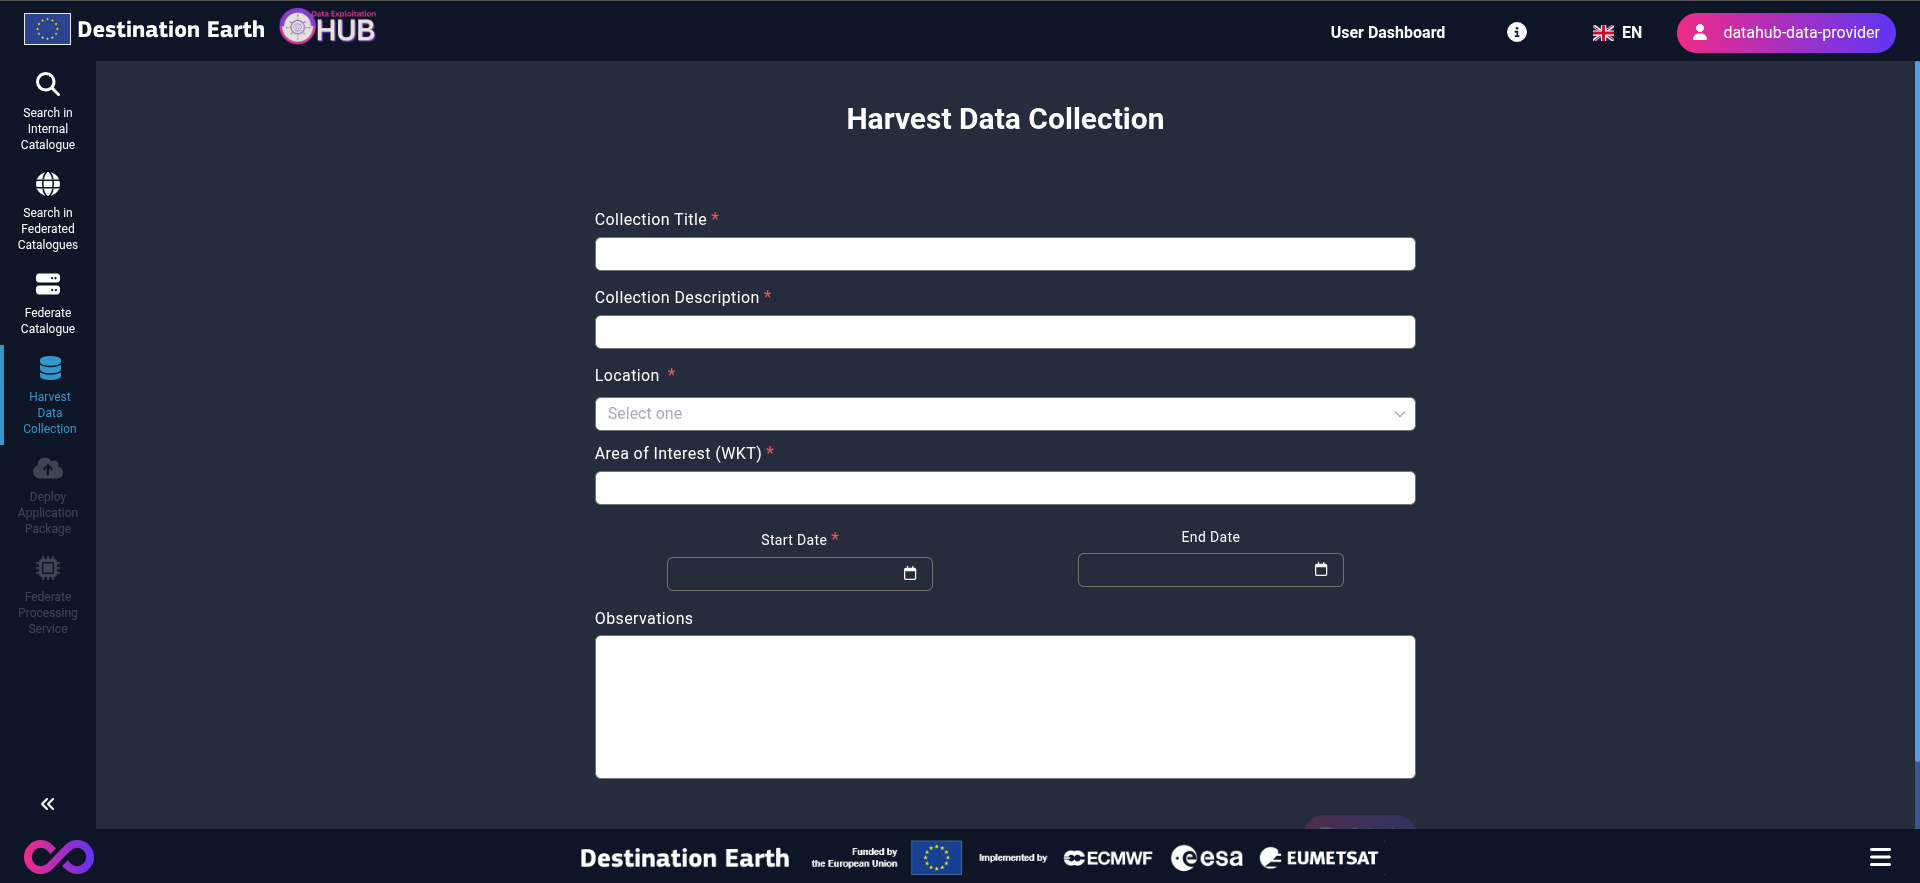
After logging in the user can access the Harvest Data Collection operation and fill a form including:
Note
Access to the Harvest Data Collection operation is restricted to users with the Data Provider role.
Collection Title and Description
Data Path (Location: FTP, Webservice or Other)
Area and Time of Interest (WKT)
Start/End Date
Some observations
The request is processed and validated by operators. Once approved, the data collection becomes discoverable and usable by all users.
Deploy Application Package
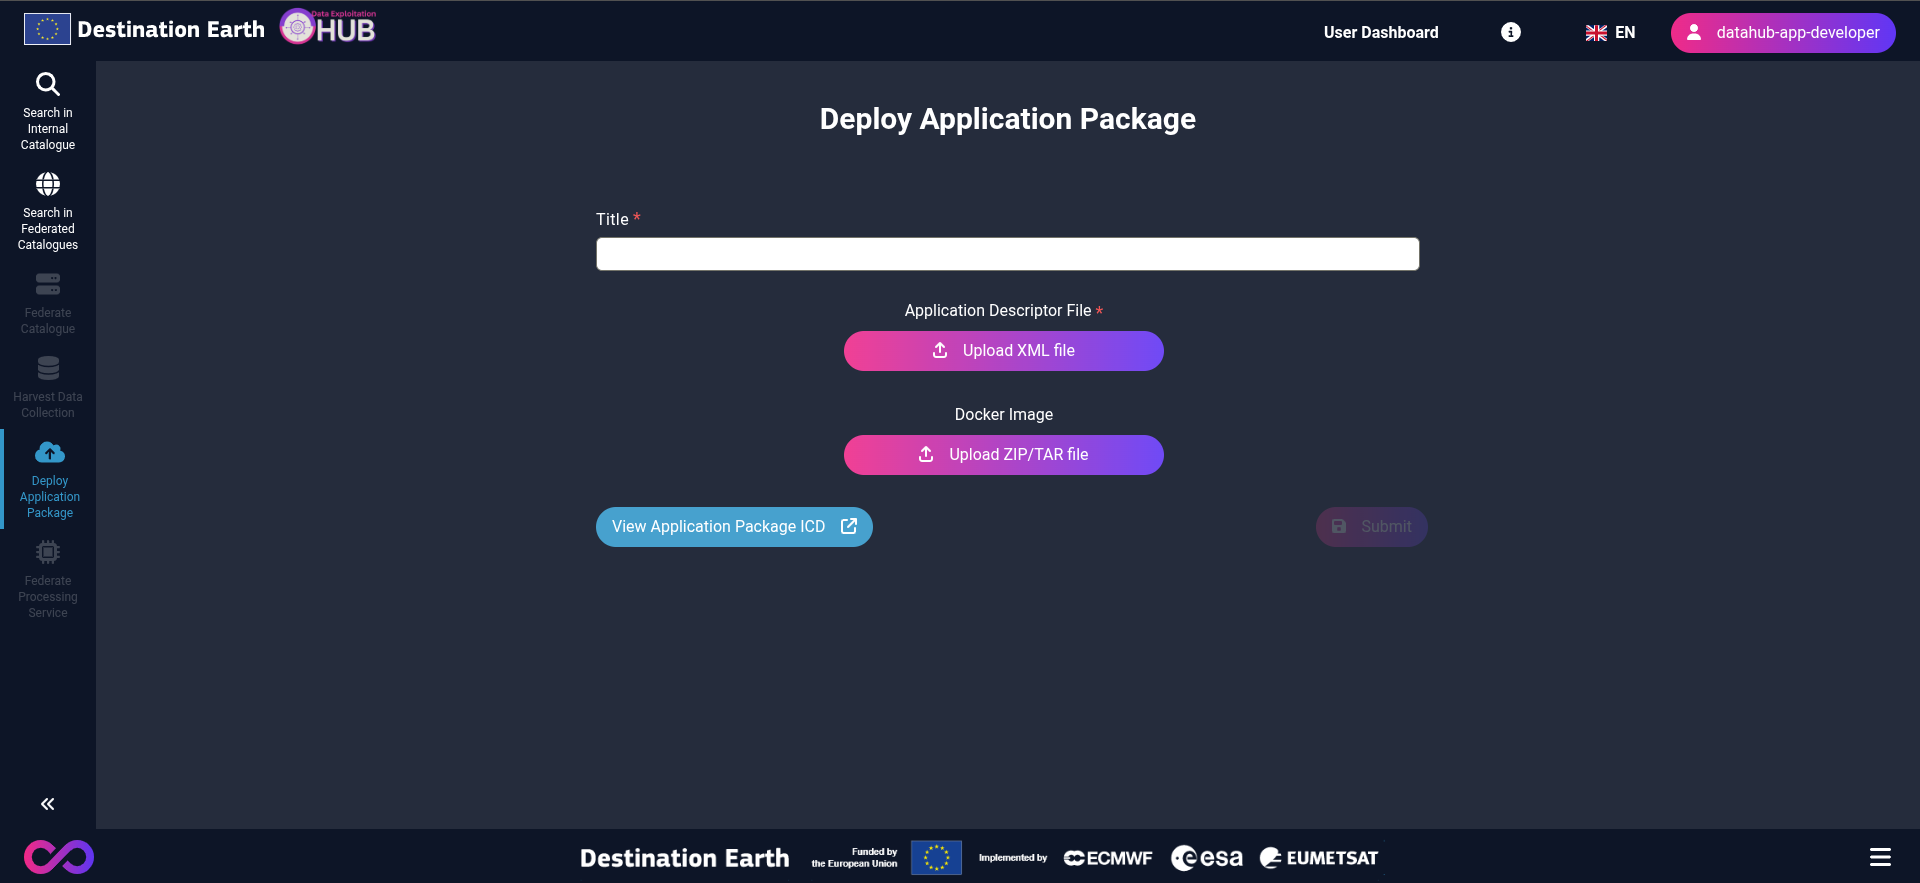
Deploy Application Package for allowing application developers to easily deploy their offline algorithms as cloud-based processing services for its orchestration, execution and monitoring
Note
Access to the Deploy Application Package operation is restricted to users with the App Developer role.
They provide:
Application metadata
Descriptor XML file
Docker image
Once validated, the package becomes available as a processing service. Users can track the status of submissions from their personal dashboard.
Federate a Processing Service
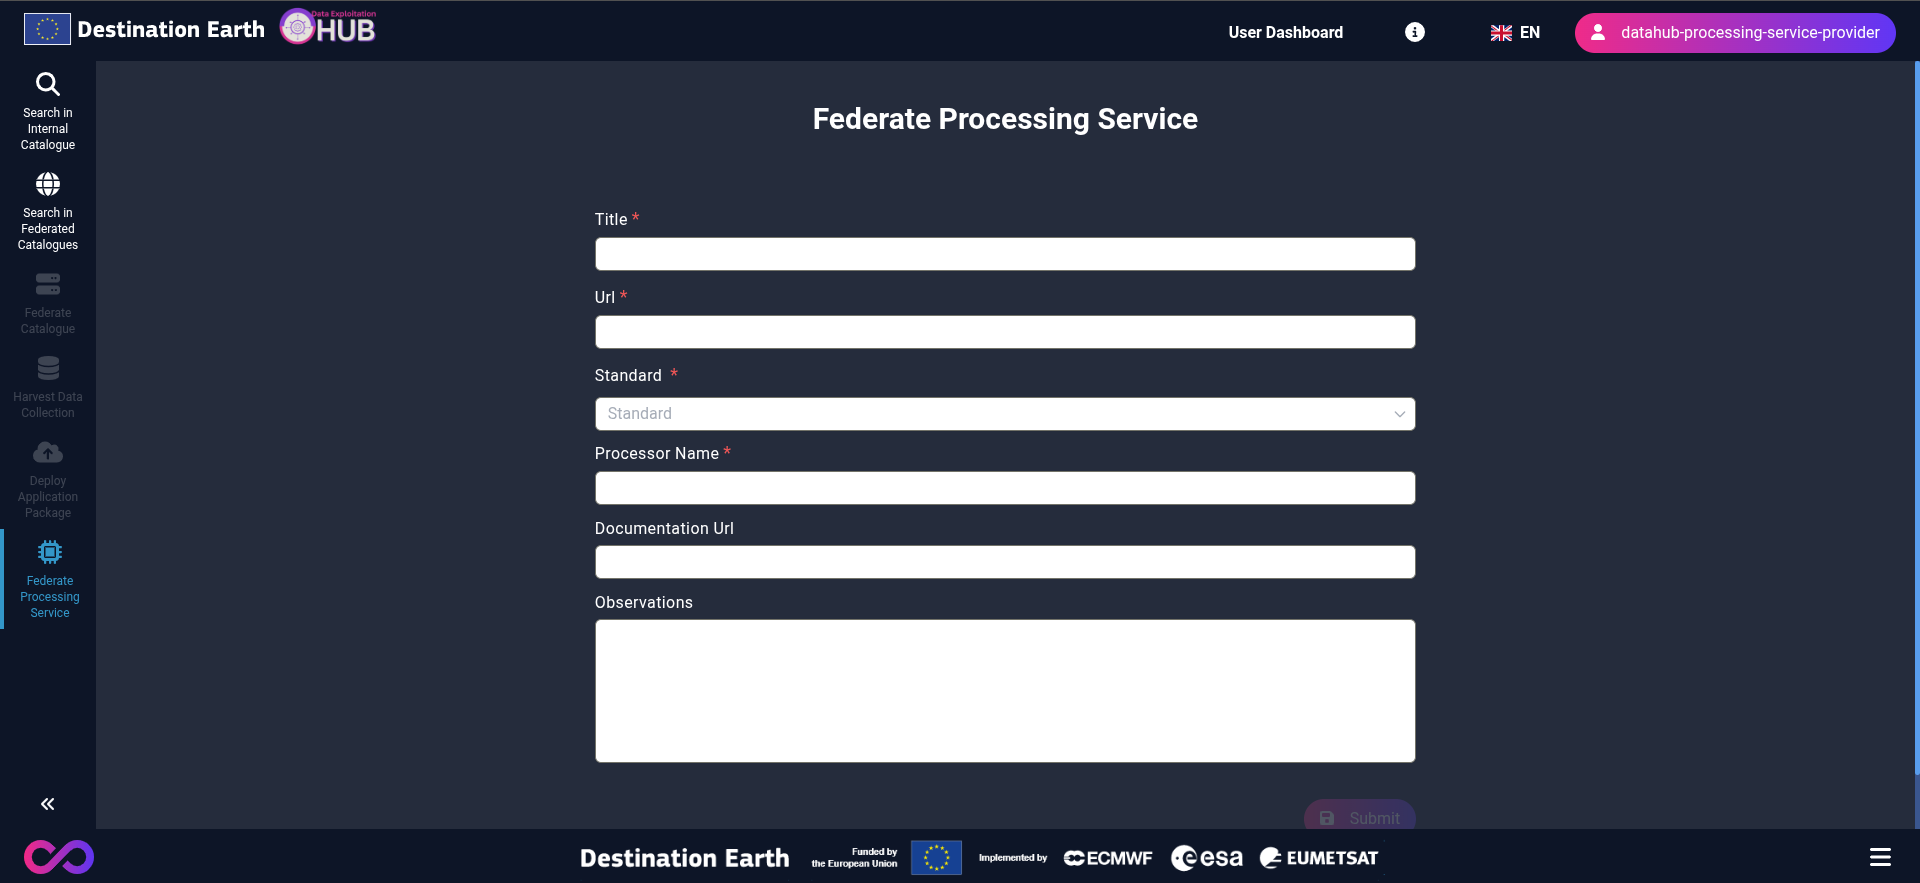
After authentication the user accesses the Federate Processing Service operation.
Note
Access to the Federate Processing Service operation is restricted to users with the Processing Service Provider role.
They fill in:
Title
WPS service URL
Standard
Processor Name
Documentation URL
Some observations
After validation and approval by operators, the processing service becomes available for discovery and execution in the Hub. Users can monitor their submitted operations in their dashboard.
User Dashboard
Processing Status
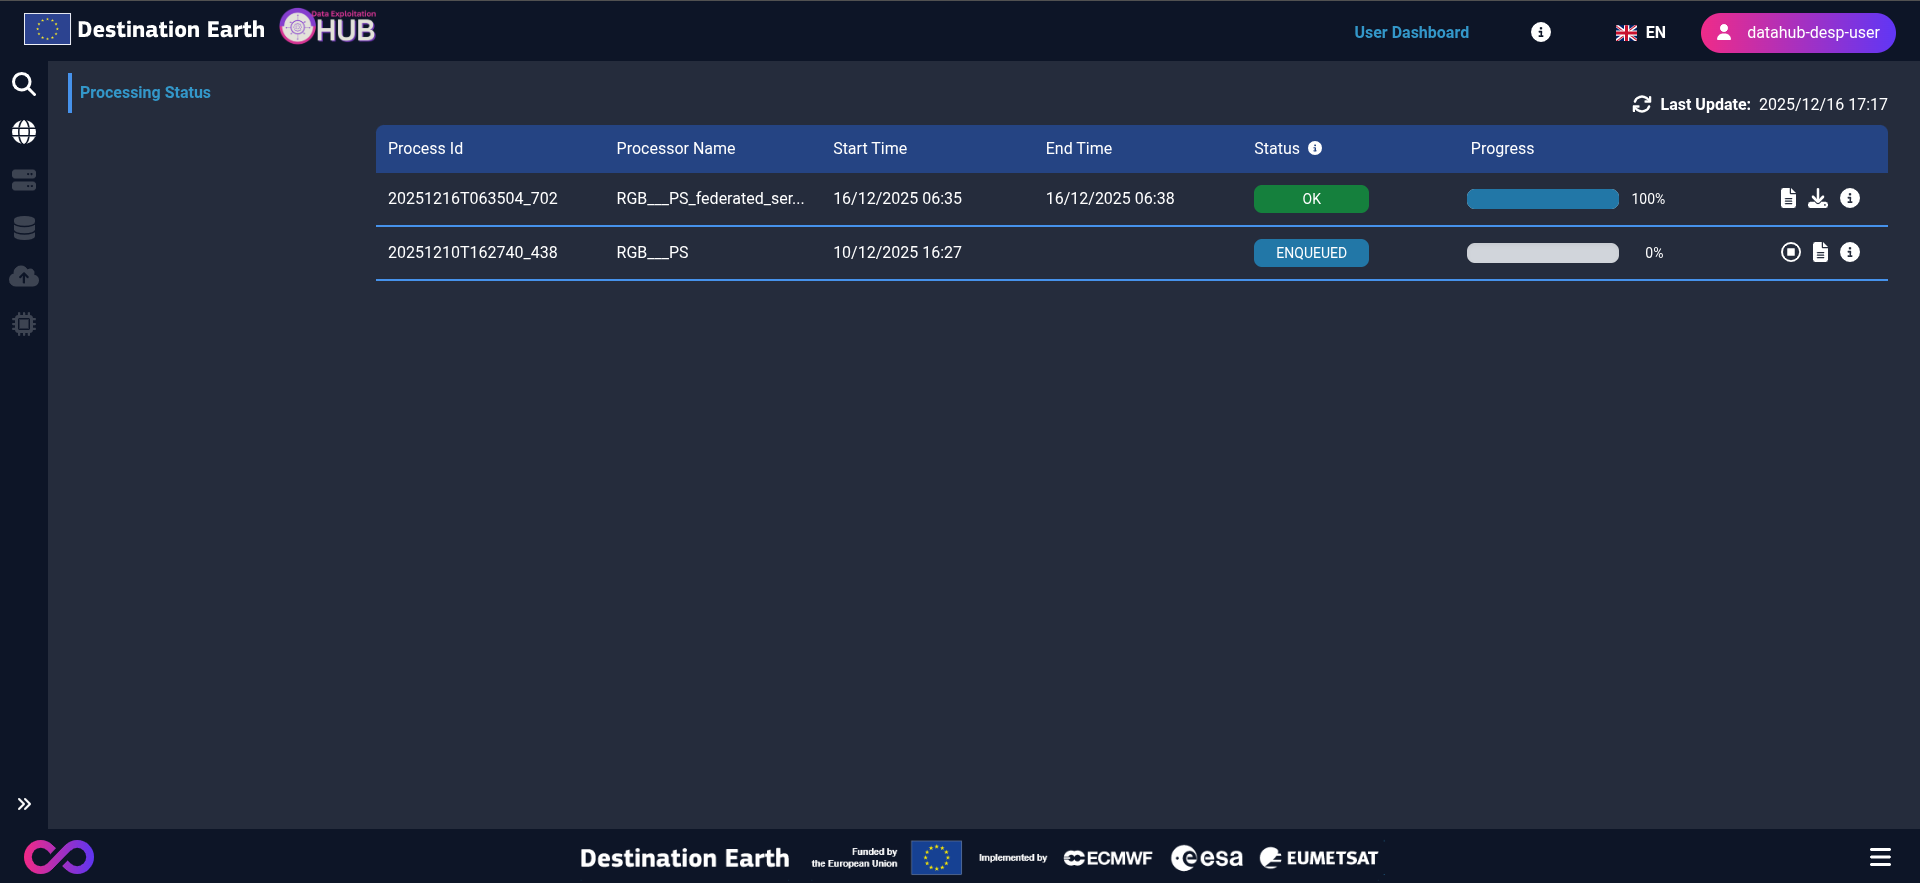
After logging in, a User Dashboard button will appear in the page header. Clicking this button will redirect you to a page where you can view the processing status of submissions you have made previously.
On the dashboard, the user can view information about their processes in a table format. The table includes:
Process ID
Process Name
Start Time
End Time
Current Status
Progress Percentage
The user can check the possible types of status by clicking the info icon located to the right of the Status column header.
At the end of each row, there is a button that, when clicked, displays more details about the process.
User Submissions
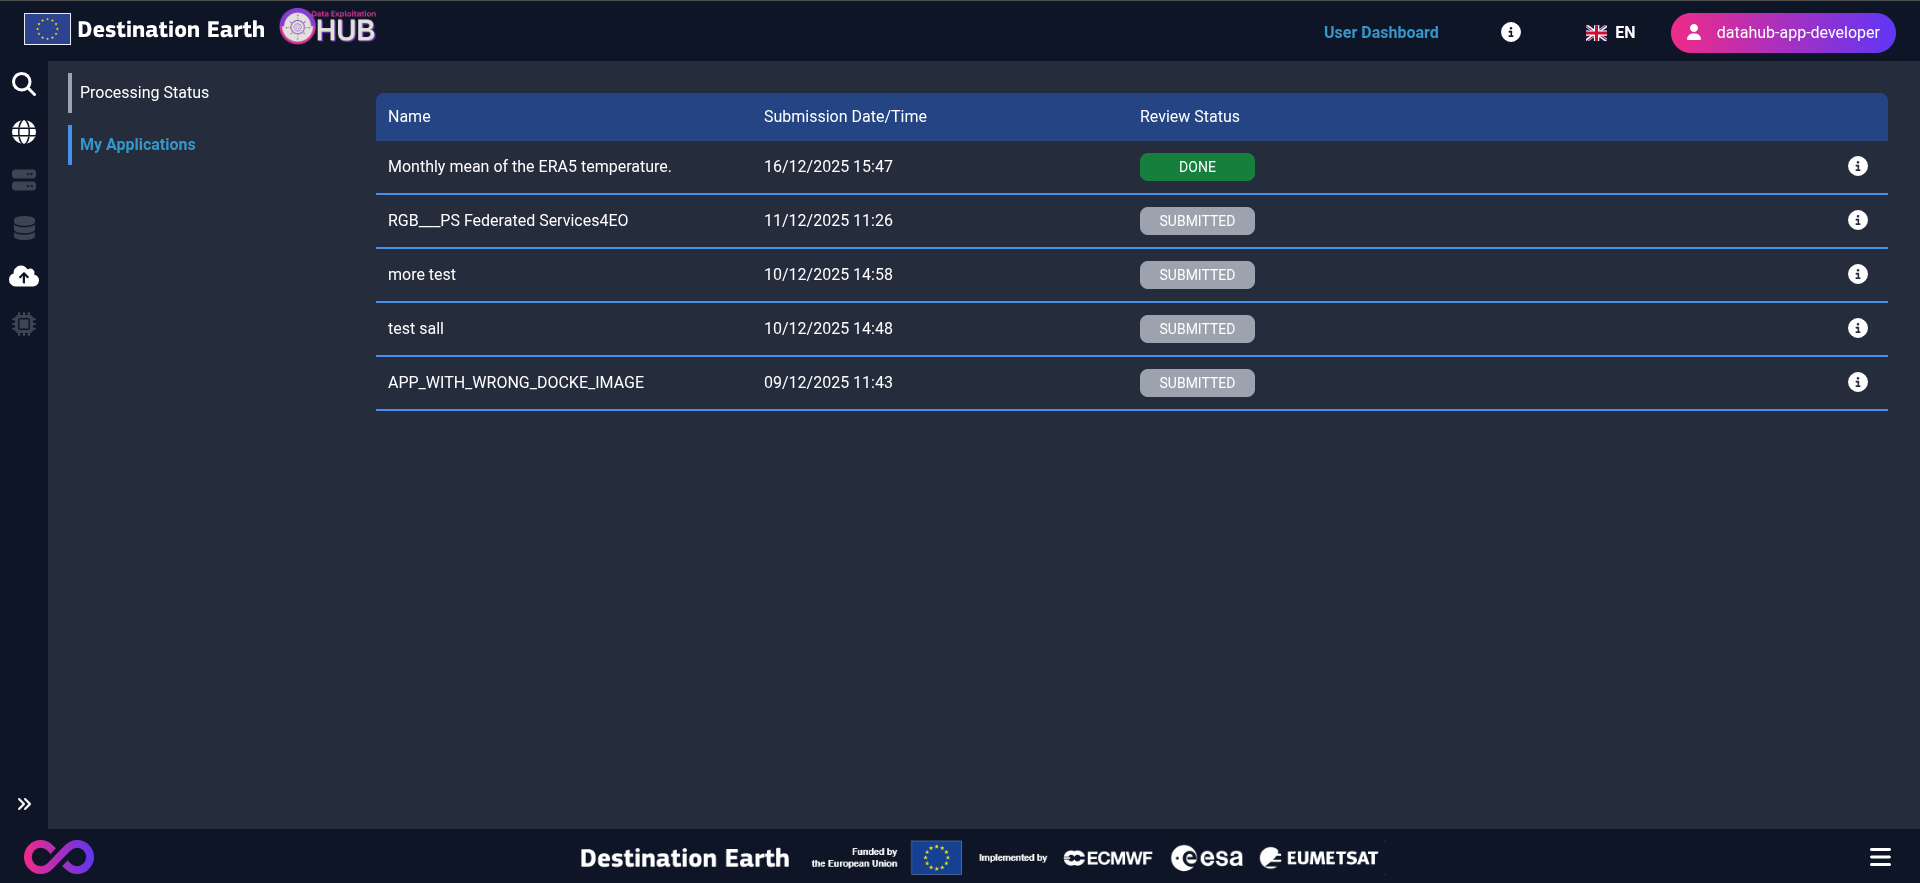
Below the processing status table, additional menus may appear depending on the roles and permissions assigned to the user. These tables contain information submitted through the forms for:
Federated Catalogue
Harvest Data Collection
Deploy Application Package
Federated Processing Service
Each table displays the following information:
Name
Submission Date/Time
Review Status
User
Similar to the processing status table, each row includes a button to view more details.
Operator
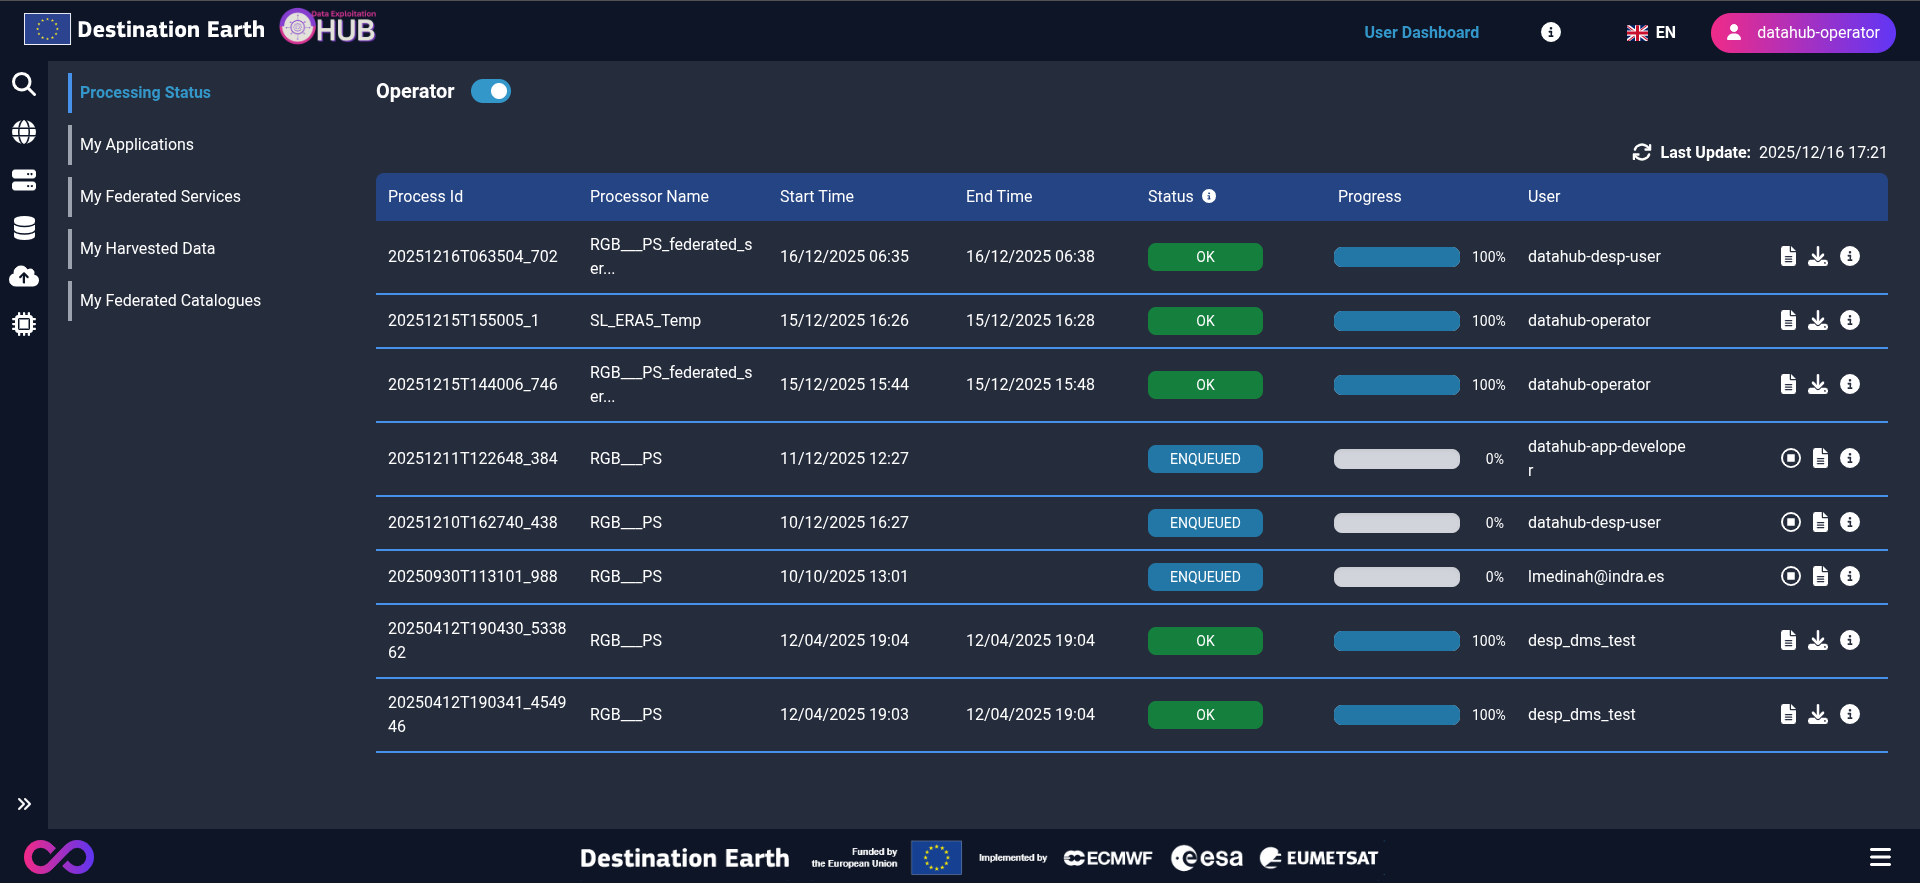
Users with the Operator role can activate the Operator toggle in the User Dashboard.
When this functionality is enabled, the user can:
View all processes, including submissions from all users.
Edit and review the status of these submissions.
Section 2: Data Exploitation Hub APIs
This section can describe how to interact with APIs such as:
STAC
OpenSearch
Access and Retrieval
Processing
STAC
STAC (SpatioTemporal Asset Catalog) is a specification that standardizes the way geospatial assets are described and accessed, facilitating interoperability and discovery across different platforms and tools.
The following examples demonstrate how to retrieve your data using the STAC endpoints:
API endpoint |
Description |
Example |
Authorization |
|---|---|---|---|
|
Get an intem |
https://stac.data-exploitation-hub.destine.eu/collections/era5/items/reanalysis-era5-single-levels-monthly-means |
Required |
|
Search |
https://stac.data-exploitation-hub.destine.eu/search |
Required |
|
Get Collections |
https://stac.data-exploitation-hub.destine.eu/collections |
Not Required |
|
Get a Collection by id |
https://stac.data-exploitation-hub.destine.eu/collections/DM2_OPT_0R |
Required |
|
Get an ItemCollection |
https://stac.data-exploitation-hub.destine.eu/collections/era5/items?federated_catalogue=https://earthdatahub.destine.eu//api/stac/v1/ |
Required |
OpenSearch
OpenSearch is an open-source search and analytics suite that enables fast, scalable data indexing and retrieval.
The following examples demonstrate how to retrieve your data using the OpenSearch endpoints:
API endpoint |
Description |
Example |
Authorization |
|---|---|---|---|
|
Returns the OSDD to the client |
https://opensearch.data-exploitation-hub.destine.eu/description.xml |
Required |
|
Construct and send a search request according to the template in OSDD |
https://opensearch.data-exploitation-hub.destine.eu/search.atom |
Required |
|
Construct and send a search request according to the template in OSDD |
https://opensearch.data-exploitation-hub.destine.eu/search.json |
Required |
Access and Retrieval
The Access and Retrieval provides transparent and efficient access to the data located in the local and external Storage Services. In this way, an authorized user can access and download products without knowing the physical data location or storage system used.
The following examples demonstrate how to retrieve your data using the Access and Retrieval endpoints:
API endpoint |
Description |
Example |
Authorization |
|---|---|---|---|
|
Gets data from S3 |
https://retrieval.data-exploitation-hub.destine.eu/storage/DM2_OPT_0R/DE2_L0R_000000_20150731T110109_20150731T110118_DE2_6034_918C |
Required |
Processing
The Web Processing Service (WPS) defines how inputs and outputs (requests and responses) are standardized for geospatial processing services.
The following examples demonstrate how to retrieve your data using the Processing endpoints:
API endpoint |
Description |
Example |
Authorization |
|---|---|---|---|
|
Get Capabilities |
https://processing.data-exploitation-hub.destine.eu/wps20/ |
Not Required |
|
Describe Process |
https://processing.data-exploitation-hub.destine.eu/wps20/processes/RGB___PS |
Not Required |
|
Execute |
https://processing.data-exploitation-hub.destine.eu/wps20/processes/RGB___PS |
Required |
|
Get Status |
https://processing.data-exploitation-hub.destine.eu/wps20/processes/RGB___PS/jobs/20250412T190430_533862 |
Required |
|
Cancel |
https://processing.data-exploitation-hub.destine.eu/wps20/processes/processes/RGB___PS/jobs/20250412T190430_533862 |
Required |
|
Get Result |
https://processing.data-exploitation-hub.destine.eu/wps20/processes/RGB___PS/jobs/20250412T190430_533862/outputs |
Required |
|
Get Output |
https://processing.data-exploitation-hub.destine.eu/wps20/processes/RGB___PS/jobs/20250412T190430_533862/outputs/PS__20200520_102801_5551879E_RGB___PS |
Required |