Quantum Emulators
2.1 Creating a Quantum Emulator
To create a new Quantum Emulator, the user starts from the “Quantum Emulators” tab in the header. This page shows a list of the user’s existing emulators (if any).
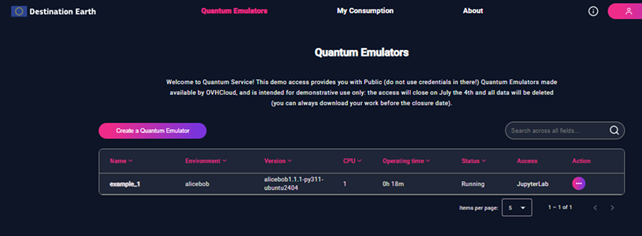
Figure 1 - The list of Quantum Emulators
By clicking the “Create a Quantum Emulator” button, the user is taken to a page that displays the ‘Create a Quantum Emulator’ form.
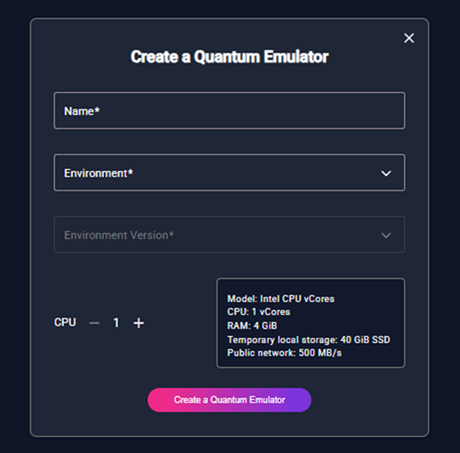
Figure 2 - “Create a Quantum Emulator” Form
This form allows the user to configure the new emulator using the following required fields:
Name – A name for the emulator (free text).
Environment – Select one of the available quantum frameworks from dropdown list. When a framework is selected, its available versions are automatically shown in the dropdown.
Environment Version – Choose a version of the selected environment (only available after selecting the environment).
CPU – Select how many CPU cores to assign to the emulator (between 1 and 2).
CPU Options
Depending on CPU, two configurations are available:
CPU: 1 vCores
RAM: 4 GiB
Temporary local storage: 40 GiB SSD
Public network: 500 MB/s
CPU: 2 vCores
RAM: 8 GiB
Temporary local storage: 80 GiB SSD
Public network: 1 GB/s
Users can increase or decrease the CPU count using the plus/minus buttons.
The Emulators are created in the Graveline (GRA) datacenter by default.
The form is submitted by clicking the “Create a Quantum Emulator” button. If all required fields are filled in correctly and the user’s quota limits are not exceeded, a new Quantum Emulator is created and started automatically, and the user is redirected to the “Quantum Emulators” page, where the updated list of emulators is displayed.
Form submission can fail in the following cases:
Mandatory fields are not filled
All fields in the form are mandatory. If the user tries to submit the form without filling in a required field, an error message is displayed: “Please fill in all required fields”, and the corresponding fields in the form are highlighted.
Quota limits reached
When the user clicks the “Create a Quantum Emulator” button, the system checks the current usage against the user’s quota. If the quota is exceeded, the user will see an error message: “Available quota exceeded, please stop or delete running Quantum Emulators.”
2.2 Managing Quantum Emulators
Each Quantum Emulator listed in the Quantum Emulators page has a set of available actions accessible via the “Action” menu (⋮) next to each item.
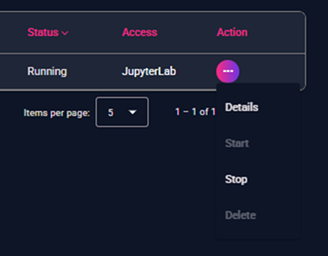
Figure 3 – Dropdown list of available actions for a Quantum Emulator
2.2.1 Start
This action starts a stopped Quantum Emulator. After the user clicks “Start”, the emulator enters a transitional state before reaching its final “running” status. This process may take some time.
Before starting, the system checks the user’s current resource usage (CPU, etc.) and quota limits. If the quota is exceeded, the emulator cannot be started, and an error message is shown: “Available quota exceeded, please stop or delete running Quantum Emulators.” (see more info about quota enforcement in the section User Consumption).
Only emulators in the “Stopped” state can be started. For emulators that are already starting or in a transitional state (e.g., “initializing”, “finalizing”, “pending”) “start” option is not available.
Please note that due to a change in the OVH offering, starting from Monday, 19 January 2026, a maximum run time of 7 days for all emulators will be implemented. After this period, all emulators will be automatically stopped.
2.2.2 Stop
This action stops a running Quantum Emulator. After the user clicks “Stop”, the emulator enters a transitional state before reaching its final “stopped” status. This process may take some time.
When stopping, the system checks if the number of stopped emulators has reached the user limit (see more info about quota enforcement in the section User Consumption). If so, an error message is displayed: “You have too many stopped notebooks, please restart or delete another Quantum Emulator to continue.”
Only emulators in the “Running” state can be stopped. For emulators that are already stopping or in a transitional state (e.g., “initializing”, “finalizing”, “pending”) “stop” option is not available.
Please note that due to a change in the OVH offering, starting from Monday, 19 January 2026, a maximum run time of 7 days for all emulators will be implemented. After this period, all emulators will be automatically stopped.
2.2.3 Delete
This action can only be used on emulators that have already been stopped. It permanently deletes the selected Quantum Emulator. A confirmation message is shown before deletion. Once confirmed, the emulator is removed and its resources are released. If the deletion is cancelled, no changes are made and the emulator remains listed with its current status.
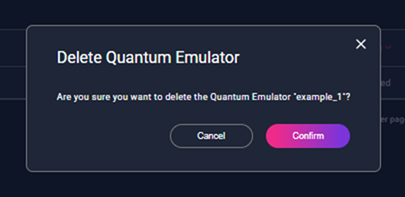
Figure 4 – Confirmation dialog displayed before deleting a Quantum Emulator
2.2.4 Details
This action redirects the user to a detailed view of the selected emulator.
2.2.5 Access to JupyterLab
If the emulator is running, the JupyterLab link in the “Access” column becomes active. Clicking it opens the notebook interface in a new browser tab. If the emulator is not running, the access link is disabled.
2.3 Emulator Details
Clicking “Details” from the action menu opens a dedicated page for the selected Quantum Emulator. This page displays all available information about the emulator, divided into three main sections: “General Information”, “Lifecycle”, “Resources”.
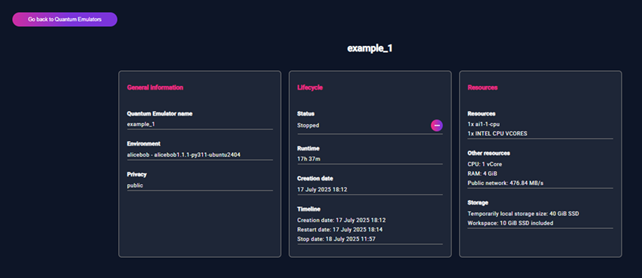
Figure 5 – Quantum Emulator Details
2.3.1 General Information
Quantum Emulator name – User-defined name.
Environment – Selected framework and version.
Privacy – Type of access.
2.3.2 Lifecycle
Status – Current emulator status.
Runtime – Total active time.
Creation date – When emulator was created.
Timeline – Key lifecycle events (Creation, Start, Stop).
Actions - Start: Available if stopped. - Stop: Available if running. - Delete: Available if stopped.
These actions use the same rules and quota validations as the list view.
For more info, see:
User Consumption – quota and usage limits
Managing Quantum Emulators – start, stop, delete
2.3.3 Resources
Resources – CPU and instance type
Other resources: - CPU: Number of virtual cores - RAM: Memory in GiB - Public network: Bandwidth (e.g., 476.84 MB/s)
Storage: - Local SSD (e.g., 40 GiB SSD) - Workspace (if available, in GiB)